Advertisement
- 1 Introduction
- 2 Before You Begin
- 3 Selecting Your Dimmer Location
- 4 Installing Your Dimmers
- 5 Replacing Switches With Dimmers
- 6 Installing A Dimmer For Lights Controlled By One Switch
- 7 Installing A Dimmer For Lights Controlled By Two Switches
- 8 Installing A Dimmer For Lights Controlled By Three Switches
- 9 Setting Up Your Master Control
- 10 Setting Up Your Central Antenna
- 11 Enjoying Your System
- 12 Adding to Your System
- 13 Adding to Your System
- 14 Frequently Asked Questions
- 15 General Information
- 16 Troubleshooting
- 17 Documents / Resources
Introduction
The AuroRa installation guide is designed to help you plan and complete the installation of your AuroRa Lighting Control System.
Refer to the information included in this guide to learn about the following:

- AuroRa lighting control package contents
- How to install AuroRa dimmers
- How to operate your system
Consumer Information:
This lighting control system must not be used to control equipment other than lighting. It must not be used to control equipment which could create hazardous situations, such as entrapment, if operated accidentally. Examples of equipment which must not be controlled by this system include (but are not limited to) motorized gates, garage doors, industrial doors, microwave ovens, heating pads, etc. It is the installer's responsibility to ensure that only lighting is connected to this system.
Before You Begin
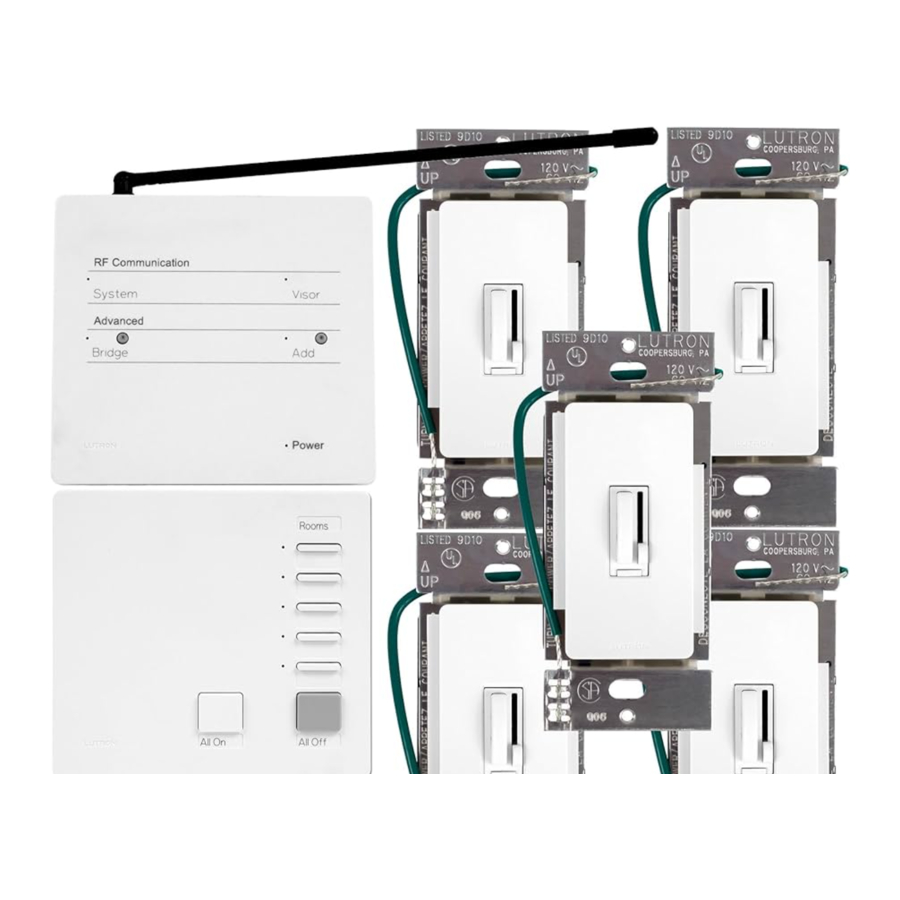
What's in your new system

Tools you may need

Selecting Your Dimmer Location
- Decide which lights you want to control with dimmers
Choose Your Locations:
Dimmer 1:
Dimmer 2:
Dimmer 3:
Dimmer 4:
Dimmer 5:


 Helpful Hint: Dimmer 1 should control your most used light. Dimmer 2 should control your second most used light. Repeat for dimmers 3, 4, and 5.
Suggested Locations:
Dimmer 1: Front Entry
Dimmer 2: Garage Exterior
Dimmer 3: Hall/Foyer
Dimmer 4: Kitchen
Dimmer 5: Family Room
Personalize your system
- Label your master control with your light locations
(Suggested locations shown)


Helpful Hint: Use the included labels.

Installing Your Dimmers
Installing an AuroRa dimmer is as straightforward as replacing a light switch.
Your first step is to identify how many switches control the lights you have decided to add to your system.
This is important so that you use the correct installation instructions.
Lutron has created specific instructions for lights controlled by one, two, or three switches to help simplify your installation.
After you have installed the first dimmer, repeat the process until all of the AuroRa dimmers have been installed.
| Note: If this is your first time wiring a dimmer, we recommend that you read over the dimmer information found before proceeding. If you have any questions, give our 24/7 Technial Support Center a call at 800.523.9466. Use dimmers with 120V incandescent lighting fixtures only. Do not use with low-voltage transformers. The total wattage of all light bulbs controlled by each dimmer must be between 50 and 600 watts. When combining dimmers in the same wallbox, the dimmer's load capacity must be reduced. |
Replacing Switches With Dimmers
- Write down how many switches control the lights you selected as 1-5 on your Master Control
Your Locations:
1:
2:
3:
4:
5:
Number of Switches:
![]()
- For lights controlled by one switch, use instructions
![]()
![information]() Helpful Hint: This circuit is called a single-pole circuit.
Helpful Hint: This circuit is called a single-pole circuit.
Typical location:- Porch light
- Bedroom light
- For lights controlled by two switches, use instructions
![]()
![information]() Helpful Hint: This circuit is called a three-way circuit.
Helpful Hint: This circuit is called a three-way circuit.
Typical location:- Hallway light
- Kitchen light
- For lights controlled by three switches, use instructions

![information]() Helpful Hint: This circuit is called a four-way circuit.
Helpful Hint: This circuit is called a four-way circuit.
Typical location:- Stairwell light
- For lights controlled by one switch, use instructions


Installing A Dimmer For Lights Controlled By One Switch
- Turn power off at circuit breaker or remove fuse
![]()
Power must be turned off for your safety.
![]()
- Remove wallplate
![information]() Helpful Hint: Save your wallplate and screws.
Helpful Hint: Save your wallplate and screws.
![]()
- Remove existing switch
![]()
- Uninstall switch
![]()
- You should see two insulated wires attached to the switch. A green or bare wire is a ground wire.
- Disconnect the wires from the switch.
![information]() Helpful Hint: Use the Lutron screwdriver (supplied) to help remove "pushed-in" wires on existing switch.
Helpful Hint: Use the Lutron screwdriver (supplied) to help remove "pushed-in" wires on existing switch.

- Install dimmer
![]()
- Connect the green or bare wire (ground wire) to the green wire on the dimmer with a wire nut.
![]()
- Connect one wire to the black screw on the dimmer.
- Connect the other wire to one of the two gold colored screws (brass) on the dimmer.
- Connect the green or bare wire (ground wire) to the green wire on the dimmer with a wire nut.


- Mount dimmer

- Replace wallplate
![]()
- Turn power on at circuit breaker or replace fuse
![]()


Installing A Dimmer For Lights Controlled By Two Switches
- Turn power off at circuit breaker or remove fuse
![]()
Power must be turned off for your safety.
![]()
- Remove wallplate
![information]() Helpful Hint: Save your wallplate and screws.
Helpful Hint: Save your wallplate and screws.
![]()
- Remove existing switch from wall (Do not disconnect wires yet)
![warning]() Reminder: Only replace one of the two switches controlling the light with a dimmer.
Reminder: Only replace one of the two switches controlling the light with a dimmer.

- Uninstall switch
![]()
- You should see three insulated wires attached to the switch. A green or bare wire is a ground wire.
![warning]() Tag the wire attached to the different colored screw. This screw is usually labeled COMMON.
Tag the wire attached to the different colored screw. This screw is usually labeled COMMON.- Disconnect the wires from the switch.
![information]() Helpful Hint: Use the Lutron screwdriver (supplied) to help remove "pushed-in" wires on existing switch
Helpful Hint: Use the Lutron screwdriver (supplied) to help remove "pushed-in" wires on existing switch
![]()
- Install dimmer
![]()
- Connect the green or bare wire (ground wire) to the green wire on the dimmer with a wire nut.
![]()
- Connect the tagged wire to the black colored screw on the dimmer.
- Connect one of the remaining wires to either of the gold colored screws (brass) on the dimmer.
- Connect the remaining wire to the remaining gold colored screw (brass) on the dimmer.
- Connect the green or bare wire (ground wire) to the green wire on the dimmer with a wire nut.


- Mount dimmer
![]()
- Replace wallplate
![]()
- Turn power on at circuit breaker or replace fuse
![]()


Installing A Dimmer For Lights Controlled By Three Switches
- Turn power off at circuit breaker or remove fuse
![]()
Power must be turned off for your safety.
![]()
- Remove wallplate
![information]() Helpful Hint: Save your wallplate and screws.
Helpful Hint: Save your wallplate and screws.
![]()
- Remove existing switch from wall (Do not disconnect wires yet)
![information]() Reminder: Only replace one of the three switches controlling the light with a dimmer.
Reminder: Only replace one of the three switches controlling the light with a dimmer.

- Locate a switch with three insulated wires attached to it
Note: If the switch has four wires attached to it, remount it and remove one of the other two switches. The AuroRa dimmer cannot be used in a switch location that has four wires.


- Uninstall switch

![warning]() Tag the wire attached to the different colored screw. This screw is usually labeled COMMON.
Tag the wire attached to the different colored screw. This screw is usually labeled COMMON. - Disconnect the wires from the switch.
![information]() Helpful Hint: Use the Lutron screwdriver (supplied) to help remove "pushed-in" wires on existing switch.
Helpful Hint: Use the Lutron screwdriver (supplied) to help remove "pushed-in" wires on existing switch.
![]()
- Install dimmer brass screws
![]()
- Connect the green or bare wire (ground wire) to the green wire on the dimmer with a wire nut.
![]()
- Connect the tagged wire to the black colored screw on the dimmer.
- Connect one of the remaining wires to either of the gold colored screws (brass) on the dimmer.
- Connect the remaining wire to the remaining gold colored screw (brass) on the dimmer.
- Connect the green or bare wire (ground wire) to the green wire on the dimmer with a wire nut.


- Mount dimmer and replace wallplate

- Turn power on at circuit breaker or replace fuse
![]()


Setting Up Your Master Control
- Select a location and plug in master control
![information]() Helpful Hint: Place the master control where you will want to control lights throughout your home.
Helpful Hint: Place the master control where you will want to control lights throughout your home.
Suggested locations:


- Bedside table
- Kitchen counter
- Remove the 1, 2, 3, 4, 5 label


Setting Up Your Central Antenna
- Find the approximate center of your system

![information]() Helpful Hint: the central antenna works best within 30 feet of your master control and dimmers.
Helpful Hint: the central antenna works best within 30 feet of your master control and dimmers.
![]()
- Plug in your central antenna
The Central Antenna plugs in to a standard wall outlet and should be placed centrally in the home to ensure the best Radio Frequency coverage.
![information]() Helpful Hint: Don't place your central antenna inside a metal container. The metal container will block radio signals and keep the central antenna from working properly.
Helpful Hint: Don't place your central antenna inside a metal container. The metal container will block radio signals and keep the central antenna from working properly.
The central antenna does not need to be placed in the open. We recommend placing it in a discrete location that is out of sight.
Suggested locations:

- Under a sofa
- Under a table
- In a closet
- In a cabinet above microwave


Enjoying Your System
- Monitor and control lights throughout your home from one place

- Have your lights welcome you home
![]()
- Dim to transform the look of any room
Slide to adjust light level.
![]()
Tap to turn lights on and off.
![]()
Double-tap button turns lights on to 100%. Hold button for 1-2 seconds to start 10 second fade to off.
![]()
![]()


Adding to Your System
Bridging AuroRa® Systems
- Purchase and install two separate AuroRa systems.
The central antennas should be at least 3 feet apart and within 60 feet of each other when bridging two systems.
![]()
- To bridge two systems, press and hold the "Bridge" button on the central antenna of either system for 3 seconds. The "Bridge" LED should flash slowly.
![]()
- Press and hold the "Bridge" button on the second central antenna for 3 seconds. The "Bridge" LED should flash slowly.
The LEDs on both central antennas will begin to flash quickly as the bridging process starts.
The loads in both systems will start flashing.
![]()
- When the process is finished, the "Bridge" LEDs on both central antennas will stop flashing and stay on. The loads in both systems will stop flashing.
- The systems are now bridged.
![]()


For information about returning your system to its original default settings, visit www.lutron.com/aurora.
Bridged System Functionality

"All On" Button
All dimmers in both systems will turn on to full brightness.
"All Off" Button
All dimmers in both systems will turn off.
"Favorite" Button
All dimmers in both systems will turn on to their local slider levels.
Adding to Your System
Activating Additional Wireless Controllers
Before additional wireless controllers can be used to control lights in the AuroRa® system, they must be activated. Follow the steps below to activate a wireless controller.
- Enter Advanced "Add" Mode
Press and hold the "Add" button on the central antenna until the LED light begins to flash (approximately 3 seconds). Dimmers that are in the system will flash the lights connected to each. The master control will flash the LEDs corresponding to dimmers present in the system.
![]()
- Activate Wireless Controller
Press and hold any button on the wireless controller until the "Visor" LED light on the central antenna starts flashing (approximately three seconds), indicating the wireless controller has been activated in the system. The "Add" LED and the "Visor" LED will remain flashing until the wireless controller button is released.

- Exit Advanced "Add" Mode
Press and hold the "Add" button until the "Add" LED light stops flashing and remains off (approximately 3 seconds). The dimmers will stop flashing their lights.
![]()
- The wireless controller has now been activated.


Frequently Asked Questions
| How far away can I use my wireless controller? |  |
| What is the range of the central antenna? | The central antenna has a radio frequency range of at least 30 feet in any direction. |
| Will other equipment in my home or neighboring homes interfere with my AuroRa system? ® | AuroRa operates at a frequency different from most remote controls, ® cellular/portable phones, and other wireless devices. The communication protocol ensures that any device operating at the same frequency will not affect your system. |
| What happens to the AuroRa system during a power outage? | AuroRa has non-volatile memory that maintains all system addressing and master control programming during a power outage. After the power outage, the memory restores all system lighting to its previous state before the power failure. |
| Can I replace or move a dimmer after the initial installation? | Yes. One or all of the dimmers can be relocated to different locations in the home, if the user prefers to control different lights. All system addressing, as well as master control and wireless controller programming remains unchanged. |
| Can I add to my AuroRa system? | You can increase the capability of your AuroRa system by adding another complete package or by adding up to nine additional wireless controllers. (See "Bridging AuroRa Systems") |
| Can I use two AuroRa dimmers to control a light or a group of lights? | No. AuroRa dimmers work with standard 3 or 4-way switches. Only one AuroRa dimmer can be used to control a light or group of lights. |
General Information
![]()
To avoid overheating and possible damage to other equipment, do not use dimmers to control receptacles, fluorescent lighting fixtures, motor-operated or transformer-supplied appliances.![]()
Use dimmers with 120V incandescent lighting fixtures only. Do not use with low-voltage transformers.- Install in accordance with all national and localelectrical codes.
- When there is no ground wire or way to connectthe wallbox, to ground within the wallbox the NEC® 2002, Article 404-9 allows a dimmer without a grounding connection to be installed as a replacement, (as long as a plastic, noncombustible wallplate is used). For this type of installation, cap or remove the green ground wire on the dimmer, and use an appropriate wallplate (such as Lutron's Fassada® series wallplates).
- Do not paint dimmers or wallplates.
- Cleaning Instructions: Clean with a soft, damp cloth only. Do not use any chemical cleaners.
- The total wattage of all light bulbs controlled byeach dimmer must be between 50 and 600 watts.
- Dimmers work with most incandescent lightbulbs. Dimmers may not work with dioded light bulbs (Sylvania Designer 16TM or Philips PAR-16TM).
- Operate system in temperatures between 0°C (32°F) and 40°C (104°F).
- Dimmer may feel warm to the touch during normal operation.
- Recommended wallbox depth is 2 1/2" minimum.
- Single-pole circuit
![]()
Three-way circuit
![]()
Four-way circuit
![]()
- When combining dimmers in the same wallbox, the dimmer's load capacity must be reduced.
![]()
![warning]() Follow the load capacities in table below for multi-ganged dimmers.
Follow the load capacities in table below for multi-ganged dimmers.
Derating ChartModel Not Ganged End of Gang Middle of Gang AR-6D 600 W 500 W 400 W - Wire Preparation:
Trim or strip wallbox wires to the length indicated by the strip gauge on the back of the dimmer.
Push-in: Use #14 AWG solid copper wire only. Insert wires fully. For aluminum wire, consult an electrician. DO NOT use stranded or twisted wire.
![]()
Screw Terminals: Tighten securely. Screw terminals are for use with solid copper wire only. For aluminum wire, consult an electrician. DO NOT use stranded or twisted wire.
![]()
- Service Switch: Pull service switch out to open position to replace light bulbs. Push service switch in after new bulb is installed.
![]()


Troubleshooting
| Symptom | Possible Cause | Remedy |
Dimmers do not respond to the wireless controller | Central antenna is not powered. The wireless controller may be out of communication range of the central antenna. Batteries in the wireless controller are weak or dead. (factory installed batteries are designed to last ten (10) years during typical useage) | Ensure that plug on the rear of the central antenna is inserted fully and that the unit is plugged in to a live wall receptacle. Move the wireless controller closer to the central antenna and try again. We recommend no more than 100 feet. Replace batteries in the wireless controller with new ones (CR2032). |
| Master control or central antenna appears not to be working at all. | No power available to unit. Faulty dc adapter. | Ensure that the plug on the rear of the unit is inserted fully and that the unit is plugged in to a live wall receptacle. Check that the receptacle is not controlled by a switch. Check that breaker is on and not tripped. Swap dc adapters with master control or central antenna and check unit for power. |
A dimmer appears not to be working at all | Burned out or missing light bulb. Service switch is in the OFF position (pulled out). No power available to unit. | Replace light bulb. Turn service switch on by pushing the switch in. See note 15. Check that breaker is on and not tripped. |
Dimmer keeps turning on and off | Unit has been wired incorrectly. Wattage is under recommended minimum load. 2 or more AuroRa dimmers on one circuit. | Refer to wiring instructions. See number 7. Remove and replace additional AuroRa dimmer with standard 3/4-way switch. |
| Dimmer performs normally when operated manually, but fails to respond to master control button pushes. | The dimmer may be out of communication range of the central antenna. The master control may be out of communication range of the central antenna. | Move the central antenna closer to the dimmer. Move central antenna closer to master control. |
If you have any questions, the Lutron Technical Support Hotline is ready to help 24 hours, 7 days a week. Call us at 800.523.9466 for immediate assistance. Or, find information on the internet at www.lutron.com/aurora.
Documents / Resources
References
Download manual
Here you can download full pdf version of manual, it may contain additional safety instructions, warranty information, FCC rules, etc.
Advertisement


Need help?
Do you have a question about the AuroRa and is the answer not in the manual?
Questions and answers