Advertisement
Trek3 Install Guide
RV battery monitor Trek3 is a smart battery monitor able to learn the actual battery capacity with time and provide more
accurate feedback to the user. It combines comprehensive battery data together with water tank level measurement on one
screen in a sleek design.
Trek3 is designed to work with BatteryPlus35 battery management system. Connected to the BatteryPlus35 via CAN bus, it
continuously monitors information providing vital data at a glance.
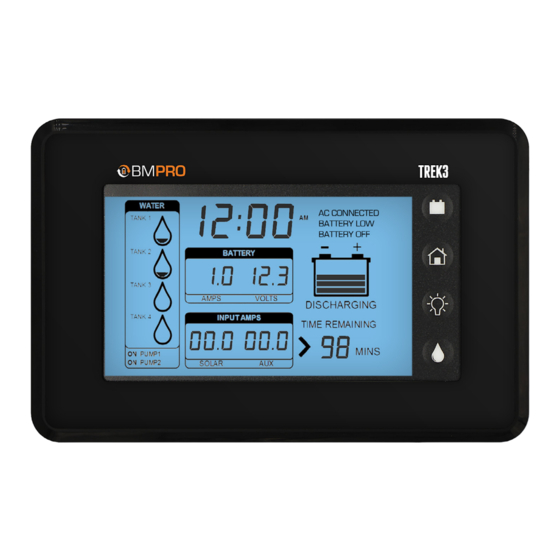
1. Parts
1.
Battery Information
2.
Battery Capacity Bar Graph
3.
AC Connected: Appears when connected to AC mains
4.
Battery Low: Appears when battery voltage is low.
5.
Battery Off: Appears BatteryPlus35 has entered ECO Mode.
6.
Battery Button: Enables ECO Mode.
7.
Home Button: Enters Set-up Mode.
8.
Backlight Button
9.
Water Pump Button
10. Time Remaining
11. Input Amps
12. Water Pump Status
13. Tank Level Indicators
3. Set up Mode
Set-up mode allows you to configure the Trek3.
To enter Set-up mode, hold down the Home Button until SET UP is
seen on the Battery display.
1.
& 6. Menu Function Display: Displays various Set-Up menu
functions and information.
2.
Edit: Use the Battery button to edit.
3.
Back: Use the Home button go back.
4.
& 5. Scroll Arrows: Use the Backlight and Water Pump buttons
to scroll.
To exit Set-up mode, repeatedly press the Back button.
2. Mounting
To mount the Trek3:
1.
Drill holes in the wall for the connectors.
2.
Use flat head screws with a maximum diameter of 4.0mm to
mount the Trek3 to the wall.
3.
Connect the Trek3 to the wall using the provided connectors.
4.
Attach the provided fascia cover to the Trek3.
TEAM
BMPRO
DOC PART 038652
.COM
REV 1.0
Advertisement
Table of Contents

Subscribe to Our Youtube Channel
Related Manuals for BMPRO Trek3


Summary of Contents for BMPRO Trek3
- Page 1 Trek3 Install Guide RV battery monitor Trek3 is a smart battery monitor able to learn the actual battery capacity with time and provide more accurate feedback to the user. It combines comprehensive battery data together with water tank level measurement on one screen in a sleek design.
- Page 2 Press Edit. Use the scroll arrows to change to 24hrS. Press Edit. Use the scroll arrows to set the hour. Press Edit. Use the scroll arrows to set the minute. MANUAL PRODUCT PAGE TEAM BMPRO DOC PART 038652 .COM REV 1.0...
Need help?
Do you have a question about the Trek3 and is the answer not in the manual?
Questions and answers