
Related Manuals for AVer M70Wv2


Summary of Contents for AVer M70Wv2
- Page 1 M70Wv2 Instruction Manual |安裝指南 取扱説明書| Bedienungsanleitung Mode d'emploi | Manual de instrucciones Manuale d'uso...
- Page 2 English……..……………………………………………………….…..1 繁體中文……………………………………………………………….…19 日本語…..……………………………..……………………………….…35 Deutsch.....................50 Français…………………………………………………..………..…..67 Español...……………………………………………..……….…….…..84 Italiano..…………………………….….……………..……….…..101...
-
Page 3: Package Contents
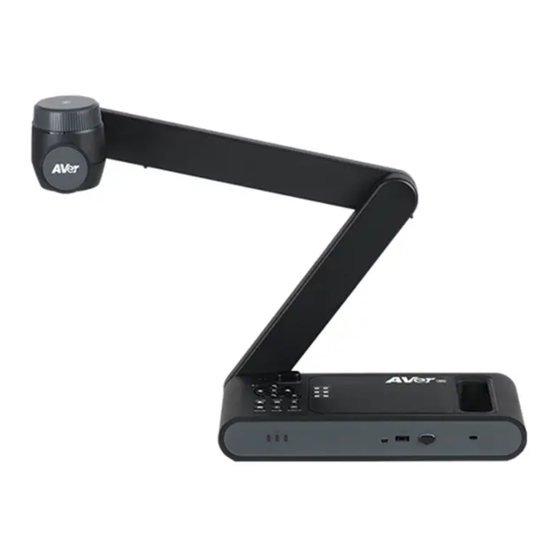
Package Contents The items below are included with this product. If any item is missing, contact the dealer from whom you purchased this product. Power Adaptor M70Wv2 unit Remote controller USB Cable Power cord* Wi-Fi Dongle AAA Batteries Quick Guide... - Page 4 Overview 14 15 1. Camera head 2. LED lighting 3. Arm 4. IR sensor 5. Control panel 6. Handle 7. Built-in MIC 8. Battery Indicator 9. USB mini port 10. USB port 11. Wi-Fi dongle 12. Anti-theft Slot 13. HDMI Input 14.
-
Page 5: Remote Control
- Auto detects the best resolution(4K, 720P, 1080P) - 1024x768 (If HDMI device support) - 4K 60Hz (If HDMI device support) 15. AE LOCK Lock the exposure to stop M70Wv2 attempting to find optimal exposure. 16. LAMP Turn the overhead light on/off. Delete... -
Page 6: Led Indicator
LED Indicator Name Status indicator Solid green: Power on Power No light: Power off Solid red: Standby mode* *Standby mode is supported when power plugged in. Solid green(x3): Battery is full(100% ~ 60%) Battery Solid green(x2): Battery is 60% ~ 30% Solid green(x1): Battery is 30% ~ 5% Solid red (x1): Battery is 5% ~ 0% Flashing red (x1): Battery is out of power... -
Page 7: Device Connection
Device Connection Power Connection and Charging Plug in power adapter and turn on M70Wv2. [Note] Please full charge the camera for the first time use. When the camera is power on, the camera is in “Standby” mode. In standby mode, it can be charging with the USB connection between other devices;... -
Page 8: Usb Connection
USB Connection Press Wi-Fi button to disable Wi-Fi mode. Connect M70Wv2 to laptop/PC with USB port. Connect USB pen drive to USB port to save the recording file. English-6... -
Page 9: Hdmi Connection
HDMI Connection Connect M70Wv2 to HDMI display with HDMI output port. Connect M70Wv2 to laptop/PC with HDMI input port. English-7... - Page 10 P2P connection via Wi-Fi Dongle(Optional) Plug-in the WiFi dongle to PC/laptop and Install AVerTouch application. AVerTouch Wi-Fi Dongle Laptop Open AVerTouch application, click to connect the camera. [Note] Check the serial number at bottom of the camera to find your camera. Click Next to continue.
- Page 11 Entering the Camera Name and Passcode, click Done to continue. Click Done button to connect camera. [Note] It takes about 60 seconds to complete connection. Select X can exit the live view page. [Note] When connecting is successful, you should see the live view of the camera. English-9...
- Page 12 The software will auto detect the camera on your network. Select the camera that you want to connect with it. The camera name will be “AVer ‘model name’ - WiFi dongle Mac address”. The Mac address will be different from the device.
- Page 13 Select the to make a connection with the camera. Select to switch to camera live screen. English-11...
- Page 14 Miracast Connection Press to enter selection menu. [Note] Use , and button to move between the selections and press button to confirm the selection. A commercial Miracast Dongle (Wireless Adapter) is required for the display device. Select Wireless > Mode > Miracast to enable Miracast mode. The camera image will display on the display device’s screen.
-
Page 15: Using The Camera
Using the Camera Object Position The icon on top of camera head can help user to place object in positive direction. The direction adjust wheel can turn 90° to change the icon in 2 positions (refer to figure). Shooting Area When camera position is 470mm high, the shooting area will be A3 size. - Page 16 Storage the Camera Mounting the Camera on a Flat Surface [Note] M4 screw x4, depth is5mm 75.00 English-14...
-
Page 17: Specification
Specification Sensor 1/3.2 CMOS Pixel Count 13 megapixels Frame Rate 60 fps (max.) Image mode Normal / High Frame / High Quality/ Microscope/Infinity/Marco Effect Rotate / Freeze HDMI Output 4K; 1080p 60Hz; 720p 60Hz Focusing Auto / Manual/ Area (SW) Shooting Area 480mm x345mm @ 470 mm Zooming... - Page 18 In no event will AVer be liable for direct, indirect, special, incidental, or consequential damages arising out of the use or inability to use this product or documentation, even if advised of the possibility of such damages.
- Page 19 ©2023 AVer Information Inc. All rights reserved. | June 30, 2023 All rights of this object belong to AVer Information Inc. Reproduced or transmitted in any form or by any means without the prior written permission of AVer Information Inc. is prohibited.
- Page 20 Tel: +81 (0) 3 5989 0290 https://jp.aver.com/technical-support テクニカル・サポート: Vietnam Branch Office Công ty TNHH AVer Information (Việt Nam) Tầng 5, 596 Nguyễn Đình Chiểu, P.3, Quận 3, Thành phố Hồ Chí Minh 700000, Việt Nam Tel: +84 (0)28 22 539 211 English-18...
- Page 21 包裝內容物 請確定包裝中附有下列項目的物品。如有缺少的項目,請與你的經銷商連絡。 M70Wv2 本機 遙控器 電源變壓器/ 電源插頭* USB 連接線 無線接收器 AAA 電池 安裝指南 保固卡** (選配) *變壓器類型視販售國家之標準電源插座而異。 **只有歐洲、日本和台灣使用 選購配件 顯微鏡轉接器 防眩光片 手提袋 (含 28mm 聯軸器和 34mm 聯軸器) 複合功能鍵 按下複合鍵啟動功能。 :回到出廠預設值。 :兩鍵一起按可切換下列解析度 - 自動偵測最佳解析度:4K、720P、1080P - 1024x768 (如果連接的 HDMI 設備有支援) - 4K 60Hz (如果連接的 HDMI 設備有支援) :兩鍵一起按可切換下列模式...
- Page 22 LED 燈號 名稱 燈號狀態 綠燈恆亮:電源啟動 電源 熄滅:電源關閉 紅燈恆亮:待機模式* *待機模式僅在電源連接下有支援。 藍燈恆亮:無線分享器模式或 STA 連接 Wi-Fi 藍燈閃爍:軟體連接機器(M70Wv2)中 藍燈快閃:建立無線分享器模式或 STA 連接中 綠燈恆亮:Miracast 模式 綠燈閃爍:Miracast 傳輸中 綠燈快閃:Miracast 設備掃瞄或連接中 綠燈恆亮(x3):電力 100% ~ 60% 電池 綠燈恆亮(x2):電力 60% ~ 30% 綠燈恆亮(x1):電力 30% ~ 5% 紅燈恆亮(x2):電力 5% ~ 0% 紅燈閃爍(x1):無電力...
- Page 23 至 USB 隨身碟。 8,19 14. RESOULTION 可切換下列解析度模式: - 自動偵測最佳解析度(4K、 720P、 1080P) - 1024x768 (如果 HDMI 設備有支援) - 4K 60Hz (如果 HDMI 設備有支援) 15. AE LOCK 鎖定曝光,可停止 M70Wv2 嘗試找到最佳 曝光的動作。 16. LAMP 開啟/關閉頂燈。 17. DEL 在播放模式中永久刪除所選擇的圖片/影像。 18. MODE 可切換模式有一般、運動、高品質、顯微鏡、近拍和遠拍模式。 確認選項。 20. VOLUME +/- 調整音量大小。...
- Page 24 設備連接 電源連接和充電 插入電源並啟動 M70Wv2。 首次使用請完全充電後才使用。 當電源啟動後 , 機器是位於 「待機」 狀態 。 在待機狀態 , 可透過 USB 線與其他可供電設備 (如: 電腦)充電;但電源需為 5V3A 且充電時間較長。 當機器在運作時(非待機狀態),筆記電腦、投影機或螢幕無法透過 USB 線連接提供電力給機 器 當連接到牆上的插座充電時,電池燈號顯示為綠燈閃爍。 當機器無法操作時,按 鍵可重啟機器。 繁體中文-22...
- Page 25 USB 連接 按 Wi-Fi 鈕關閉無線模式。 將 M70Wv2 透過 USB 埠連接到筆記型電腦/電腦上。 可插入 USB 隨身碟於 USB 埠,可儲存錄影檔案。 繁體中文-23...
- Page 26 HDMI 連接 透過 HDMI 輸出埠連接 M70Wv2 到 HDMI 輸出設備上。 透過 HDMI 輸入埠連接 M70Wv2 到電腦/筆記型電腦上。 繁體中文-24...
- Page 27 透過 Wi-Fi 接收器點對點(P2P)連接(選配) 將 Wi-Fi 接收器安裝到筆記電腦或電腦到,並安裝 AVerTouch 軟體。 AVerTouch Wi-Fi 接收器 筆記型電腦 啟動 AVerTouch 軟體,點選 連接實物攝影機。 [註] 可確認位於實物攝影機底部的序號來找尋你的實物攝影機。 點選 Next 繼續。 繁體中文-25...
- Page 28 於 Camera Name 和 Passcode 欄位輸入實物投影機名稱和密碼,然後點選 Done 繼續。 點選 Done 連接實物攝影機。 [註] 約需等待 60 秒來完成連接。 點選 X 可離開即時影像顯示畫面。 [註] 當連線成功,會看到實物攝影機的即時影像顯示畫面。 繁體中文-26...
- Page 29 Wi-Fi 的連接 啟動電源。 確認無線連線狀態為「藍燈恆亮」狀態。 啟動 AVerTouch 軟體,並操照螢幕指示來啟動實物攝影機的無線功能。 [註] 軟體會自動偵測位於你網路上的實物攝影機。 請選擇想要連接的實物攝影機。 實物攝影機的名稱顯示會是「AVer 型號名稱」-「無線接收器的 MAC 位址」 ,MAC 位址會 隨不同台實物攝影機而變動。 繁體中文-27...
- Page 30 選擇 與實物攝影機連接。 選擇 切換到實物攝影機即時影像畫面。 繁體中文-28...
- Page 31 Miracast 的連接 按 鈕進入選單。 [註] 、 使用 、 和 鈕在選單中移動, 按 鈕可確認選擇的項目。 顯示設備位需要安裝 Miracast 接收器,例如:微軟出的 無線接收器。 請選擇「無線」 > 「模式」 > 「Miracast」來啟動 Miracast 模式。 選擇「Miracast 設定」 > 顯示設備的名稱。 [ 註 ] 所有可連接的顯示名稱會列於出。 按 回到選單 當連接完成後,機器的影像會顯示於選擇的顯示設備螢幕上。 繁體中文-29...
- Page 32 使用 M70Wv2 物體擺放位置 位於鏡頭上方的圖示可幫助使用者在擺放投射物體的位置為正方位。 可轉動轉輪變動圖示位置,共有兩種方向,可往左或往右轉動 90 度(請參見右圖)。 拍攝範圍 當鏡頭高度位於 470mm 時,此拍攝區域可觀賞最大範圍在 A3 內。 繁體中文-30...
- Page 33 收納 M70Wv2 安裝 M70Wv2 於平面上 [註] M4 螺絲 4 顆,深度是 5mm。 75.00 繁體中文-31...
- Page 34 規格 感應器 1/3.2 CMOS 有效畫素 13 megapixels 畫格速率 60 fps (最高) 一般/運動/高品質/顯微鏡/遠拍/近拍 影像模式 效果 旋轉/靜止 HDMI 輸出 4K; 1080p 60Hz; 720p 60H 對焦 自動/手動/區域(軟體) 拍攝範圍 480mm x345mm @ 470 mm 縮放倍數 共 33X (10X AVerZOOM + 23X 數位縮放) Dual Mode AP / Station DHCP(伺服器端/使用者端) 1080P@30fps, up to 4K@30fps WiFi 傳輸率...
- Page 35 請使用正確的電源電壓以避免損壞機器。 請勿將機器放在容易被踩到電源線的地方,否則可能會導致電源線或插頭磨損或損壞。 請用雙手握住機器底部以移動機器。 請勿抓 請勿往左右相反方向拉扯機械臂和機器 住鏡頭或機械臂來移動機器。 本體。 免 責 聲 明 對於產品品質、效能、適銷性或特定用途之適用性,本文件內容皆不代表任何明示或暗示保固或陳 述。本文資訊經過仔細詳查,內容可靠無誤;雖然如此,若有任何錯誤,恕不負責。本文所含資訊 如有變更,恕不另行通知。若因使用或不當使用本產品或本文,導致任何直接、間接、特殊、意外 或後續損害,即使本公司已事先告知此類損害之可能性,亦不負任何賠償責任。 商 標 AVer 為圓展科技股份有限公司之商標。因本內容之描述出現的商標分屬個別公司所有且均受智慧財 產權相關法令保護。本文內所有提及之產品或企業名稱僅供識別與說明用途,且為各自擁有者之商 標或註冊商標。 著 作 權 ©2023 圓展科技 版權所有 本內容相關權利係圓展科技股份有限公司所有,任何人未得事先書面同意不得就本內容為一部或全 部之重製、改作、或任何型式之散布行為。圓展科技股份有限公司保留變更產品規格及內容的權利 無須另為通知。 警告使用者 警告:為避免電磁干擾,本產品不應安裝或使用於住宅環境。 若產品上標有打叉記號的滾輪垃圾桶,表示不得將產品與其他家用垃圾一同丟棄。請將 廢棄的設備交由指定之廢電機電子設備回收站處理。關於處理廢棄設備之詳細資訊,請 洽當地的家庭垃圾處理服務處或您購買產品的商家。 繁體中文-33...
- Page 36 - 不 可 將 電 池 棄 置 於 火 源 中 。 - 請 勿 嘗 試 讓 電 池 端 子 短 路 。 限用物質含有情況標示資訊參考下列網址:https://tw.aver.com/page/RoHS 低 功 率 電 波 輻 射 性 電 機 管 理 辦 法...
- Page 37 パッケージ内容 以下内容物が製品に同梱されています。 同梱物に不備がある場合は、この製品を購入した販売店までご連絡ください。 電源アダプタ M 7 0 W v 2 本 体 操作リモコン USB ケーブル 電源コード* 単 4 電池 取扱説明書 保証書** *電源アダプタ・電源ケーブルの形状・仕様は販売国により異なります。 ***日本・ヨーロッパのみ オプション販売品 顕微鏡アダプタ ( 28mm・34mm のゴム製カプラ 2 種を同梱) キャリーバッグ 反射防止シート 日文語-35...
- Page 38 製品外観 14 15 1. カメラヘッド 2. LED ライト 3. アーム 4. リモコン受光部 5. 操作パネル 6. ハンドル 7. 内蔵マイク 8. バッテリー状態表示ランプ 9. Mini USB 端子 10. USB 端子 11. Wi-Fi ドングル 12. ケンジントンスロット 13. HDMI 入力端子 14. HDMI 出力 15. 電源差込口 ショートカットキー...
- Page 39 操作リモコン 名称 説明 本体の電源オン・オフ操作 電源ボタン *電源アダプタ接続時、スタンバイモードに対 応しています。 WiFi モード/USB モードの切り替え. WiFi/USB カメラ映像の静止画キャプチャ キャプチャ 連続キャプチャ時、このボタンをもう 1 度押 すと連続キャプチャを終了 カメラ映像の一時停止 フリーズ カメラ映像の表示回転 回転 機器とバッテリーの情報表示 INFO/ ▲,▼,, & ズーム時のカメラ映像の移動 オートフォーカス実行 オートフォーカス カメラ映像の拡大/縮小 拡大/縮小+/- 10. ズーム 1X ズーム倍率リセット(1倍の状態) 11. ミュート マイク音声ミュート 12. カメラ / PC 表示映像の切り替え...
- Page 40 LED 状態表示 名称 LED と機器の状態 緑点灯: 電源オン 電源 無点灯: 電源オフ 赤点灯: スタンバイ状態* *電源アダプタ接続時、スタンバイモードに対応しています。 緑点灯(x3):バッテリー残量(100% ~ 60%) 緑点灯(x2): バッテリー残量 60% ~ 30% バッテリー 緑点灯(x1): バッテリー残量 30% ~ 5% 赤点灯(x1): バッテリー残量 5% ~ 0% 赤点滅(x1): バッテリー残量なし オレンジ点滅(x3): バッテリー異常 青点灯: AP モード準備完了/ STA 接続済み WiFi 青点滅(ゆっくり): カメラとのソフトウェア接続...
- Page 41 機器の接続 電源アダプタの接続と充電 製品付属の電源アダプタを接続し、M 7 0 W v 2の電源を入れます。 [注意] 初回使用前に必ずバッテリーを完全に充電してください。 カメラの電源プラグを挿しこむと、カメラは「スタンバイ」モードの状態です。 スタンバイモードで は、他のデバイスから USB 接続で充電することができますが、充電時間が長くなります。 カメラの動作中は、ノートパソコン、プロジェクタ、またはモニタから USB 接続を介してカメラのバ ッテリーを充電することはできません。 カメラをコンセントから充電しているときは、バッテリーインジケータが緑色に点滅しています。 カメラが正常に動作しない場合はボタン を同時に押し、再起動してください。 日文語-39...
- Page 42 USB 機器との接続 Wi-Fi ボタンを押し、Wi-Fi モードを無効にします。 PC の USB 端子に、M 7 0 W v 2を接続します。 録画ファイルを保存する場合、USB メモリを USB ポートに接続します。 日文語-40...
- Page 43 HDMI 入力・出力機器との接続 M 7 0 W v 2の HDMI 出力端子に、HDMI 搭載モニターを接続します。 M 7 0 W v 2の HDMI 入力端子に、PC を接続します。 日文語-41...
- Page 44 Wi-Fi による接続 カメラの電源を入れます。 Wi-Fi のランプが青く点灯していることを確認します。 AVerTouch を起動し、画面の指示内容に従いカメラの Wi-Fi 機能を有効にします。 [注意] ソフトウェアがネットワーク上のカメラを自動検出します。 接続するカメラを選択してください。 カメラ名は「AVerCam WiFi ドングルの MAC アドレス」になります。Mac アドレスはカメラによって異なりま す。 日文語-42...
- Page 45 を選択してカメラに接続してください。 を選択してライブスクリーンのスイッチを入れてください。 日文語-43...
- Page 46 ミラキャスト接続 を押してメニュー画面に入ってください。 [注意] および ボタンで選択を行い、 ボタンを押して選択を確定してください。 ディスプレイデバイスは Microsoft(ワイヤレスアダプタ)製 など市販のミラキャストドングルをインストールする必要が あります。 「無線接続」 > 「モード」 > 「ミラキャスト」の順番で選択してミラキャストを有効にしてください。 「ミラキャスト設定」 > ディスプレイデバイスを選択してください。 [注意] ボタンを押してメニューに戻り 。 ディスプレイデバイスのリストが表示されます。 完了後、カメラの画像がディスプレイデバイスの画面に表示されます。 日文語-44...
- Page 47 カメラ部の使用方法 被写体とカメラの向き カメラヘッドの上にあるマークを参考にカメラの向きを調整します。 カメラの向きは 90°回転により、2つのパターンで調整することができます。 (右図参照). 撮影範囲 カメラヘッドの位置が被写体から 470mm の場合、撮影範囲は A3 サイズになります。 日文語-45...
- Page 48 カメラの折りたたみ収納 平らな場所にカメラを取り付ける [注意] M4 ネジ×4 使用、板の厚さ 5mm 。 75.00 日文語-46...
- Page 49 製品仕様 映像素子 1/3.2 CMOS センサー 最大画素数 1300 万画素 フレームレート 最大 60 fps 撮影モード ノーマル/ フレーム優先/画質優先/顕微鏡/遠景/マクロ カメラエフェクト 回転 / フリーズ HDMI 出力 最大 4K/ 1080p 60Hz/ 720p 60Hz フォーカス 自動 / 手動/ エリア(ソフトウェア) 撮影範囲 480mm x345mm @ 470 mm ズーム倍率 最大 230 倍 (光学 10 倍+デジタル 23 倍) 無線機能...
- Page 50 カメラの底面を手で持ち、カメラを動かしてくだ アームと部カメラ部を、可動方向と反対の方向 さい。 カメラを動かす時はカメラ部分やアーム に引っ張らないでください。故障の原因となり 部分を持ちながら移動させないでください。 ます。 告知 仕様は事前の通知なしに変更されることがあります。 ここに含まれる情報は参考としてご利用ください。 著作権 ©2023 AVer Information Inc. 本書は AVer Information Inc. 及び アバー・インフォメーション株式会社から事前に文書による許諾を 得ることなく、いかなる方法によっても無断で複製、送信、複写、翻訳、情報検索システムへの保管、 翻訳することは禁止されています。本書に記載された情報は予告なしに変更される場合があります。 商標 「AVer」は、AVer Information Inc.が所有する商標です。ここで記載されている目的で使用されている その他の商標は、同社にのみ属しています。 注意 本製品のバッテリーは、 お客様自身では交換できない仕様になっており、バッテリー交換は別途有償 となります。バッテリーの交換をご依頼いただく場合、製品をご購入いただきました販売代理店までご 連絡ください。適合外のバッテリーへ交換を行った場合、破損の危険があります。 指示に従って使用 済み電池を処分してください。 VCCI-A この装置は、クラス A 機器です。この装置を住宅環境で使用すると電波妨害を引き起こすことがありま...
- Page 51 製品サポート FAQ、テクニカルサポート、ソフトウェア、およびユーザー・マニュアルのダウンロードについては、次のウェ ブサイトをご覧ください: ダウンロード・センター https://jp.aver.com/download-center ヘルプセンター https://jp.aver.com/helpcenter お問い合わせ先 アバー・インフォメーション株式会社 https://jp.aver.com 〒160-0023 東京都新宿区西新宿 3-2-26 立花新宿ビル 7 階 TEL: 03 5989 0290 テクニカル・サポート: https://jp.aver.com/technical-support 日文語-49...
-
Page 52: Inhalt Der Verpackung
Inhalt der Verpackung Di folgenden Artikel sind Bestandteile dieses Produktes. Falls ein Teil fehlen sollte, wenden Sie sich bitte an den Händler, bei dem Sie dieses Produkt erworben haben. Netzadapter M70Wv2-Gerät Fernbedienung USB-Kabel Stromkabel* WLAN-Dongle AAA-Batterien Schnellanleitung Garantiekarte** (Option) *Das Stromkabel variiert abhängig von den im Verkaufsland üblichen Steckdosen. - Page 53 Übersicht 14 15 1. Kamerakopf 2. LED-Leuchte 3. Arm 4. IR-Sensor 5. Bedienfeld 6. Griff 7. Eingebautes Mikrofon 8. Akkuanzeige 9. USB Mini Port 10. USB-Anschluss 11. WLAN-Dongle 12. Diebstahlschutz 13. HDMI-Eingang 14. HDMI-Ausgang 15. DC-Buchse Verbundtaste Drücken Sie die Tasten, um die Funktion der Verbundtasten zu aktivieren. : Zurück zu Werkseinstellungen Für die Umschaltung zwischen den folgenden Modi drücken: - Autom.
- Page 54 - Automatische Erkennung der besten Auflösung (4K, 720P, 1080P) - 1024x768 (bei HDMI-Geräteunterstützung) - 4K 60 Hz (bei HDMI-Geräteunterstützung) 15. AE-SPERRE Belichtung stoppen, so dass die M70Wv2 nicht länger die optimale Belichtung sucht 16. ENTF Markiertes Bild/Video im Wiedergabemodus löschen.
- Page 55 Fernbedienung Bezeichnung Funktion 17. LAMPE Overhead-Licht ein- und ausschalten. Drücken zum Umschalten zwischen Normal, High Frame, Hohe Qualität, 18. MODUS Mikroskop, Unendlichkeit oder Makromodus. Auswählen 20. LAUTSTÄRKE +/- Lautstärkeregelung 21. HELLIGKEIT +/- Passen Sie die Helligkeit an. 22. RESET +/- Zurücksetzen auf die Werkseinstellungen 23.
- Page 56 Geräteanschluss Stromanschluss Und Laden Netzadapter einstecken und M70Wv2 einschalten. [Hinweis] Bitte laden Sie die Kamera vor der ersten Verwendung vollständig auf. Sobald die Kamera eingeschaltet ist, ist sie im „Standby“-Modus. Im Standby-Modus kann sie über die USB-Verbindung mit dem anderen Gerät aufgeladen werden, allerdings wird ein 5V-/3A-Netzteil benötigt und die Ladezeit verlängert sich.
-
Page 57: Usb-Anschluss
USB-Anschluss Die WLAN-Taste drücken, um den WLAN-Modus zu deaktivieren. Verbinden Sie die M70Wv2 mit einem Laptop/PC mit USB-Anschluss. Verbinden Sie den USB-Stick für die Speicherung der Aufzeichnungsdatei mit dem USB-Anschluss. Deutsch-55... - Page 58 HDMI Eingang/Ausgang-Anschluss Verbinden von M70Wv2 mit einem HDMI-Display. Verbinden Sie die M70Wv2 mit einem Laptop/PC mit HDMI-Eingang. Deutsch-56...
- Page 59 P2P- Verbindung über WLAN-Dongle(Option) WLAN-Dongle am PC/Laptop einstecken und AVerTouch-App installieren. AVerTouch AVerTouch-App öffnen und zum Verbinden der Kamera anklicken [Hinweis] Prüfen Sie die Seriennummer unten an der Kamera, um die Kamera zu ermitteln. Klicken Sie zum Fortfahren auf “Next” (Weiter). Deutsch-57...
- Page 60 Klicken Sie nach der Eingabe von Kameraname und Passcode auf “Done” (Fertig), um fortzufahren. Klicken Sie auf die Schaltfläche “Done” (Fertig), um die Kamera zu verbinden. [Note] It takes about 60 seconds to complete connection. Über “X” verlassen Sie die Live-Ansicht-Seite. [Hinweis] Bei erfolgreicher Verbindung sehen Sie die Live-Ansicht der Kamera.
- Page 61 WLAN-Einrichtung Schalten Sie die Kamera ein Überprüfen Sie den WLAN-Status - Blaue Leuchte ein. Öffnen Sie AVerTouch und befolgen Sie die Bildschirmanweisungen, um die WLAN-Funktion der Kamera zu aktivieren. [Hinweis] Die Software erkannt die Kamera in Ihrem Netzwerk automatisch. ...
- Page 62 Wählen Sie , um die Verbindung mit der Kamera herzustellen. Wählen Sie , um zum Live-Bildschirm der Kamera umzuschalten. Deutsch-60...
- Page 63 Miracast-Verbindung um auf das Auswahlmenü zuzugreifen. [Hinweis] Mit und der -Taste gehen Sie zur Auswahl und drücken die -Taste, um Ihre Auswahl zu bestätigen. Für das Anzeigegerät muss ein kommerziell erhältliches Miracast- Dongle installiert werden, z. B. von Microsoft (Wireless Adapter). Wählen Sie bitte Wireless”...
- Page 64 So verwenden Sie die Kamera Objektposition Mithilfe des Symbols auf dem Kamerakopf lässt sich das Objekt in positive Richtung platzieren. Das Richtungsrädchen lässt sich um 90° drehen, um das Symbol in 2 Positionen zu verändern (siehe Abbildung). Aufnahmebereich Wenn die Kameraposition eine Höhe von 470mm hat, ist der Aufnahmebereich A3-Größe. Deutsch-62...
- Page 65 Aufbewahrung der Kamera Kameramontage auf einer flachen Oberfläche [Hinweis] M4-Schraube 4x, Tiefe 5 mm 75.00 Deutsch-63...
-
Page 66: Technische Daten
Technische Daten Sensor 1/3.2 CMOS Pixel 13 Megapixel Bildrate 60 fps (max.) Bildmodus Normal/High Frame/Hohe Qualität/ Mikroskop/Unendlich/Makro Effekt Drehen/Anhalten HDMI-Ausgang 4K; 1080p 60Hz; 720p 60Hz Fokussierung Autom./Manuell/Bereich (SW) Aufnahmebereich 480 mm x345 mm @ 470 mm Gesamt 33-fach maximal(10-fach AVerZOOM + 23-fach Zoom Digital-Zoom) - Page 67 AVer Information Inc. reproduziert, übertragen, umgesetzt, Abrufsystemen gespeichert oder in jegliche Sprachen übersetzt werden. WARENZEICHEN „AVer" ist ein Warenzeichen von AVer Information Inc. Andere in diesem Dokument genannten Warenzeichen dienen lediglich der Information und sind Eigentum der entsprechenden Unternehmen. Deutsch-65...
- Page 68 Für FAQs, technische Unterstützung, Software und für den Download der Bedienungsanleitung besuchen Sie bitte: Download Center https://www.avereurope.com/download-center Technischer Support: https://www.avereurope.com/technical-support Kontaktinformationen AVer Information Europe B.V. https://www.avereurope.com Westblaak 134, 3012 KM, Rotterdam, The Netherlands Tel: +31 (0) 10 7600 550 Technischer support: eu.rma@aver.com Deutsch-66...
-
Page 69: Contenu De L'emballage
Contenu de l'emballage Les éléments ci-dessous sont fournis avec ce produit. Si un élément venait à manquer, adressez-vous au revendeur auquel vous avez acheté le produit. Adaptateur secteur Appareil M70Wv2 Télécommande Cordon Câble USB d'alimentation* Carte de Dongle Wi-Fi Piles AAA... -
Page 70: Aperçu Général
Aperçu général 14 15 1. Tête caméra 2. Lampe LED 3. Bras 4. Capteur IR 5. Panneau de commandes 6. Poignée 7. Micro intégré 8. Voyant batterie 9. Port mini USB 10. Port USB 11. Dongle WiFi 12. Fente antivol 13. - Page 71 - 1024x768 (si un appareil HDMI est pris en charge) - 4K 60 Hz (si un appareil HDMI est pris en charge) 15. AE LOCK (verrouillage de Verrouillez l'exposition, pour empêcher la M70Wv2 de rechercher la meilleure exposition. l'exposition automatique)
- Page 72 Télécommande (suite) Fonction Allumez ou éteignez la lampe zénithale. 16. LAMPE Effacez la photo ou la vidéo sélectionnée en mode lecture. 17. SUP Appuyez pour commuter parmi les modes Normal, Cadence 18. MODE élevée, Haute qualité, Microscope, Infini ou Macro. Faites un choix.
- Page 73 Connexion d'appareils Connexion Au Réseau Et Chargement Branchez l'adaptateur secteur et allumez M70Wv2. [Remarque] Chargez la batterie à fond avant la première utilisation. Lorsque vous allumez la caméra, elle se met en mode Veille. En mode veille, la batterie peut être chargée depuis le port USB d'un autre appareil, mais l'alimentation nécessaire...
-
Page 74: Connexion Usb
Connexion USB Appuyez sur le bouton WiFi pour désactiver le mode WiFi. Connectez le M70Wv2 à un ordinateur portable ou de bureau par le port USB. Connectez une clé USB au port USB afin d'y stocker le ficher en cours d’enregistrement. - Page 75 Connexion d'entrée/sortie HDMI Connectez M70Wv2 à un écran HDMI. Connectez le M70Wv2 à un ordinateur portable ou de bureau par le port d'entrée HDMI. Français-73...
- Page 76 Connexion pair-à-pair (P2P) par dongle WiFi (en option) Branchez le dongle Wi-Fi sur PC / ordinateur portable et installez l’application AVerTouch. AVerTouch Ouvrez l'application AVerTouch, cliquez sur pour connecter la caméra. [Remarque] Vérifiez le numéro de série en bas de la caméra pour trouver votre caméra. Cliquez sur Next pour continuer.
- Page 77 Saisie du nom de la caméra et du mot de passe, cliquez sur Done pour continuer. Cliquez sur le bouton Done pour connecter la caméra. [Remarque] Il faut environ 60 secondes pour réaliser la connexion. Sélectionnez X pour quitter la page d'affichage en direct. [Remarque] Lorsque la connexion est réussie, vous devriez voir la vue en direct de la Français-75...
- Page 78 Connexion Wi-Fi Allumez la caméra. Vérifiez le statut du Wifi – Le voyant bleu doit être allumé. Ouvrez AVerTouch et suivez les instructions à l'écran pour activer la fonction Wi-Fi de la caméra. [Remarque] Le logiciel détectera automatiquement la caméra sur votre réseau. ...
- Page 79 Sélectionnez pour établir la connexion avec la caméra. Sélectionnez pour passer à l'écran d’affichage en direct de la caméra. Français-77...
- Page 80 Connexion Miracast Appuyez sur pour accéder au menu de sélection. [Remarque] À l'aide de et du bouton, allez à la sélection et appuyez sur le bouton pour confirmer. Un dongle Miracast, comme par exemple la clé Miracast Microsoft, doit être installé sur le système d’affichage.
-
Page 81: Utilisation De La Caméra
Utilisation de la caméra Position de l'objet L'icône située au sommet de la tête caméra peut aider l'utilisateur à placer l'objet dans la direction positive. La roulette de réglage de la direction peut tourner de 90° pour choisir parmi 2 positions de l'icône (voir figure). - Page 82 Rangement de la caméra Installation de la caméra sur une surface plane [Remarque] 2 vis M4, 5 mm de profondeur 75.00 Français-80...
-
Page 83: Caractéristiques
Caractéristiques CMOS 1/3,2 Capteur 13 mégapixels Nombre de pixels 60 i/s (max.) Cadence Normal / Cadence élevée / Haute qualité / Microscope / Infini /Macro Mode d'image Rotation / Gel Effet 4K ; 1080p 60 Hz ; 720p 60 Hz Sortie HDMI Mise au point Automatique / Manuelle / Zone (logicielle) - Page 84 écrite préalable de AVer Information Inc. MARQUES COMMERCIALES « AVer » est une marque commerciale propriété d'AVer Information Inc. Les autres marques commerciales mentionnées dans ce document à seule fin descriptive appartiennent à leurs sociétés respectives.
- Page 85 Pour la FAQ, l'assistance technique et le téléchargement du logiciel et du mode d'emploi, rendez-vous sur le site: Centre de téléchargement: https://www.avereurope.com/download-center Assistance Technique: https://www.avereurope.com/technical-support Coordonnées de contact AVer Information Europe B.V. https://www.avereurope.com Westblaak 134, 3012 KM, Rotterdam, The Netherlands Tel: +31 (0) 10 7600 550 Assistance technique: eu.rma@aver.com Français-83...
-
Page 86: Contenido Del Paquete
Contenido del paquete Este producto incluye los elementos siguientes. Si falta algún elemento, póngase en contacto con el distribuidor al que adquirió el producto. Mando a Adaptador de corriente Unidad M70Wv2 Cable USB distancia Cable de alimentación* Tarjeta de Llave Wi-Fi Guía rápida... -
Page 87: Información General
Información general 14 15 1. Cabezal de la cámara 2. Luz LED 3. Brazo 4. Sensor de infrarrojos 5. Panel de control 6. Asa 7. Micrófono integrado 8. Indicador de batería 9. Puerto mini USB 10. Puerto USB 11. Llave Wi-Fi 12. -
Page 88: Mando A Distancia
HDMI) - 4K 60 Hz (en caso de compatibilidad con dispositivos HDMI) Bloquea la exposición de modo que 15. AE LOCK la M70Wv2 no trate de establecer la exposición óptima. Enciende/Apaga la luz superior. 16. LAMP Español-86... -
Page 89: Indicadores Led
Nombre Función Elimina la imagen o vídeo seleccionado en el modo de reproducción. 17. DEL Permite alternar entre los modos Normal / Alta velocidad / Alta calidad / 18. MODE Microscopio / Infinito / Macro Realiza una selección. 20. VOLUME +/- Ajusta el volumen. -
Page 90: Conexión De Dispositivos
Conexión de dispositivos Carga Y Conexión De La Alimentación Conecte el adaptador de corriente y encienda el M70Wv2. [Nota] Cargue la cámara completamente antes de utilizarla por primera vez. Cuando la cámara está encendida, está en modo «En espera». En el modo de espera, se puede cargar a través de una conexión USB desde otro dispositivo;... -
Page 91: Conexión Usb
Conexión USB Pulse el botón Wi-Fi para desactivar el modo Wi-Fi. Conecte el M70Wv2 a un portátil/PC mediante el puerto USB. Conecte una llave USB al puerto USB para guardar el archivo de grabación. Español-89... - Page 92 Conexión de entrada/salida HDMI Conecte el M70Wv2 a un ordenador portátil y a una pantalla HDMI. Conecte el M70Wv2 a un portátil/PC mediante el puerto de entrada HDMI. Español-90...
- Page 93 Conexión P2P con llave Wi-Fi (opcional) Conecte la llave Wi-Fi a un PC/portátil e instale la aplicación AVerTouch. AVerTouch Abra la aplicación AVerTouch y haga clic en para conectar la cámara. [Nota] Compruebe el número de serie en la parte inferior de la cámara para detectar la cámara.
- Page 94 Introduzca el nombre de la cámara y el código de acceso y haga clic en Listo para continuar. Haga clic en el botón Listo para conectar la cámara. [Nota] La conexión tardará unos 60 segundos en establecerse. Seleccione X para salir de la página de la vista en vivo. [Nota] Una vez establecida la conexión, se mostrará...
- Page 95 Conexión Wi-Fi Encienda la cámara. Compruebe el estado de la Wi-Fi (indicador azul encendido). Open AVerTouch and follow on-screen instruction to enable Wi-Fi function on camera. [Nota] El software detectará automáticamente la cámara en su red. Seleccione la cámara que desee conectar. ...
- Page 96 Seleccione para establecer una conexión con la cámara. Seleccione para cambiar a la pantalla en vivo de la cámara. Español-94...
- Page 97 Conexión Miracast Pulse para acceder al menú de opciones. [Nota] Utilice los botones para ir a la opción y pulse el botón para confirmar la selección. El dispositivo de pantalla requiere la instalación de una llave Miracast comercial, como la de Microsoft (adaptador inalámbrico).
-
Page 98: Uso De La Cámara
Uso de la cámara Posición del objeto El icono en la parte superior del cabezal de la cámara permite al usuario colocar el objeto en la posición correcta (no invertida). Es posible girar la rueda de ajuste de la posición 90° para cambiar la posición del icono (véase la figura). - Page 99 ALMACENAMIENTO DE LA CÁMARA Montaje de la cámara en una superficie plana [Nota] 4 tornillos M4 (profundidad de 5 mm) 75.00 Español-97...
-
Page 100: Especificaciones
Especificaciones Sensor CMOS 1/3,2 Número de píxeles 13 megapíxeles Velocidad de 60 fps (máx.) fotogramas Modo de imagen Normal / Alta velocidad / Alta calidad / Microscopio / Infinito / Macro Efecto Girar / Congelar Salida HDMI 4K; 1080p 60Hz; 720p 60Hz Enfoque Auto / Manual / Área (SW) Área de disparo... - Page 101 AVer Information Inc. AVer Information Inc. se reserva el derecho a modificar sus productos, incluso sus especificaciones, y cualquier otra información aquí expuesta sin previo aviso.
- Page 102 MARCAS COMERCIALES «AVer» es una marca comercial propiedad de AVer Information Inc. Otras marcas comerciales utilizadas en este documento con fines descriptivos pertenecen exclusivamente a sus empresas correspondientes.
-
Page 103: Contenuto Della Confezione
Contenuto della confezione I seguenti articoli vengono forniti in dotazione con questo prodotto. Qualora vi siano articoli mancanti, contattare il rivenditore presso il quale è stato acquistato il prodotto Adattatore di corrente Unità M70Wv2 Telecomando Cavo USB Cavo di alimentazione*... - Page 104 Panoramica 14 15 1. Testa della telecamera 2. Illuminazione LED 3. Braccio 4. Sensore IR 5. Pannello di controllo 6. Impugnatura 7. MIC integrato 8. Spia della batteria 9. Porta mini-USB 10. Porta USB 11. Dongle Wi-Fi 12. Anti-theft Slot 13.
- Page 105 - Rileva automaticamente la risoluzione migliore (4K, 720P, 1080P) - 1024x768 (Se il dispositivo HDMI la supporta) - 4K 60Hz (Se il dispositivo HDMI la supporta) Blocca l’esposizione per interrompere la 15. BLOCCO AE ricercare, da parte di M70Wv2, dell’esposizione ottimale. Italiano-103...
- Page 106 Telecomando Nome Funzione 16. LAMP Accende o spegne la luce superiore. Elimina l’immagine/video selezionati in modalità di Riproduzione. 17. ELIMINA Premere per alternare fra Normale, High frame, e Alta Qualità, 18. MODALITÀ Microscopio, Infinito, o modalità Macro. Effettuare una selezione. 20.
-
Page 107: Collegamento Del Dispositivo
Collegamento del dispositivo Collegamento del dispositivo Inserire l'adattatore di alimentazione e accendere il dispositivo M70Wv2. [Nota] Si prega di caricare completamente la telecamera per il primo utilizzo. Quando la telecamera è accesa, la telecamera si trova nella modalità “Standby”. In modalità... -
Page 108: Collegamento Usb
Collegamento USB Premere il pulsante Wi-Fi per disattivare la modalità Wi-Fi. Collegare il dispositivo M70Wv2 al laptop/PC con la porta USB. Collegare la pen drive USB alla porta USB per salvare il file della registrazione. Italiano-106... -
Page 109: Collegamento Hdmi
Collegamento HDMI Collegare il dispositivo M70Wv2 al display HDMI con la porta di uscita HDMI. Collegare il dispositivo M70Wv2 a un laptop/PC con porta di ingress HDMI. Italiano-107... - Page 110 Connessione P2P tramite Dongle Wi-Fi (Opzionale) Collegare il dongle Wi-Fi al PC/computer fisso e installare l'applicazione AVerTouch. AVerTouch Aprire l'applicazione AVerTouch, fare clic su per collegare la telecamera. [Nota] Controllare il numero seriale nella parte inferiore della telecamera per trovare la Fare clic su Avanti per continuare.
- Page 111 Inserire il nome della telecamera e il codice di accesso, fare clic su Fatto per continuare. Fare clic sul pulsante fatto per collegare la telecamera. [Nota] Il completamento della connessione richiede indicativamente 60 secondi. Selezionare X per uscire dalla pagina di visualizzazione in diretta. [Nota] Quando il collegamento va a buon fine, si dovrebbe vedere la vista in diretta della telecamera.
- Page 112 Il software rileverà automaticamente la telecamera sulla rete. Selezionare la telecamera alla quale si desidera collegarsi. Il nome della telecamera sarà “AVer ‘nome modello’ - Mac address dongle Wi-Fi”. Il Mac address sarà diverso rispetto al dispositivo.
- Page 113 Selezionare per eseguire la connessione con la telecamera. Selezionare per passare alla schermata in diretta della telecamera. Italiano-111...
- Page 114 Connessione Miracast Premere per accedere al menu di selezione. [Nota] Usare il pulsante andare alla selezione e premere il pulsante confermare la selezione. Un Dongle Miracast commerciale (Adattatore Wireless) è necessario per il dispositivo display. Selezionare Wireless > Modalità > Miracast per attivare la modalità Miracast. Selezionare Miracast >...
- Page 115 Uso della telecamera Posizione dell'oggetto L'icona sulla parte superiore della testa della telecamera può aiutare l'utente a posizionare l'oggetto in direzione positiva. La rotella di regolazione della direzione può ruotare di 90° per cambiare l'icona in 2 posizioni (fare riferimento alla figura). Area di ripresa Quando la posizione della fotocamera è...
- Page 116 Archiviazione nella telecamera Montaggio della telecamera su una superficie piatta [Note] 2 viti M4, la profondità è 5mm. 75.00 Italiano-114...
-
Page 117: Specifiche Tecniche
Specifiche tecniche Sensore 1/3.2 CMOS Conteggio Pixel 13 megapixels Frame Rate 60 fps (max.) Modalità immagine Normale / High Frame / Alta qualità / Microscopio/Infinito/Marco Effetto Ruota / Blocca Uscita HDMI 4K;1080p 60Hz; 720p 60Hz Messa a fuoco Auto / Manuale / Area (SW) Area di ripresa 480mm x345mm @ 470 mm Ingrandimento/Rimpic... - Page 118 ©2023 AVer Information Inc. Tutti i diritti riservati. La riproduzione o la trasmissione in qualsiasi forma, o con qualsiasi mezzo senza disporre del previo consenso di AVer Information Inc. è vietata. Tutte le informazioni o le specifiche sono soggette a variazioni senza previa notifica.
- Page 119 Per Domande tecniche, assistenza tecnica, download di software e manuale di istruzioni, invitiamo a visitare: Centro download: https://www.avereurope.com/download-center Assistenza tecnica: https://www.avereurope.com/technical-support Informazioni di contatto AVer Information Europe B.V. https://www.avereurope.com Westblaak 134, 3012 KM, Rotterdam, The Netherlands Tel: +31 (0) 10 7600 550 Assistenza tecnica: eu.rma@aver.com Italiano-117...
- Page 120 P/N: 300APW30-xxx...
Need help?
Do you have a question about the M70Wv2 and is the answer not in the manual?
Questions and answers