AVer AverVision M90UHD User Manual
Hide thumbs
Also See for AverVision M90UHD:
- User manual (361 pages) ,
- Manual (313 pages) ,
- Quick start manual (72 pages)
Table of Contents
Advertisement
Quick Links
Advertisement
Table of Contents

Related Manuals for AVer AverVision M90UHD


Summary of Contents for AVer AverVision M90UHD
- Page 1 AverVision M90UHD — — User Manual...
- Page 2 WARNING To reduce the risk of fire or electric shock, do not expose this appliance to rain or moisture. Warranty will be void if any unauthorized modifications are done to the product. Do not drop the camera or subject it to physical shock. ...
- Page 3 © 2024 AVer Information Inc. All rights reserved. | April 30, 2024 All rights of this object belong to AVer Information Inc. Reproduced or transmitted in any form or by any means without the prior written permission of AVer Information Inc. is prohibited. All information or specifications are subject to change without prior notice.
- Page 4 お客様サポートセンター(固定電話のみ): +81 (0) 120 008 382 Vietnam Branch Office Korea Office 한국 에버 인포메이션 (주) Công ty TNHH AVer Information (Việt Nam) Tầng 5, 596 Nguyễn Đình Chiểu, 서울시 종로구 새문안로 92 (신문로 1 가, 광화문오피시아빌딩) 1831, P.3, Quận 3, 1832 호...
-
Page 5: Table Of Contents
Contents Overview ......................1 Package Contents ....................1 Optional Accessories ....................1 Parts Info ......................2 Control Panel ......................5 Remote Control ....................... 6 Connection ......................8 Power Connection ....................8 USB Connection ...................... 8 HDMI Out and In Connection................... 9 VGA Out and In Connection .................. - Page 6 CGI Command ....................... 37 RS-232 Send Command List ................. 38 RS-232 Receive Command List ................42 Technical Specifications ..................43 Troubleshooting ....................45...
-
Page 7: Overview
Overview Package Contents & M90UHD Power Adapter Remote Control** AAA Battery (x2) Power Cord* USB Cable VGA Cable Warranty Card Quick Start Guide *The power cord will vary depending on the standard power outlet of the country where it is sold. **Your device may come with one of the two remote controls. -
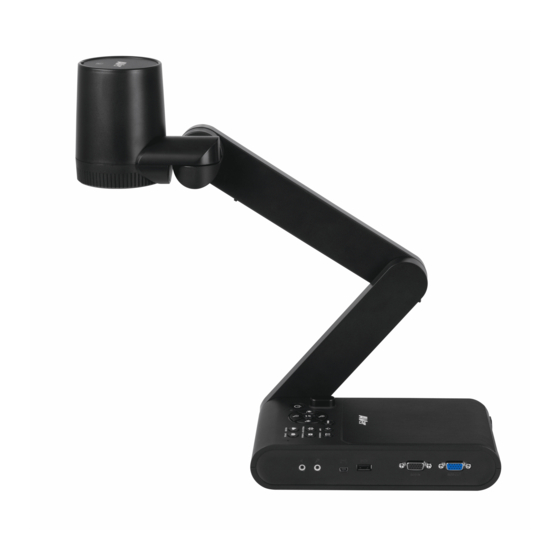
Page 8: Parts Info
Parts Info Name Function 1. Camera head Contain the camera sensor. 2. Camera lens Focus the image in the camera. 3. LED light Provide light to enhance the lighting condition. 4. Mechanical arm Provide adjustable viewing coverage. 5. Left panel Micro SD card slot. - Page 9 Input the signal from a computer or other sources and pass it through to 6. VGA IN port the VGA OUT port only. Connect this port to the VGA output port of a computer. Connect the AVerVision M90UHD to any display device with VGA cable. 7. VGA OUT port Left Panel...
- Page 10 Rear Panel Name Function Connect an external HDMI source as an input via this port. Connect this 1. HDMI IN port port to the HDMI output port of a computer. Output the video signal from the main system on an interactive flat 2.
-
Page 11: Control Panel
Control Panel Name Function POWER Turn on your device or enter standby mode. Adjust the brightness. Zoom in or out. Confirm a selection in Playback mode and OSD menu. Start/Pause video playback. Adjust the focus automatically. Pan and tilt control for digital zoom. -
Page 12: Remote Control
Remote Control Your device may come with one of the two remote controls. Name Function Turn you camera on or off, or enter Power standby mode. Camera View camera live view. Playback View images and videos from gallery. Switch to external VGA/HDMI source. PC 1/2 Press the Camera button to switch... - Page 13 Fast forward or rewind the video. 5. ZOOM 1x Reset zoom ratio to 1x. Zoom in or out. Zoom Delete the selected images or videos. Confirm a selection on the OSD menu. Play and pause the video. Reset to factory default settings.
-
Page 14: Connection
Before making the connection, make sure the power of all devices are turned off. If you are not sure where to connect, simply follow the illustrated connections below and refer to the user manual of the device you are connecting to the AVerVision M90UHD. Power Connection Plug in power adapter and press “Power”... -
Page 15: Hdmi Out And In Connection
HDMI Out and In Connection 1. Connect M90UHD to HDMI display with HDMI output port. 2. Connect M90UHD to laptop/PC with HDMI input port. -
Page 16: Vga Out And In Connection
VGA Out and In Connection 1. Connect M90UHD to VGA display with VGA output port. 2. Connect M90UHD to VGA display with VGA output port and VGA input source device with VGA input port. 3. Press the Camera/PC button on the control panel or the remote control to display the computer screen. -
Page 18: Usb To Ethernet Adapter Connection
USB to Ethernet Adapter Connection Connect your M90UHD to your laptop or desktop with a USB to Ethernet adapter (self-purchased accessory) for online control. 1. Connect the Ethernet cable from your computer to the USB to Ethernet adapter, then insert the adapter to your M90UHD. -
Page 19: Amplified Speaker Connection
Amplified Speaker Connection Plug a 3.5mm amplified speaker to Line Out ( port. Only the audio from the video playback is supported. [Note] We recommend connecting an amplified speaker to the Line out port. Take caution when using earphones. Adjust the volume down on the remote to prevent hearing damage due to loudness. Connect a Microphone Plug a 3.5mm microphone to MIC In ( port. -
Page 20: Microscope Connection
Microscope Connection Connect the AVerVision M90UHD to a microscope enables you to examine microscopic objects on a big screen. Change the image display mode to Microscope. Select IMAGE tab > select Preview Mode > select Microscope and press Aim the camera head at the farthest point and press AUTO FOCUS. - Page 21 Remove the microscope eyepiece from the microscope and connect it to the microscope adapter with the rubber coupler inserted. Fasten the 3 bolts until the adapter secures the eyepiece. Connecting plate - For the eyepiece, we suggest using Microscope 33mm eye relief or higher. adapter - Do the adjustment manually to get better image view.
-
Page 22: Get Started
Get Started This section provides useful tips on how to adjust the AVerVision M90UHD to meet your needs. Dimension Please follow the below figure to store the document camera. -
Page 23: Shooting Area
Shooting Area The shooting area can be viewed an area of 420 x 315mm at High Definition preview mode. When camera position is 360.3mm high, the shooting area will be A3 size. The Camera head can be rotated 90 as below figure shown. -90°... -
Page 24: Overhead Light
Overhead Light Press LAMP button on the control panel or remote control to turn on and off light. -
Page 25: Infrared Sensor
Infrared Sensor Aim the remote control at the infrared sensor to operate the unit. Mounting the M90UHD on a Flat Surface Measure and mark the horizontal of 75 mm from the center line distance between the holes on the flat surface as describe in the illustration below. -
Page 26: Anti-Glare Sheet
External Memory Storage AVerVision M90UHD supports both Micro SD memory card and USB flash drive for more image capture and audio & video recordings. AVerVision M90UHD can detect when there is an external storage media and automatically switch to the last detected storage. If no external storage is connected, all captured still images will be saved in the built-in memory. -
Page 27: Rs232 Diagram Connection
RS232 Diagram Connection AVerVision M90UHD can be controlled using a computer or any centralized control panel through RS232 connection. For RS-232 Command list, please refer to <Appendix>. -
Page 28: Osd Menu
OSD MENU There are 3 main options on the OSD menu: IMAGE, SETTING and SYSTEM. SETTING IMAGE SYSTEM... - Page 29 Navigate the Menu and Submenu 1. Press MENU button on the remote or control panel. 2. Press ►, ◄, ▲ and ▼ to choose a selection in the menu list. 3. Press to make a selection. 4. Use ▲ and ▼ to adjust the setting or make a selection. Press to enter submenu.
- Page 30 Saturation Adjust the saturation level manually between 0 and 255. Preview Mode Select from the various image display settings. Normal - adjust the gradient of image. Motion – high refresh rate upon a motion image. High Quality - high resolution with the best quality.
- Page 31 Exposure Setup Select AUTO to automatically adjust the white balance and exposure setting and correct the color and exposure compensation. Select MANUAL to enable advanced settings for manual exposure and WB. Manual Exposure MANUAL - manually adjust the exposure level. The exposure can be adjusted between 0 and White Balance Setup Select the White Balance setting for various light...
- Page 32 Manual WB Red Manually adjust the red color level. The color level can be adjusted up to 255. Focus Manually fine-tune the image.
- Page 33 Setting Menu Screen Function Capture Resolution Select the capture size. In 13M setting, the capture resolution size is 4208 x 3120. Select Normal, the capture size is based on the resolution settings. Capture Quality Select the capture compression setting. Select the Finest to get the best quality capture compression.
- Page 34 Format to delete all the data in the selected memory. USB to PC Select status of the AVerVision M90UHD when it is connected to the computer via USB cable. Camera - can be used as a computer webcam or with our bundled software to record video and capture still image.
- Page 35 Start Timer Start the timer. The timer automatically counts up after the countdown reaches zero to show the elapsed time. Pause/Stop Timer Press Menu button during timing to pause or stop timing. Timer Interval Set the timer duration up to 2 hours.
- Page 36 System Menu Screen Function Language Change and select a different language. M90UHD supports up to 12 languages. Output Display Set the resolution to display the image on screen. The output device resolution detected automatically and configured to the highest resolution. Backup Copy the image from the built-in memory to SD card or USB flash drive.
- Page 37 Flicker Select between 50Hz or 60Hz. Some display devices cannot handle high refresh rates. The image will flicker a couple of times as the output is switched to another refresh rate. Information Display the product information. Default Restore all the settings into original factory default setting.
- Page 38 Playback You can use the playback feature to configure the saved images or videos. Menu Screen Function Slide Show Start or Stop the Slide Show. Interval Set the interval between playing images or videos. Storage Choose the images or videos from Storage, including Embedded, SD Card or USB Drive.
-
Page 39: Transfer Captured Images/Videos To A Computer
Transfer Captured Images/Videos to a computer This enables you to transfer the captured image from the built-in memory, SD or USB drive to a computer. Two ways to save images/videos: a. Built-in memory+SD card b. Built-in memory+USB drive The instruction below MUST be read and followed BEFORE connecting the USB cable. 1. -
Page 40: Appendix
Appendix IP Command Protocol Port Internet protocol IPv4 Transport protocol Port address 9528 Format The data sent between device control and camera consists of multiple fields. The data in each field are placed in little-endian. Header Magic Number 4-byte field with the value 0xABCD1234. - Page 41 Command and Data Data Byte [ 0 – N] Function Command Description [0 – 3] 0x00 ~ 0xFF SET BRIGHTNESS 0x80000207 Setup value from 0 to 255 [0 – 3] 0x00 ~ 0xFF SET CONTRAST 0x8000020A Setup value from 0 to 255 (0~255) 0x00: Color Mode [0 –...
- Page 42 Example for packet data via internet protocol sender tool. Data Action Header Checksum Command Flags Data Footer Size Description 34 12 cd 00 00 04 00 64 00 09 ef 78 BRIGHTNESS 6F 02 00 80 07 02 00 80 00 00 00 00 00 00...
-
Page 43: Cgi Command
CGI Command Enter the following URL into your web browser to view the CGI command list. To access a control command, follow the following CGI command format. URL: http://IPv4 Address/cgi-bin/NetApi? Format: http://IPv4 Address/cgi-bin/NetApi?setCmd=ParamCmd&setValue=ParamValue Description ParamCmd ParamValue Set Brightness Value img_brightness 0 ~ 255 Set Contrast Value... -
Page 44: Rs-232 Send Command List
RS-232 Send Command List Send Format 0x52 + 0x0B + 0x03 + Data[0] + Data[1] + Data[2] + 0x53 + Checksum Success Receive Format 0x53 + 0x00 + 0x02+ *2 + 0x00 + 0x52 + Checksum Abnormal Receive Format 0x53 + 0x00 + 0x01+ *3 + 0x52 + Checksum Checksum = 0x0B xor 0x03 xor Data[0] xor Data[1] xor Data[2] xor 0x53 Receive data ok : 0x0B, Not Command : 0x03 ID error: 0x01, Checksum error: 0x02, Function fail = 0x04... - Page 45 PREVIEW MODE: INFINITE 0x0A 0x05 0x00 0x54 PREVIEW MODE: NORMAL 0x0A 0x06 0x00 0x57 PREVIEW MODE: HIGH QUALITY 0x0A 0x07 0x00 0x56 PREVIEW CAPTURE 0x0B 0x00 0x00 0x50 PLAYBACK DELETE 0x0C 0x00 0x00 0x57 PLAYBACK FULL SCREEN 0x0D 0x00 0x00 0x56 MIRROR OFF 0x0E...
- Page 46 RECORD: OFF 0x23 0x00 0x00 0x78 RECORD: ON 0x23 0x01 0x00 0x79 MOVIE FAST REWIND 0x25 0x00 0x00 0x7e MOVIE FAST FORWARD 0x25 0x01 0x00 0x7f MOVIE VOL INC 0x26 0x00 0x00 0x7d MOVIE VOL DEC 0x26 0x01 0x00 0x7c STORAGE: EMBEDDED 0x28 0x00...
- Page 47 CAPTURE QUALITY: FINEST 0x37 0x02 0x00 0x6e AUTO FOCUS 0x40 0x00 0x00 0x1b MENU 0x41 0x00 0x00 0x1a ARROW - DOWN 0x42 0x00 0x00 0x19 ARROW - UP 0x42 0x01 0x00 0x18 ARROW - LEFT 0x42 0x02 0x00 0x1b ARROW - RIGHT 0x42 0x03 0x00...
-
Page 48: Rs-232 Receive Command List
RS-232 Receive Command List Send Format 0x52 + 0x0A + 0x01 + Data[0] + 0x53 + Checksum Receive Format 0x53 + 0x0C + 0x01 + ReData[0] + 0x52 + ReChecksum ReChecksum = 0x0C xor 0x01 xor ReData[0] xor 0x52 Power Status Receive Data = 0x51 + 0xFF + 0x01 + 0x0A + 0x51 + 0xA5 Function Data[0] Checksum... -
Page 49: Technical Specifications
Technical Specifications Image Sensor 1/3.06" CMOS Pixel Count 13 megapixels Frame Rate 60 fps (max.) White Balance Auto/Manual Exposure Auto/Manual Image mode Normal, High Frame, High Quality, Microscope, Infinity, Marco Effect Color/B/W/Negative RGB output 1280×720, 1024×768, 1080P HDMI Output 4K, 1080p, 720p Image Capture 200 Frames... - Page 50 Dimension Operating 481.3mm(L) x 159mm(W) x 469.9mm(H) Folded 319.0mm(L) x 176mm(W) x 112mm(H) Weight 2.2 +/-0.5Kg (about 5.732 lbs) External Storage Micro SD Card Max 32GB (FAT32) USB Flash Drive Max 32GB (FAT32) *please note that this specification depends on certain order.
-
Page 51: Troubleshooting
There is no computer signal on presentation screen. 1. Check all the cable connections among the display device, AVerVision M90UHD and your PC. 2. Connect your PC to the AVerVision M90UHD first before you power on your computer. - Page 52 This limited warranty extends only to You as the original purchaser. Except for the foregoing, the Product is provided “AS IS.” In no event does AVer warrant that You will be able to operate the Product without problems or interruptions, or that the Product is suitable for your purposes.
Need help?
Do you have a question about the AverVision M90UHD and is the answer not in the manual?
Questions and answers