Table of Contents
Advertisement
Available languages
Available languages
ATTACH YOUR RECEIPT HERE
_________________________
Serial Number
Questions, problems, missing parts? Before returning to your retailer, call our
customer service department at 1-866-439-9800, 8 a.m. - 8 p.m., EST, Monday - Sunday.
VR20189
Tub & Shower Faucet
Purchase Date
1
ITEM # 2517124
MODEL # 873X-732707
_________________________
Español p. 12
Advertisement
Table of Contents

Related Manuals for Allen + Roth 873X-732707


Summary of Contents for Allen + Roth 873X-732707
- Page 1 ITEM # 2517124 Tub & Shower Faucet MODEL # 873X-732707 Español p. 12 ATTACH YOUR RECEIPT HERE _________________________ _________________________ Serial Number Purchase Date Questions, problems, missing parts? Before returning to your retailer, call our customer service department at 1-866-439-9800, 8 a.m. - 8 p.m., EST, Monday - Sunday.
-
Page 2: Package Contents
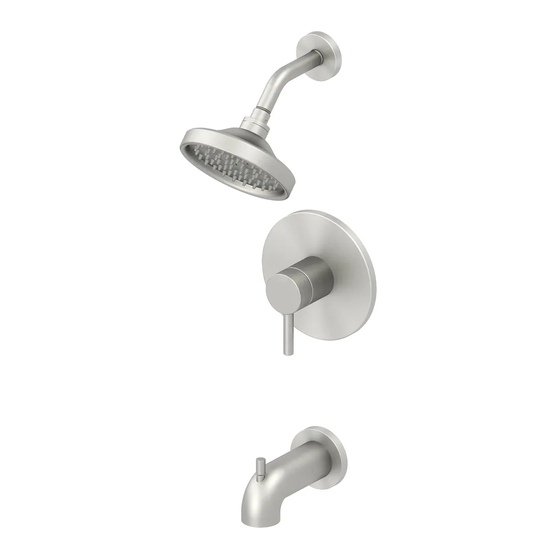
PACKAGE CONTENTS PART DESCRIPTION QUANTITY Shower Flange Shower Arm Showerhead Valve Body Escutcheon Handle Assembly Plug Tub Spout Plaster guard Screw Bonnet (Preassembled to Valve Body (D)) Cartridge (Preassembled to Valve Body (D)) -
Page 3: Safety Information
SAFETY INFORMATION Please read and understand this entire manual before attempting to assemble, operate, or install the product. WARNING • Follow the installation instructions carefully. Proper installation is the installer’s responsibility. • Failure to follow correct installation procedures can result in the faucet being loose, which can result in serious injury. - Page 4 ASSEMBLY INSTRUCTIONS 2. Unscrew the screws (J), and remove the plaster guard (I). 3. Installing the supply connections: a. Wrap thread sealant tape around the pipe threads in a clockwise direction, as shown. b. Connect the hot and cold water supply lines (1, not included), the shower (2, not included) and tub outlet pipes (3, not included) to the valve body (D).
- Page 5 ASSEMBLY INSTRUCTIONS 4. Back to back installation Normal If the hot and cold inlets are reversed (hot on right Installation and cold on left), remove the screw (I), inverter (J), (changes and bonnet (K) from the valve body (D) with reversed required) Cold supply connections.
- Page 6 ASSEMBLY INSTRUCTIONS 7. Install the shower arm (B): a. Insert the long end of the shower arm (B) through the flange (A), then wrap thread sealant tape around long end of the shower arm (B) in a clockwise direction, as shown. b.
- Page 7 ASSEMBLY INSTRUCTIONS 10. Checking for leaks: a. Attach the handle assembly (F) by threading the base of the handle assembly (F) onto the valve body (D) and twisting clockwise until secure. Turn the handle assembly (F) to the on position. b.
- Page 8 ADJUSTING THE TEMPERATURE LIMITER AND WATER FLOW ON THE VALVE The limiter on the valve can be set to allow partial or full access to hot water by limiting how far the handle can be turned to the hot side of the valve. The limiter is typically set at the factory to allow only warm water to pass through the valve.
- Page 9 ADJUSTING THE TEMPERATURE LIMITER AND WATER FLOW ON THE VALVE 3. To adjust for the desired maximum water temperature: a. For colder water, adjust the stop ring (1) in a For colder water For hotter water clockwise direction and reinstall the stop ring (1) onto the cartridge assembly (L).
-
Page 10: Care And Maintenance
CARE AND MAINTENANCE • Clean carefully by gently wiping with a grit-free damp cloth. • Use only mild soap with water. • Never use acids, harsh chemicals, or abrasive detergents to clean the faucet surface. TROUBLESHOOTING PROBLEM POSSIBLE CAUSE There is a leak from 1. -
Page 11: Warranty
WARRANTY This faucet has been manufactured under the highest standard of workmanship. All parts of this faucet are warranted to be free from leaks or drips during domestic use for as long as the original purchaser owns this product. THIS EXCLUDES INDUSTRIAL, COMMERCIAL, OR BUSINESS USE. The manufacturer will replace FREE OF CHARGE, under the warranty conditions the entire unit or any part (at our option) which proves defective in material and/or workmanship under normal installation, use and service. - Page 12 ARTÍCULO # 2517124 Grifo para bañera y ducha MODELO # 873X-732707 ADJUNTE SU RECIBO AQUÍ _________________________ _________________________ Número de serie Fecha de compra ¿Preguntas, problemas, piezas faltantes? Antes de volver a la tienda, llame a nuestro Departamento de Servicio al Cliente al 1-866-439-9800, de lunes a domingo de...
-
Page 13: Contenido Del Paquete
CONTENIDO DEL PAQUETE PIEZA DESCRIPCIÓN CANTIDAD Brida de la ducha Brazo de la ducha Cabezal de la ducha Cuerpo de la válvula Escudo de bocallave Ensamble de la manija Tapón Surtidor para bañera Protector de yeso Tornillo Bonete (preensamblado en el cuerpo de la válvula (D)) Cartucho (preensamblado en el cuerpo de la válvula (D)) -
Page 14: Información De Seguridad
INFORMACIÓN DE SEGURIDAD Lea y comprenda completamente este manual antes de intentar ensamblar, usar o instalar el producto. ADVERTENCIA • Siga atentamente las instrucciones de instalación. El instalador tiene la responsabilidad de realizar una instalación adecuada. • Si no sigue los procedimientos correctos de instalación el grifo puede soltarse y provocar lesiones graves. - Page 15 INSTRUCCIONES DE ENSAMBLAJE 2. Desatornille los tornillos (J) y retire el protector de yeso (I). 3. Cómo instalar las conexiones de suministro: a. Aplique cinta selladora para roscas alrededor de las roscas de la tubería en dirección de las manecillas del reloj, como se muestra.
- Page 16 INSTRUCCIONES DE ENSAMBLAJE 4. Instalación de parte posterior con posterior Instalación Si las entradas de agua caliente y fría se revierten normal (no (caliente a la derecha y fría a la izquierda), quita el se requieren cambios) tornillo (I), el inversor (J) y el bonete (K) del cuerpo Fría de la válvula (D) con conexiones de suministro revertidas.
- Page 17 INSTRUCCIONES DE ENSAMBLAJE 7. Instale el brazo de la ducha (B): a. IInserte el extremo largo del brazo de la ducha (B) a través de la brida (A), luego aplique cinta selladora para roscas alrededor del extremo largo del brazo de la ducha (B) en dirección de las manecillas del reloj, como se muestra.
- Page 18 INSTRUCCIONES DE ENSAMBLAJE 10. Detección de fugas: a. Instale el ensamble de la manija (F) enroscando la base del ensamble de la manija (F) en el cuerpo de la válvula (D) y girando en dirección de las manecillas del reloj. Gire el ensamble de la manija (F) a la posición de encendido.
- Page 19 CÓMO REGULAR EL LIMITADOR DE TEMPERATURA Y EL FLUJO DE AGUA DE LA VÁLVULA Puede regular el limitador de la válvula para permitir un acceso parcial o total de agua caliente, para esto debe limitar cuánto se puede girar la manija hacia el lado “caliente” de la válvula. Generalmente, el limitador de agua se configura en fábrica para permitir que solo agua tibia circule a través de la válvula.
- Page 20 CÓMO REGULAR EL LIMITADOR DE TEMPERATURA Y EL FLUJO DE AGUA DE LA VÁLVULA 3. Para ajustar en la temperatura máxima deseada del agua: Para agua más fría Para agua más caliente a. Para agua más fría, ajuste el aro de retención del límite rojo (1) hacia la derecha y vuelve a instalarlo (1) en el conjunto del cartucho (L).
-
Page 21: Cuidado Y Mantenimiento
CUIDADO Y MANTENIMIENTO • Limpie cuidadosa y suavemente con un paño limpio. • Lave solo con agua y jabón suave. • Nunca limpie la superficie con ácidos, agentes químicos fuertes ni detergentes abrasivos. SOLUCIÓN DE PROBLEMAS PROBLEMA CAUSA POSIBLE ACCIÓN CORRECTIVA Hay una filtración 1. -
Page 22: Lista De Piezas De Repuesto
GARANTÍA Este grifo ha sido fabricado bajo los estándares de mano de obra más elevados. Todas las piezas de este grifo están garantizadas contra fugas o goteos durante el uso doméstico mientras lo posea el propietario original. ESTO EXCLUYE EL USO INDUSTRIAL, COMERCIAL O EN OFICINA. El fabricante reemplazará...
Need help?
Do you have a question about the 873X-732707 and is the answer not in the manual?
Questions and answers
Why are there two off positions for water flow?
The Allen + Roth 873X-732707 does not have two off positions for water flow. It has a single off position controlled by the handle assembly. Water normally flows through the tub spout when the valve is on, and pulling the knob diverts water to the shower.
This answer is automatically generated
How do you take the handle off
To remove the handle from the Allen + Roth part number 873X-732707, twist the base of the handle assembly (F) counterclockwise to unthread it from the valve body (D).
This answer is automatically generated