Advertisement
Quick Links
Gima S.p.A. – Via Marconi, 1 - 20060 Gessate (MI) Italy
Italia: tel 199 400 401 – fax 199 400 403 – gima@gimaitaly.com
Export: phone + 39 02 953854209/221/225 – fax + 39 02 95380056 - export@gimaitaly.com
–
www.gimaitaly.com
Code 29613
LED COLPOSCOPE - 3 magnifications
User Manual
Advertisement

Related Manuals for Gima 29613


Summary of Contents for Gima 29613
- Page 1 Gima S.p.A. – Via Marconi, 1 - 20060 Gessate (MI) Italy Italia: tel 199 400 401 – fax 199 400 403 – gima@gimaitaly.com Export: phone + 39 02 953854209/221/225 – fax + 39 02 95380056 - export@gimaitaly.com – www.gimaitaly.com Code 29613...
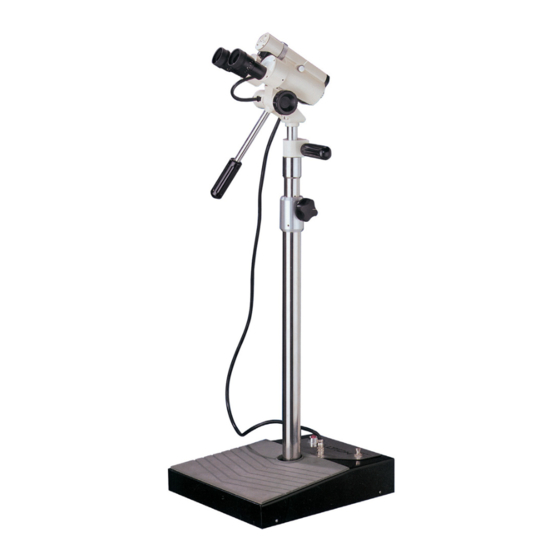
- Page 2 Three-Step Colposcope Featuring LED Light Source: LED Bulb Cover • Lasts longer • Cool to the touch • Gives you more of a sure color balance Diopter Knobs Three-Step Head Inclination Magnification Adjusting Knob Knob Rheostat Knob Fine Focus Handle Gross Height Adjustment and Locking Knob...
- Page 3 Three-Step Magnification Knobs Green Filter Knob LED Bulb Cover mm 3.75X3.5 7.5X2 These circles give you the millimeter size at the tissue site according to the magnification you’re using. Rheostat Knob Diopter Knobs Fine Height Adjustment Handle Fine Focus Handle Gross Height Adjustment and Locking Knob...
-
Page 4: Indications For Use
Indications for Use The ALLTION brand Colposcope is a device designed to permit viewing of the tissues of the vagina and cervix by a telescopic system located outside the vagina. A Colposcope is used to diagnose and examine abnormalities of the vagina and cervix. - Page 5 4. Setting Up the Colposcope A. Remove the power cord from the shipping box. B. Insert the power cord into the plug located at the back end of the base. C. Insert the other end of the power cord into the wal socket. Note: It must be a three-hole wal socket, in order to ensure proper grounding of the instrument.
- Page 6 6. Adjustment of the Eyepieces The interpupillary distance (IPD) is the distance in the spacing between a person’s eyes. To Adjust the IPD A. Turn on power by pressing the foot-switch on the base. On/off indica- tion light will come on. B.
- Page 7 7. Adjustment of the Diopter Knobs Focusing the Colposcope A. Set the Diopter Knobs at zero. B. Turn the Colposcope on, place your eyes against the eyepieces, and focus the Colposcope on a fixed object until that object appears clear and sharp.
- Page 8 8. Colposcope Instructions for Use The following briefly describes using the Colposcope with a patient. It is recommended that you practice using the Colposcope to familiarize yourself with all of the features it has to offer. A. With patient in lithotomy position, your Colposcope should be placed so that the head of the scope is 300mm from the area you wish to view, with the post to as near vertical as possible.
- Page 9 Move Head Up & Down If patient is not centered, you can move the Colposcope head in multiple directions to change your field of vision. See photos D–H. Move Head Left Move Head Right Fine Focus Handle Fine Height Adjustment Handle Twist the adjustment handle to Push the Fine Height Adjustment...
- Page 10 I. Adjust the Fine Focus Controls to provide clear, magnified views of the area to be examined. Rotate your left hand on the Fine Focus Handle which will finely move the optics towards or away from the object that you wish to view. Also, rotate your right hand which is on the Fine Height Adjustment Handle up or down to raise or lower the optics.
-
Page 11: Fuse Replacement
Fine Height Adjustment Handle 10. Moving the Colposcope A. Rotate the Gross Height Adjustment and Locking Knob to move the post to a comfortable position. B. Tighten the Gross Height Adjustment and Locking Knob. Gross Height C. Place your foot between the wheels at the front end of the base. Adjustment and Locking D. - Page 12 Congratulations for purchasing a GIMA product. This product meets high qualitative standards both as regards the material and the production. The warranty is valid for 12 months from the date of supply of GIMA. During the period of validity of the warranty, GIMA will repair and/or replace free of charge all the defected parts due to production reasons. Labor costs and personnel traveling expenses and packaging not included.
Need help?
Do you have a question about the 29613 and is the answer not in the manual?
Questions and answers