MAJORITY FITZWILLIAM 3 Instruction Manual
Smart internet radio tuner & music system
Hide thumbs
Also See for FITZWILLIAM 3:
- Instruction manual (24 pages) ,
- User manual (222 pages) ,
- User manual

Related Manuals for MAJORITY FITZWILLIAM 3


Summary of Contents for MAJORITY FITZWILLIAM 3
- Page 1 FI T ZWI L LI AM 3 Smart Internet Radio Tuner & Music System Instructions Guide...
-
Page 2: Table Of Contents
Setting the Alarm ................................26 Cancelling the Alarm ................................26 Speci cations and Warranty ....................27 Speci cation ..................................27 Support ....................................28 Warranty ....................................28 Safety Information ........................29 SAFETY PRECAUTIONS ..............................29 YEAR Register your product online for a FREE 3 year extended warranty at: www.majority.co.uk WARRANTY... -
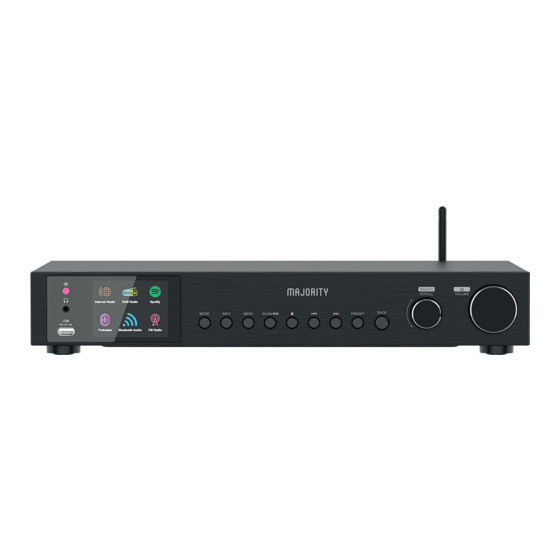
Page 3: Controls And Functions
Controls And Functions Front View 11. 8 Button 1. Remote Control Sensor 6. INFO Button 2. USB connection 7. MENU Button 12. PRESET Button 3. Earphone Jack 8. SCAN/12 Button 13. BACK Button 9. 3 Button 4. Display 14. SELECT/SCROLL Dial 10. -
Page 4: Remote Control
Controls And Functions Remote control 1. q Button 2. SLEEP Button 3. CLOCK Button 4. PAIR button 5. RANDOM Button 6. MODE Button 7. 12 w Button 8. 7 Button 9. SELECT Button 10. EQ Button 11. VOL +/− Buttons 12. -
Page 5: What's In The Box
What's in the Box? Box Contents A. Main Unit B. Instruction Manual C. Remote D. Antenna E. WLAN Antenna... -
Page 6: Instructions Guide
Instructions Guide Battery Replacement for the Remote Control 1. Press down the battery cover at “ ” and push the battery cover outwards in the direction of the arrow. 2. Insert 2 x AAA 1.5V batteries (not included). Make sure to match the (+) and ( - ) ends of the battery with the (+) and ( - ) ends indicated in the battery compartment. -
Page 7: Connection
Instructions Guide Connection 1. The audio input/output (analogue), optical out (digital) and coaxial out (digital) are available on the back of the unit to connect A/V ampli er or HiFi system. 2. Insert the DAB/FM antenna included in the product box into its port and extend to the desired length. -
Page 8: Getting Started
Instructions Guide Getting Started This instruction manual explains the basic instruction for operating this unit. Unless otherwise stated, all operations described are based on remote control use. Powering ON/OFF 1. Press the q/VOLUME dial on the unit or q button on remote control to switch the unit on. 2. - Page 9 Instructions Guide Initial Set-Up When you rst connect the unit to the mains socket, the display will show the welcome screen then with language menu shown up, turn SCROLL/SELECT dial on unit or press 12 w/s 3 buttons on remote control to change the display language of your choice and press the SCROLL/SELECT dial on unit or SELECT button on remote control to con rm.
- Page 10 Instructions Guide Pin (code number) The radio generates an 8-digit code number. Enter this code number into the wireless router or access device. Connecting using your wireless network password If your router has no WPS button you will now be asked to enter your wireless network password, or you can select SKIP WPS which also take you to the password screen.
- Page 11 Instructions Guide Press BACK button to exit and then press 7 / 8 buttons to select [YES]. Press SELECT button to con rm. The Display will show Equaliser Saved. My EQ p rofile setup Bass Bass: Treble: 0 Bass -14+ Network 1.
- Page 12 Instructions Guide Time/Date The Time/Date can be automatically set once it has been connected to the Internet, DAB or FM radio station with time/date information. You may also adjust the Time/Date manually. Press CLOCK button on remote control to access Set Time/Date menu to adjust Time/Date, Alternatively, - While in System settings mode, press 12 w/s 3 buttons to select Time/Date.
- Page 13 Instructions Guide Factory Reset There may be times when you need to reset your unit back to the factory settings especially when you have moved house. If you experience reception problems you may want to reset and try again. If you move to another part of the country and pick up the local and national DAB stations in that area, your previously tuned channels may no longer be available.
-
Page 14: Internet Radio
Instructions Guide Backlight 1. While in System settings mode, press 12 w/s 3 buttons to select Backlight and then press the SELECT button to con rm. 2. For the other settings under Backlight, press 12 w/s 3 buttons to select the following options and then press the SELECT button to con rm. - Page 15 Instructions Guide Station List If it is the rst time listen Internet radio, the radio will be in [Station List]. Press 12 w/s 3 buttons to select from the following options, and then press the SELECT button to con rm. "Countries"...
-
Page 16: Podcasts
Instructions Guide Internet Radio Display Modes Every time you press the INFO button on the unit or remote control, the display will show the following display modes: Channel Info/Description- Language/Location - Bit rate/Sound format/Sampling rate - Playback bu er - Date Podcasts To listen to Podcasts your radio must be connected to the internet. -
Page 17: Spotify Connect
Instructions Guide Saving and Recalling Preset Station - Refer to "Preset Stations" and "Recalling a Stored Station" under Internet Radio for instruction. Spotify Connect Use your phone, tablet or computer as a remote control for Spotify. Go to spotify.com/connect to learn how. Licenses The Spotify Software is subject to third party licenses found here: https://www.spotify.com/connect/third-party-licenses... - Page 18 Instructions Guide Playing Music via Music Player 1. Press SCAN/ 12 button on unit or 12/ w button on remote control to play/pause music or 2. Press 7 / 8 buttons on unit or remote control to skip to the previous/next track. My playlist 1.
-
Page 19: Dab Operation
Instructions Guide DAB Operation Press MODE button on unit or remote control to access Mode Menu. Turn the SCROLL/SELECT dial on unit or press 7 / 8 buttons on remote control to select DAB Radio mode, then press SCROLL/ SELECT dial on unit or SELECT button on remote control to con rm. The unit will enter DAB mode and perform the auto scan function. - Page 20 Instructions Guide DAB Display Modes Every time you press the INFO button on the unit or remote control, the display will show the following display modes: DLS – Programme Type – Ensemble/Frequency – Signal error/Strength – Bit rate/Codec/Channels – Date DLS (Dynamic Label Segment) This is a scrolling message giving real-time information, e.g.
-
Page 21: Fm Operation
Instructions Guide DRC (Dynamic Range Compression) If you are listening to music with high dynamic range in a noisy environment, you may wish to compress the audio dynamic range. 1. While in DAB mode, press the MENU button and press 12 w/s 3 buttons to select DRC and press the SELECT button to con rm. - Page 22 Instructions Guide Manual Tuning To search for FM stations manually, turn the SCROLL/SELECT dial on unit or press 12 w/s 3 buttons on remote control repeatedly until your desired frequency is reached. With FM radio, it may be necessary to ne tune each station by turning the SCROLL/SELECT dial on unit or pressing 12 w/s 3 buttons on remote control repeatedly.
-
Page 23: Bluetooth Operation
2. If the unit is not paired with any Bluetooth device, the bluetooth logo will start to ash to show the unit in pairing mode. 3. Activate your Bluetooth device and select the search mode. “Majority Fitzwilliam 3” will appear on your Bluetooth device list. -
Page 24: Auxiliary Input
Instructions Guide Auxiliary Input You can play sound from an external device via the device 1. Connect the external device to the Analog Audio Input on the device through suitable AUX cable (not include). 2. Press MODE button on unit or remote control to access Mode Menu. Turn the SCROLL/SELECT dial on unit or press 7 / 8 buttons on remote control to select AUX In mode, then press SCROLL/SELECT dial on unit or SELECT button on remote control to con rm. -
Page 25: Using Headphones
Instructions Guide Using headphones Do not listen to music at high volume when using headphones. Doing so can cause permanent hearing impairment. Turn the tuner volume level to the lowest before using headphones. > Only use headphones with a 3.5 mm jack plug. >... -
Page 26: Setting The Alarm
Instructions Guide Setting the Alarm 1. Press ALARM button on the remote control, the display shows “Alarm (1 or 2): O [hh:mm]”. 2. Press 12 w/s 3 buttons to select the Alarm number (1 or 2) and then press the SELECT button to start the setting of the following parameters. -
Page 27: Speci Cations And Warranty
Speci cations and Warranty Speci cation Brand Majority Model Fitzwilliam 3 System Section Power Supply AC100-240V ~ 50/60Hz Power Consumption 7.8W Working Environment - 0 ~ 35 °C Temperature Net Weight Main unit: app. 2.3 kg Unit Dimension (W) × (D) ×... -
Page 28: Support
Thank you for purchase of Majority Fitzwilliam 3. Please follow the guidance of the manual to set up your device and enjoy its fantastic features. If you require further assistance with your new device, please contact our support team on the Majority website: https://www.majority.co.uk/support... -
Page 29: Safety Information
Safety Information SAFETY PRECAUTIONS - Read all the instructions carefully before using the unit and keep them for future reference. - Check that the voltage marked on the rating label matches your mains voltage. - The unit must be placed on a at stable surface and should not be subjected to vibrations. - Do not place the unit on sloped or unstable surfaces as the unit may fall o or tip over. - Page 30 Safety Information Mains Cable Make sure the unit is not resting on top of the mains cable, as the weight of the unit may damage the mains cable and create a safety hazard. If the mains cable is damaged it must be replaced by the manufacturer, its service agent, or similarly quali ed persons in order to avoid a hazard.
- Page 31 Under the environment with radio-frequency disturbance, the product may malfunction and could self- recover when the interference disappear. Keep these instructions. Instructions are all available for download at www.majority.co.uk IMPORTANT: Please read all instructions carefully before use and keep for future reference...
- Page 32 EU RP: AR Experts, P.O. Box 5047, 3620 AA Breukelen, The Netherlands US: lzilla Ltd, C/0 A.N. Deringer, Inc., 19520 Wilmington Ave, Rancho Dominguez, CA, 90220 Majority is owned and operated by iZilla Ltd. Registered in England with Company No: 08520738...
Need help?
Do you have a question about the FITZWILLIAM 3 and is the answer not in the manual?
Questions and answers