
Related Manuals for Lamona LAM3708


Summary of Contents for Lamona LAM3708
- Page 1 Built-in Single Pyrolytic Oven LAM3708 LAM3709 Instructions and Installation www.howdens.com/appliance-registration ISSUE v3. 030522...
- Page 2 Built-in Single Pyrolytic Oven LAM3708 LAM3709 www.howdens.com...
- Page 3 Instructions and Installation Welcome Dear Customer, Congratulations on your choice of oven. The user manual will help you use your product quickly and safely. • Please read this user manual before installing and using the oven. • Always follow the safety instructions. •...
-
Page 4: Table Of Contents
Built-in Single Pyrolytic Oven LAM3708 LAM3709 Contents 1. Safety instructions 4. First use Purpose of usage First time setting Child, vulnerable person First cleaning and pet safety 5. How to operate the oven Electrical safety General information Transportation safety on oven usage... -
Page 5: Safety Instructions
Instructions and Installation 1. Safety instructions • This section contains safety instructions that will help prevent any risks of personal injuries or material damage. • If the product is transferred to another person or used second hand, the operating manual, product labels, other relevant documents and accessories should be delivered with the product. -
Page 6: Child, Vulnerable Person And Pet Safety
Built-in Single Pyrolytic Oven LAM3708 LAM3709 Child, vulnerable person and pet safety • This product can be used by children 8 years of age and older, and people who are underdeveloped in physical, sensory or mental skills, or lack of experience and knowledge, as long as they are supervised or trained about the safe use and hazards of the product. -
Page 7: Transportation Safety
Instructions and Installation • Do not wire the product into an outlet that is loose, has come out of its socket, is broken, dirty, oily, with risk of water contact (for example, water that may leak from the counter). • Never touch the electrical connection with wet hands! To remove appliance, do not pull the cord. -
Page 8: Installation Safety
Built-in Single Pyrolytic Oven LAM3708 LAM3709 Installation safety • Before the product is installed, check the product for any damage. If the product is damaged, do not install it. • Do not install the product near heat sources (radiators, stoves, etc.). -
Page 9: Accessory Use
Instructions and Installation Accessory use • It is important that the wire grill and tray are placed properly on the wire shelves. For detailed information, refer to the section “Usage of accessories”. • Accessories can damage the door glass when closing the product door. -
Page 10: Maintenance And Cleaning Safety
Built-in Single Pyrolytic Oven LAM3708 LAM3709 Maintenance and cleaning safety • Wait for the product to cool before cleaning the product. Hot surfaces may cause burns! • Never wash the product by spraying or pouring water on it! There is an electric shock hazard! •... -
Page 11: General Warnings About Cooking In The Oven
Instructions and Installation General warnings about cooking in the oven WARNING! Risk of fire! • Do not place aluminium foil • Do not line the grill tray or any or baking trays on the base of baking trays with aluminium foil. the oven when in use. -
Page 12: Environmental Instructions
Built-in Single Pyrolytic Oven LAM3708 LAM3709 2. Environmental Instructions Waste regulation Compliance with the WEEE Directive and disposing of the Waste Product This product complies with EU WEEE Directive (2012/19/EU). This product bears a classification symbol for waste electrical and electronic equipment (WEEE). -
Page 13: Your Product
Instructions and Installation 3. Your product Product introduction Control panel Ventilation holes Top heater Lamp* Wire shelves** Fan motor Shelf (behind positions steel plate) Bottom heater (bottom steel plate) Door Handle *It depends on the model. Your product may not have a lamp, or the type and location of the lamp may differ from the illustration. -
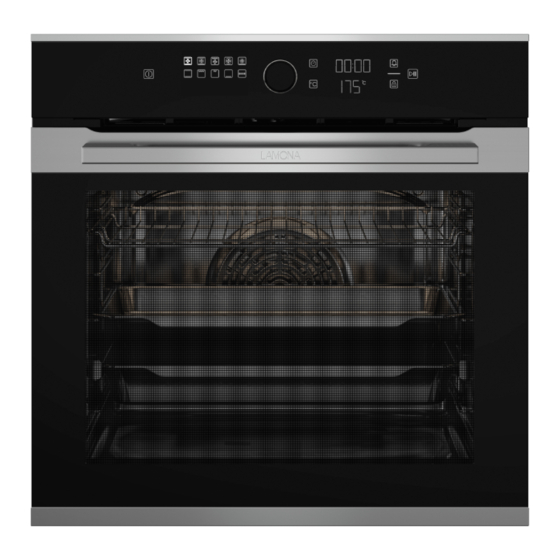
Page 14: Product Control Panel Introduction And Usage
Built-in Single Pyrolytic Oven LAM3708 LAM3709 Product control panel introduction and usage In this section, you can find the overview and basic uses of the product’s control panel. There may be differences in images and some features depending on the type of product. -
Page 15: Oven Operating Functions
Instructions and Installation Displays Clock/time display Cooking time/Day time symbol Alarm symbol Settings symbol Key lock symbol Low level steam symbol* High level steam symbol* Meat probe symbol* Eco fan cooking symbol Keys: *It varies depending on the product model. It may not be available on Time and settings key your product. - Page 16 Built-in Single Pyrolytic Oven LAM3708 LAM3709 Function Function Temperature Description and use symbol description range (°C) The hot air heated by the upper and lower Fan assisted heaters is distributed equally and rapidly bottom/top 40 - 280 throughout the oven with the fan. Cooking is heating done with a single tray.
-
Page 17: Product Accessories
Instructions and Installation Product accessories There are various accessories in your product. In this section, the description of the accessories and the descriptions of the correct usage are available. Depending on the product model, the supplied accessory varies. All accessories described in the user guide may not be available in your product. -
Page 18: Use Of Product Accessories
Built-in Single Pyrolytic Oven LAM3708 LAM3709 Use of product accessories Placing the tray on the cooking shelves Cooking shelves It is also crucial to place the trays There are 5 levels of shelf position on the wire side shelves properly. - Page 19 Instructions and Installation Stopper function of the Proper placement of the wire grill wire grill tray and tray on the telescopic rails There is also a stopper function to Thanks to telescopic rails, trays or prevent the tray from tipping out the wire grill can be easily installed of the wire shelf.
-
Page 20: Technical Specifications
Built-in Single Pyrolytic Oven LAM3708 LAM3709 Technical specifications General specifications Product external dimensions 595mm / 594mm / 567mm (height/width/depth) Oven installation dimensions 590 or 600mm / 560mm / min. 550mm (height/width/depth) Voltage / frequency 220-240 V ~ 50 Hz Cable type and cross section min. -
Page 21: First Use
Instructions and Installation 4. First use Before you start using your product, ›› Hour field and symbol flashes it is recommended to do the on the time/clock display. following in the following sections. First time setting Always set the time of day before using your oven. -
Page 22: First Cleaning
Built-in Single Pyrolytic Oven LAM3708 LAM3709 First cleaning Before using the accessories; Clean the accessories you remove 1. Remove all packaging from the oven with detergent materials. water and a soft cleaning sponge. 2. Remove all accessories from NOTICE The surface might get... -
Page 23: How To Operate The Oven
Instructions and Installation 5. How to operate the oven General information on In some operating functions, the lamp does not light due to oven usage energy savings. Cooling fan (It may not exist on Operation of the oven your product.) control unit Your product has a cooling fan. - Page 24 Built-in Single Pyrolytic Oven LAM3708 LAM3709 Clock/time display On/Off key Cooking time/Day time symbol Function display Alarm symbol Oven control knob Settings symbol Temperature key Key lock symbol Temperature display Low level steam symbol* High level steam symbol* Key lock key...
- Page 25 Instructions and Installation Turning on the oven 1. Turn on the oven by touching the key. ›› After the oven is turned on, the first operating function is displayed on the display. On this 3. Touch on the operating function display, the operating function, you want to cook on function temperature, cooking time,...
- Page 26 Built-in Single Pyrolytic Oven LAM3708 LAM3709 If you change the operating symbol lights up as the oven function after changing the interior temperature reaches predefined temperature the set temperature. The oven for the operating functions, does not turn off automatically...
- Page 27 Instructions and Installation 3. Touch on the operating function If you change the operating you want to cook on function function after changing the display. If the function you want predefined temperature to select is not among the first for the operating functions, operating functions that appear the temperature you on the function display, you...
- Page 28 Built-in Single Pyrolytic Oven LAM3708 LAM3709 ›› Your oven will start operating After setting the operation immediately at the selected function and temperature, function and temperature. The cooking time will be set 30 set cooking time starts to count minutes by touching the down.
-
Page 29: Bread Function
Instructions and Installation Bread function Your oven has a “Bread function” specially defined for bread making. The temperature and time settings of the function are fixed. ›› The 3- 2- 1 count down is Ingredients displayed. When the countdown • 500 g flour expires, symbol will appear and the “Eco fan cooking”... - Page 30 Built-in Single Pyrolytic Oven LAM3708 LAM3709 6. Take your dough, which has been fermented for 60 minutes, on the counter and fold it 4-5 times and remove the air inside. Apply 1 teaspoon of sunflower oil on the dough and cover it with stretch film so that it touches 12.
-
Page 31: Settings
Instructions and Installation Settings The key lock will not be cancelled in case of power The 3-2-1 count down is failure. displayed on the menus Deactivating the key lock or settings that shall be activated by touching for a 1. Touch the key until the long period. - Page 32 Built-in Single Pyrolytic Oven LAM3708 LAM3709 2. Set the alarm time to “00:00” by rotating the oven control knob to right/left. Setting the volume You may set the volume of the timer. Your oven shall be off to perform this operation.
- Page 33 Instructions and Installation 4. Set the desired volume level by 3. Activate the brightness setting rotating oven control knob to by touching the key or right/left. pressing to oven control knob. 5. Confirm the selected volume ›› symbol flashes on the time/ level by touching the key or clock display.
- Page 34 Built-in Single Pyrolytic Oven LAM3708 LAM3709 Setting the Quick pre-heating (Booster) function You may operate the cooking automatically with the timer using the quick pre-heating function. For this purpose, you shall activate the quick pre-heating setting. Your 4. Rotate the oven control knob to oven shall be off to perform this right/left to change the “OFF”...
- Page 35 Instructions and Installation Changing the time of day To change the time of day that you have previously set. 1. When the oven in stand-by mode, activate the settings menu by touching key for about 3 seconds. 4. Set the minute by rotating the oven control knob to right/ ››...
-
Page 36: General Information About Cooking
Built-in Single Pyrolytic Oven LAM3708 LAM3709 6. General information about cooking This section describes tips on • For foods that you will cook preparing and cooking your food. according to your own recipe, you can reference similar foods In addition, you can also find some given in the cooking tables. - Page 37 Instructions and Installation • If preheating is recommended • If the cake is moist, use a small in the cooking table, be sure to amount of liquid or reduce the put your food in the oven after temperature by 10°C. preheating.
- Page 38 Built-in Single Pyrolytic Oven LAM3708 LAM3709 Cooking table for pastries and oven food Cooking Tray Accessory Operating Shelf Temperature Food time (min) amount to be used function position (ºC) (approx.) Top and bottom Cakes in tray Single tray Standard tray*...
- Page 39 Instructions and Installation Cooking Tray Accessory Operating Shelf Temperature Food time (min) amount to be used function position (ºC) (approx.) Top and bottom Single tray Standard tray* 20 - 30 heating Shortbread Single tray Standard tray* Fan Heating 15 - 25 (sweet cookie) 2 - Standard tray* 2 trays...
-
Page 40: Meat, Fish And Poultry
Built-in Single Pyrolytic Oven LAM3708 LAM3709 Meat, Fish and Poultry The key points on roasting • After the cooking time is over, leave the meat in the oven for • Seasoning it with lemon juice about 10 minutes. The juice of... -
Page 41: Grill
Instructions and Installation Grill Red meat, fish and poultry meat • Place the pieces to be grilled will quickly turn brown when on the wire grill or wire grill tray grilled, hold a beautiful crust by distributing them without and do not dry out. Fillet meats, exceeding the dimensions of skewer meats, sausages as well the heater. -
Page 42: Maintenance And Care
Built-in Single Pyrolytic Oven LAM3708 LAM3709 7. Maintenance and care General cleaning information • Do not wash any component of General warnings your appliance in a dishwasher. • Wait for the product to cool before cleaning the product. Inox and stainless surfaces Hot surfaces may cause burns! •... - Page 43 Instructions and Installation • For persistent stains, the oven • If there is residual detergent and grill cleaner recommended after cleaning, wipe it with cold on the website of your product water and dry with a clean and brand and a non-scratching dry microfibre cloth.
-
Page 44: Cleaning The Accessories
Built-in Single Pyrolytic Oven LAM3708 LAM3709 Cleaning the accessories Cleaning the side walls of the oven Unless otherwise stated in the user The side walls in the cooking manual, do not wash the product area can only be covered with accessories in the dishwasher. -
Page 45: Pyrolytic Self-Cleaning
Instructions and Installation Pyrolytic self-cleaning Do not clean the door gasket. Fibre glass gasket is Hot surfaces cause burns! highly sensitive and can get Do not touch the product damaged easily. In case of during self-cleaning step a damage on the oven door and keep children away gasket, replace with the new from it. - Page 46 Built-in Single Pyrolytic Oven LAM3708 LAM3709 Remove all accessories, telescopic shelf and side racks prior to using the Pyrolytic self- cleaning function. Failure to do so will result in damage to the accessories and side rack. If your oven is not very dirty, 8.
- Page 47 Instructions and Installation 5. Touch on the “Pyrolysis” function 8. When the oven reaches a on the lower row of function certain temperature after display. the self-cleaning process starts, the lock symbol appears on the time display and oven door cannot be opened. It remains locked for a while after the pyrolysis function ends.
-
Page 48: Cleaning The Oven Door
Built-in Single Pyrolytic Oven LAM3708 LAM3709 Cleaning the oven door Do not use harsh abrasive cleaners, metal scrapers, wire wool or bleach materials to clean the oven door and glass. You can remove your oven door and door glasses to clean them. -
Page 49: Removing The Inner Glass Of The Oven Door
Instructions and Installation Removing the inner glass of 3. As shown in the figure, gently lift the innermost glass towards ‘A’ the oven door and then, remove it by pulling towards ‘B’. Inner glass of the product’s front door of may be removed for cleaning. - Page 50 Built-in Single Pyrolytic Oven LAM3708 LAM3709 The first step of regrouping the door is to replace the second and third glasses (2, 3). As shown in the figure, place the bevelled edge of the glass to meet the bevelled edge of the plastic slot.
-
Page 51: Cleaning The Oven Lamp
Instructions and Installation Cleaning the oven lamp • The lamps used in this product must withstand extreme In the event that the glass door physical conditions such as of the oven lamp in the cooking temperatures above 50°C. area becomes dirty; clean If your oven has a round lamp;... -
Page 52: Troubleshooting
Built-in Single Pyrolytic Oven LAM3708 LAM3709 8. Troubleshooting Consult the Authorised Service Agent or technician with license or the dealer where you have purchased the product if you cannot remedy the trouble although you have implemented the instructions in this section. - Page 53 Instructions and Installation Error codes/reasons and possible solutions Error codes Error reasons Possible solutions Turn off at the isolation switch for the oven, wait 10 seconds and then switch back on at the isolation Er 1 - Er 7 Communication errors switch for the oven.
-
Page 54: Installation
Built-in Single Pyrolytic Oven LAM3708 LAM3709 9. Installation If the product is to be placed Connecting the appliance under the counter: (Figure 2) to the electricity supply • In order to provide the • Only connect the product to necessary ventilation in the... - Page 55 Instructions and Installation • Rear surface of the oven gets the product. Open the front hot when it is in use. Make sure door to see the type label. that the electrical connection • Power cable of your product does not come into contact must comply with the values in with the rear surface otherwise, “Technical specifications”...
- Page 56 Built-in Single Pyrolytic Oven LAM3708 LAM3709 If the product is produced • After completing the wire with cable and without plug connections, close the terminal block cover. • A power cable that it is defined in the technical table home •...
- Page 57 Instructions and Installation Final check Removing the product • After installation, turn on • Disconnect the product from the mains supply. the mains supply. • Read the user manual for • Unscrew the fastening screws. the first use of the product. Lift the product lightly with •...
- Page 58 Built-in Single Pyrolytic Oven LAM3708 LAM3709 Figure 1 Figure 2 *Any cut edges should be sealed with a water proof varnish or PVA. All installation dimensions shown are in millimetres. www.howdens.com...
- Page 59 Instructions and Installation Figure 3 Figure 4a Figure 4b Figure 5...
-
Page 60: Your Guarantee
• Your full contact details. Call the Depot number on your Proof of Purchase Document supplied with the product/kitchen. Call the LAMONA Service Line on: Within the UK: 0344 460 0006 Within Republic of Ireland: 01525 5703 • Product installed within a domestic kitchen or a non-domestic kitchen where 8 or fewer people are using the appliance. - Page 61 Instructions and Installation Notes _____________________________________________________________________ _____________________________________________________________________ _____________________________________________________________________ _____________________________________________________________________ _____________________________________________________________________ _____________________________________________________________________ _____________________________________________________________________ _____________________________________________________________________ _____________________________________________________________________ _____________________________________________________________________ _____________________________________________________________________ _____________________________________________________________________ _____________________________________________________________________ _____________________________________________________________________ _____________________________________________________________________ _____________________________________________________________________ _____________________________________________________________________ _____________________________________________________________________...
- Page 62 Built-in Single Pyrolytic Oven LAM3708 LAM3709 Notes _____________________________________________________________________ _____________________________________________________________________ _____________________________________________________________________ _____________________________________________________________________ _____________________________________________________________________ _____________________________________________________________________ _____________________________________________________________________ _____________________________________________________________________ _____________________________________________________________________ _____________________________________________________________________ _____________________________________________________________________ _____________________________________________________________________ _____________________________________________________________________ _____________________________________________________________________ _____________________________________________________________________ _____________________________________________________________________ _____________________________________________________________________ _____________________________________________________________________ www.howdens.com...
- Page 63 Instructions and Installation Notes _____________________________________________________________________ _____________________________________________________________________ _____________________________________________________________________ _____________________________________________________________________ _____________________________________________________________________ _____________________________________________________________________ _____________________________________________________________________ _____________________________________________________________________ _____________________________________________________________________ _____________________________________________________________________ _____________________________________________________________________ _____________________________________________________________________ _____________________________________________________________________ _____________________________________________________________________ _____________________________________________________________________ _____________________________________________________________________ _____________________________________________________________________ _____________________________________________________________________...
- Page 64 Product serial number (Place sticker here) REPRISE À DÉPOSER À DÉPOSER À LA LIVRAISON EN MAGASIN EN DÉCHÈTERIE Cet appareil se recycle Howden Joinery Ltd, Thorpe Road, Howden, East Yorkshire, DN14 7PA Imported in EU by: Houdan Cuisines SAS, Z.A. du Bois Rigault Nord, 1Rue Calmette, 62880 Vendin-le-Vieil, Cedex, France.
Need help?
Do you have a question about the LAM3708 and is the answer not in the manual?
Questions and answers