Table of Contents
Advertisement
Quick Links
Advertisement
Chapters
Table of Contents

Related Manuals for Docomo P-07B


Summary of Contents for Docomo P-07B
- Page 1 P-07B ’10.9 INSTRUCTION MANUAL...
- Page 2 (In Japanese only) For Using This Manual http://www.nttdocomo.co.jp/support/trouble/manual/ Note that “P-07B” is referred to as “FOMA terminal” in this manual. download/index.html Most operating procedures and displays in this manual are shown ※ Note that the URL and published contents may be modified with the default settings of the “Black”...
-
Page 3: Table Of Contents
Introduction FOMA Terminal ····································2 Precautions ··········································6 Contents What You can Do with P-07B ···············3 Handling Precautions ························13 P.1 ~ ▶ Part Names and Functions ··················4 Before Using ·····························16 Character Entry·························26 Lock/Security ····························33 Basic Charging, Power ON/OFF, etc. Various Security Codes,... -
Page 4: Foma Terminal
SSL/TLS. In the event that the user shall sustain damage or loss due to the use of SSL/TLS, neither DOCOMO nor the certifi ers shall be responsible for any such damage or loss. -
Page 5: What You Can Do With
What You can Do with P-07B 使いかたナビ (Guide) ○○ Railway eco Mode ▶ P.33 Suspension of the You can check “使いかたナビ (Guide)” You can easily switch to service now... on screen for how to operate a the eco Mode to minimize function you want. -
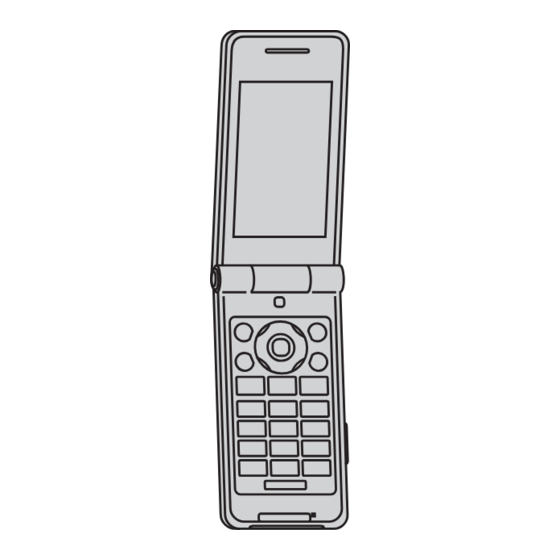
Page 6: Part Names And Functions
Part Names and Functions ❶■ E arpiece ❼- �+ d Start key/Hands-free c Camera key/1Seg key ❶ For listening to the other party’s switch key �- h Power/End key voice ❽■ M icrophone For turning on/off the power or ❷ Display For speaking to the other party ending a call ❷... - Page 7 � Call/Charging indicator � <Side ▲ key � Lights while you are receiving a call or For turning up the earpiece volume during a call message, talking, or charging. �. > Side ▼ key � � Private window For turning down the earpiece volume during a call �...
-
Page 8: Precautions
Precautions ALWAYS FOLLOW THESE DIRECTIONS ■ Before using the FOMA terminal, read these safety precautions ■The following symbols show specifi c directions: carefully so that you can use it correctly. After reading the precautions, keep them in a safe place. Denotes actions prohibited to do. - Page 9 Otherwise, injury may result. With your FOMA terminal, use Keep out of the reach of babies the batteries and adapters and infants. specifi ed by NTT DOCOMO, INC. Accidental swallowing or injury may Fire, burns, injury or electric shock may result. result.
- Page 10 Take special care when you Turn off the FOMA terminal in Turn off the FOMA terminal when near electronic devices using high- use the FOMA terminal for places where use is prohibited precision control or weak signals. a long time with the adapter such as in airplanes and hospitals.
- Page 11 Do not use the FOMA terminal if Be careful not to get your finger Do not throw the battery into fire. or a strap caught in the parts it has been damaged. Otherwise, the battery pack may ignite, when you close or open the burst or overheat and its electrolyte may Fire, burns, injury or electric shock may FOMA terminal.
- Page 12 Fire, burns or electric shock may result. electric shocks. such as a docomo Shop or dispose of it AC adapter: 100 V AC in accordance with local waste disposal If a thunderstorm is nearby, do DC adapter: 12/24 V DC regulations.
- Page 13 When you do not intend to use If you use an implanted cardiac the adapter for a long period Warning pacemaker or implanted of time, disconnect the power defibrillator, use the FOMA plug from the power outlet or Pull the terminal 22 cm or more away Comply with the following in power plug...
- Page 14 ■List of materials used Where it is used Material/Finishing Cosmetic part of Private window Polycarbonate/tin vapor deposition + UV Where it is used Material/Finishing surface coating Outer casing Display surface, Polycarbonate + glass fiber/UV coating One-push open button Polycarbonate Projection part of hinge area Metal part of the one-push open Aluminum/alumite treatment...
-
Page 15: Handling Precautions
Handling Precautions ■Do not apply excessive force onto the ■Do not insert an external device to the General notes FOMA terminal and battery pack. connector terminal (earphone/microphone If you put the FOMA terminal in a bag along ■Do not wet the equipment. terminal) at a slant when connecting, and with many other articles or sit with the FOMA do not pull it out when it is inserted. - Page 16 UIMs to a handling counter remaining life. observe the instructions given in that such as a docomo Shop. ■Depending on how the battery pack is instruction manual. ■Do not damage, carelessly touch, or short- used, it might swell as its operating life ■Do not give a strong shock.
- Page 17 Caution ■Do not use the modified FOMA terminal. Using a modified FOMA terminal infringes the Radio Law. The FOMA terminals are granted technical regulations conformity certification as the specified radio equipment under the Radio Law and bear a “technical conformity mark ”...
-
Page 18: Before Using
Attach the battery pack. Attach the battery pack. Before Using Projection With the arrow mark facing up, With the arrow mark facing up, Attaching UIM (FOMA Card)/ Battery Pack fi t the tab side of the battery pack to the FOMA terminal Remove the back cover. - Page 19 You cannot use the UIM (blue) on your FOMA indicator of the AC Adapter of the AC Adapter terminal. If you have that blue one, have it replaced at (option) horizontally a docomo Shop. Lock claw with its engraved side facing down into the Connector connector terminal of...
- Page 20 ■ Charging Only with the AC Adapter Turning Power ON Pull out the cover Pull out the cover Cover h for at Press and hold of the connector of the connector least one second. terminal in After the Wake-up display is direction A, Release Connector...
- Page 21 Confi guring Initial Setting Checking Your Own Phone Number The Initial Setting display appears when you turn on m from the Stand-by the power for the fi rst time. ▶ display display Phonebook Set the date and time. Set the date and time. ▶...
-
Page 22: Screen Explanation
Screen Explanation Viewing Display/Icon Battery level (estimate) Status icon ········ Vibrator is set. Full ········ Ring Volume is set to When is shown, charge the battery. “Silent”. Depending on the usage ········ In Manner Mode state, the battery level indication ····... - Page 23 Private Window Notifi cation icon ····· New i-mode mail or Various information is displayed on the Private window like the following examples: ······Missed call Information is displayed for about 15 seconds in < > with the FOMA cases such as when you press ·······Record message terminal closed.
- Page 24 Navigation Displays and Key Operations Play back an Animation on the Private Window When you close FOMA terminal, an animation is Key operations you can perform while you are played back on the Private window when “Illum. when operating a function are shown at the bottom of the closed”...
- Page 25 ■Command navigation key Navigation Displays while Dialing Enter numeric strings on the Stand-by display. Then Moves the cursor or Moves the cursor to the key operations of the several available function appear highlighted display up. (Hold right. on the display according to the number of digits. You Scrolls forward page by down to scroll continuously.) can now get the target function with a single key press.
- Page 26 ■Simple Menu Menu Operation ■Main Menu Simple Menu is a menu focusing on only basic functions for easy operation. By setting “Menu icon m from the Stand-by display to show Main Menu. Press setting” to “Simple menu”, you can show the Simple m from the Stand-by display.
- Page 27 Function menu Functions Starting with Simple Operation When “ ” is displayed at the lower right of the Depending on the function, you can start it either by display, you can use functions such as Store, Edit, and selecting a menu item or by key operation from the Delete by pressing Stand-by display.
-
Page 28: Character Entry
Character Entry You can enter characters on the Registration display for Phonebook entries or the Composition display for mail messages, etc. Switch between input modes. Switch between input modes. Convert/fi x characters. Each time you press Each time you press o to specify the area 1. - Page 29 <Example> Entering “タダの菓子” in a text memo. m from the Stand-by o to move the ▶ display display Stationery cursor onto “の”. cursor onto “ ▶ Text memo ▶ Select <Not recorded>. o to move the Enter hiragana characters Enter hiragana characters in Kanji/Hiragana input in Kanji/Hiragana input cursor onto the candidate...
-
Page 30: Sound/Screen Setting
Sound/Screen Setting Adjusting Ring Volume <Example> Adjusting the ring volume for incoming Changing Ring Tone voice calls m from the Stand-by display <Example> Changing the ring tone for incoming voice ▶ ▶ ▶ Set./Service Sound Ring volume calls m from the Stand-by display Select “Phone”. - Page 31 Using Manner Mode Setting Keypad Sound OFF With a single key press, you can set a tone from the You can silence a Keypad sound for when you press a FOMA terminal such as a ring tone, keypad sound, key. and alarm sound silent.
- Page 32 ■ ■ Changing the Display Brightness Making Display Hard to Be Seen by the People Around You can set Backlight to OFF. Then the display dims, and the key light turns off. You can also set the time You can set “View blind” to make it harder for the that elapses before Power Saver Mode activates.
- Page 33 ■ Changing Font Size Using Kisekae Tool You can change font sizes at a time. You can set the ring tone, Stand-by display, menu m from the Stand-by display icons and others at a time. ▶ ▶ Set./Service Display m from the Stand-by display ▶...
- Page 34 Changing Illumination Checking Missed Calls and New Mail by Tone and Call/Charging Indicator You can set the pattern of the illuminations such as for incoming calls and talking at a time. With the FOMA terminal closed, you can check for m from the Stand-by display missed calls, new mail and others.
-
Page 35: Lock/Security
(your copy) that is handed over to you at a docomo Shop at the time of contract. If your 2. Put a check mark for items to be set. contract has been made at a shop other than a docomo 3. - Page 36 When the PIN1 Code/PIN2 Code Entry display This is a four-digit number required for your identification appears, enter your four-to-eight digit PIN1 code/PIN2 when you place an order at a docomo Shop, docomo Information Center, or “お客様サポート (User support)” code and press site, or when you use respective network services.
- Page 37 You can set your FOMA terminal not in succession, the UIM is locked. In that case contact to be used by a third party. one of docomo Shops. You can do no operations other than answering calls and turning on/off ■...
- Page 38 ※Unavailable from some IP phones. ▶ Call setting w/o ID You can set/release also from the My docomo site via your personal computer or other devices. (In Japanese only) Enter your Terminal Security Code Enter your Terminal Security Code Personal Data You can lock functions which ▶...
- Page 39 The items indicated by might include the functions ■Inquiries which do not return to their default settings or state. DOCOMO corporate service website m from the Stand-by display docomo Business Online From personal computers ▶...
-
Page 40: Call Telephone
■ Making a Call from Phonebooks Call Telephone <Example> Search a Phonebook entry by the name Making a Call/Videophone Call stored in Phonebook ■Enter a Phone Number to Make a Call o from the Stand-by display. Press Press From the Stand-by display, enter a From the Stand-by display, enter a Select “Name?”. - Page 41 (Received call from Japan. Press Press Contact “docomo Information Center” on the back page Calls) from the Stand-by display. Calls) from the Stand-by display. of this manual for inquiries about WORLD CALL. When using international carriers other than DOCOMO, Select a call record.
-
Page 42: Receiving A Call/Videophone Call
Receiving a Call/Videophone Call When You cannot Answer a Call ■ Activate Record Message A call comes in. A call comes in. By activating Record Message, you can record a The ring tone sounds and the Call/Charging indicator The ring tone sounds and the Call/Charging indicator caller’s voice/video message when you cannot answer lights. - Page 43 ■ ■ Using Public Mode (Drive Mode) Using Public Mode (Power Off) Once you activate Public mode (Drive mode), the Once you activate Public mode (Power off), the guidance is played back telling that you cannot guidance is played back when receiving a call while answer the call as you are currently driving or in a the power is off, telling that you cannot answer place where you should refrain from speaking on the...
- Page 44 The network services are not available when you are out of the service area or out of reach of radio waves. For details, refer to “Mobile Phone User’s Guide [Network Services]”. For subscriptions and inquiries, contact “docomo Information Center” on the back page of this manual. Service...
- Page 45 ■ ■ Using Voice Mail Service Using Call Waiting Service m from the Stand-by display m from the Stand-by display ▶ ▶ ▶ ▶ Set./Service NW services Set./Service NW services ▶ ▶ Voice mail Call waiting To activate the service To activate the service ▶...
- Page 46 Services Available for FOMA Terminal Available services Phone number Available services Phone number Directory assistance service Emergency calls to police (No prefix) 110 (Charges apply: guidance fee + call fee) Emergency calls to fire station and (No prefix) 104 (No prefix) 119 ※...
- Page 47 ※2 ○ number and mail address you use in Japan, in a service ※3 ○ i-mode area of the overseas carrier partnered with DOCOMO. It ○ i-mode mail enables you to continue using the voice call, SMS and ※3※4 ○...
-
Page 48: Mail
■Make a Call to Outside the Country Mail You Stay at Sending i-mode Mail 0 (for at least one second) from the ▶ Stand-by display Stand-by display Enter numbers in Once you subscribe to i-mode, you can exchange e-mail order of country/area code→area code messages over the Internet. - Page 49 Sending Deco-mail Sending Decome-Anime You can change the color or size of characters or You can create impressive messages by inserting text background color, or insert images or Deco-mail or images into a Flash fi le. pictograms. 1 1 1 1 l from the Stand-by display l from the Stand-by display ▶...
- Page 50 ■ Replying to i-mode Mail Displaying Received i-mode Mail Press Press ) while an i-mode mail ▶ l from the Stand-by display Inbox is displayed. is displayed. Enter each item. Enter each item. Select a folder. Select a folder. Press Press Select an i-mode mail message.
- Page 51 ■ ■ Checking New i-mode Mail Sorting i-mode Mail You can check the i-mode Center for a new mail You can use “Auto-sort” to sort received/sent i-mode message or Message R/F. mail messages into a folder such as “Business” or “Friend”...
- Page 52 Early Warning “ Area Mail” Using SMS ■Receiving Area Mail You can send text messages to the mobile phone number at the other party. You can receive information such as about earthquake ■Sending SMS alerts that are issued from the Japan Meteorological Agency as an Area Mail message.
-
Page 53: Phonebook
■ Displaying Received SMS Message Phonebook ▶ l from the Stand-by display Inbox Storing Phonebook Entries ■Storing New Phone Numbers/Mail Select a folder. Select a folder. Addresses You can store Phonebook entries in the FOMA terminal (Phone) or on the UIM. Select an SMS message. - Page 54 ■Storing Phonebook Entries from Editing Phonebook Entries Redial/Received Call Records o from the Stand-by display o (Redial) or o (Received Press Press ▶ Search and select a Phonebook entry. Calls) from the Stand-by display. Calls) from the Stand-by display. Highlight a call record and press Highlight a call record and press ▶...
-
Page 55: I-Mode/Full Browser
i-mode/Full Browser ■Before using i-mode Content of sites or websites is in general protected Displaying i-mode Sites by copyrights law. You can use data such as text and images for your entertainment, which you download i-mode is a service that enables you, by using the to your i-mode phone, but you cannot use them, part display of the FOMA terminal supporting i-mode or whole of it as is, or modify them for the purpose of... - Page 56 Displaying Websites Designed for Switching Browsers You can switch to Full Browser to show the Internet websites incorrectly displayed by i-mode. You can browse Internet websites designed for PCs The billing system differs between i-mode and Full using the Full Browser function. Browser.
-
Page 57: Viewing And Operating Sites
Viewing and Operating Sites Saving Site Content Operations on site viewing display If you save the page once you visited as a screen memo, you can easily refer to it without connecting to i-mode. Scroll display/Move highlighted/ Move the pointer: + ) while the site is displayed ▶... -
Page 58: I-Channel
Stand-by display by tickers. You can read it on the i-Channel list by pressing the i-Channel key. Further, two types of channels, “Basic channel” provided by DOCOMO and “Okonomi (Optional) channel” provided by IPs (Information Providers) are available. You are not charged a packet communication fee for auto-updates of “Basic channel”... -
Page 59: Camera
Camera Viewing and Operating Finder Display Image stabilizer Menu : Auto You can check the settings. Camera mode Select photo mode : Digicam mode : Normal You can also select “Scene” Number of recordable image which selects a mode suitable for Shows the number of remaining recordable the scenery around you. - Page 60 Shooting Still Images/Moving Pictures Viewing Still Images/ Moving Pictures after Shooting ■Shooting Still Images ( Digicam Mode) You can shoot still images within the sizes from The still image you shot is saved to “My picture” Stand-by (240 x 428) to 5M (1944 x 2592). in Data Box.
- Page 61 ■ Shooting Still Images Using Auto Shooting Still Images Using Shutter Various Methods The camera automatically shoots identifying the ■ Shooting Still Images Using number of faces and the distance between faces by Continuous Mode face recognition. <Example> Using “Group shutter” to shoot a group of ) from the Finder display for three persons Photo Mode or Movie Mode...
-
Page 62: 1Seg
1Seg Using 1Seg ■Using 1Seg 1Seg is a service provided by television entrepreneurs (broadcasting stations). You are not charged a communication fee for receiving video and audio. For about fee charged by NHK, contact NHK. ※You are charged a packet communication fee for browsing “Data broadcasting site” and “i-mode site”. You might be charged an information fee for using some sites (i-mode pay sites). - Page 63 Setting Channels Watching 1Seg When you activate 1Seg for the fi rst time or change c for Press and hold the area you are in, you need to operate “Channel at least one second from setting”. Select “Auto channel setting” to enable you the Stand-by display.
- Page 64 Viewing and Operating Viewer Display Setting Timer for Watching or Recording 1Seg Programs Displayed while you are watching a 1Seg program Set the date and time, a channel, and program name, and Program enter them to the TV Timer List or Timer Recording List. Video Information When the set time arrives, watching or recording starts.
-
Page 65: Music
Music Setting Programs ▶ m from the Stand-by display MUSIC Music&Video Channel ▶ ▶ Music&Video Channel Set program Music&Video Channel is a service which automatically Follow the instructions on the display Follow the instructions on the display delivers up to about one-hour programs at night just by selecting your favorite music programs etc. - Page 66 ® Downloading Chaku-uta Full Playing Music Files Music Files ® MUSIC Player enables you to play Chaku-uta Full music fi les you have downloaded from sites, or to ® You can download Chaku-uta Full music fi les from ® play Windows Media Audio (WMA) fi les you saved on sites.
-
Page 67: I-Αppli
i- α ppli Downloading i-αppli from Sites Select a software program from Select a software program from downloadable site. downloadable site. “i-αppli” is a software program for i-mode mobile phones. By downloading various software programs from the Select “OK” when downloading ends. Select “OK”... -
Page 68: I-Motion/Movie
i-motion/ Movie Downloading i-motion/Movie Select an i-motion/movie fi le from an Select an i-motion/movie fi le from an i-motion is a fi le consisting from video, audio, and i-motion/movie downloadable site. i-motion/movie downloadable site. music which you can download to your FOMA terminal from i-motion sites that support i-motion. -
Page 69: I-Concier
Phonebook. It also allows you to share the schedules or images held by the DOCOMO’s Data Storage Center with friends, family members or other groups. It also enables you to easily print out the images held. i-concier information is notifi ed Select a message. -
Page 70: Convenient Tools
Convenient Tools Using Alarm m from the Stand-by display Using Schedule ▶ ▶ Stationery Alarm m from the Stand-by ▶ display display Stationery Highlight an alarm and press Highlight an alarm and press ▶ Schedule Select a date to show a schedule Enter each item. - Page 71 QR code is one of the 2-dimensional codes that denotes data in the vertical Select the URL Select the URL and horizontal directions. ▶ Select “i-mode Browser” “株式会社NTTドコモ (NTT DOCOMO, ▶ Select “YES”. INC.)” is displayed when you scan the QR code with the FOMA terminal.
-
Page 72: Data Management
If you do not have a microSD card, you need to purchase Push it until it clicks. P-07B supports a commercial microSD card of up to 2 Gbytes and microSDHC card of up to 16 Gbytes (As of July 2010). - Page 73 When you use the microSD card for the fi rst time, you need to format (initialize) it. Be sure to use P-07B for formatting. The microSD card formatted using other devices such as personal : A microSD card is inserted.
- Page 74 ■ ■Displaying Data Stored on the microSD Copying Data to the microSD Card Card <Example> Copying a still image <Example> Displaying still image m from the Stand-by display m from the Stand-by display ▶ ▶ Data box My picture ▶ ▶...
-
Page 75: Microsd Card
■ Back up Data to the microSD Card Sending/Receiving Data by Infrared Communication You can back up Phonebook entries, schedule events, ToDo items, messages, text memos, and You can send or receive data such as Phonebook bookmarks, and the settings on and information entries to or from a device supporting infrared about your FOMA terminal collectively onto the communication function. - Page 76 ■Sending Data Connecting to Personal Computer Set the receiving end terminal fi rst, and then start sending You can connect the FOMA terminal to a personal data within 30 seconds. computer to exchange WMA fi les, images or other fi les stored on microSD card. Function menu of the data to be sent Function menu of the data to be sent ▶...
-
Page 77: Support
…When you use the desktop holder, make sure the connector DOCOMO. terminal of the FOMA terminal is not stained. If it is stained, wipe the terminal part with a dry cotton swab, etc. - Page 78 The usable time of the battery is short. Cannot talk. …Make sure not to leave the FOMA terminal out-of-service-area for (“ ” does not disappear even if you move to another place. You cannot make or receive a call, though the radio wave a long time.
- Page 79 (the nameplate and therefore cannot verify the product conformity to the damages of display, connector, etc.), the repair cost is charged technical standard, it might happen that we at DOCOMO reject to even within the warranty period. repair the malfunction.
- Page 80 The information such as about function settings and Total i-mode Fault Diagnosis Site Calls Duration, etc. might be reset depending on the troubles or repairs, or the way you handle the FOMA terminal. Set the You can check on your FOMA terminal whether settings again.
- Page 81 When updating software programs, the proprietary information about your FOMA terminal (model name or serial number, etc.) is automatically sent to the server (DOCOMO-managed server for Software Update). We at DOCOMO never use the sent information for purposes other than to update software programs.
- Page 82 ■ ■Start Software Update from Menu Start Software Update from Icon m from the Stand-by display Select “Update notifi cation icon” on the Select “Update notifi cation icon” on the Stand-by display. Stand-by display. ▶ ▶ Set./Service Other settings ▶ Software update Enter your Terminal Enter your Terminal...
- Page 83 FOMA terminal, or when no virus pattern data supporting them is found, this function does not prevent troubles from occurring. The virus pattern data installed on the FOMA terminal differs in content by every model. Note that we at DOCOMO might stop to distribute the virus pattern data for models on market for last three years since their release.
- Page 84 Some products may not be dealt in depending on the area. For details, consult a handling counter such as a docomo Shop. For details on options, refer to the user’s manuals of respective options and related devices.
-
Page 85: Appendix
Appendix Attachment preference Auto-start attachment Address/Spam Mail set. Function List Mail settings Feel*Mail Execute “Resetting the Function Settings” on page Auto save setting 37 for the items indicated by to return to the Text predict respective defaults. Check settings SMS report request Inbox SMS validity period Outbox... - Page 86 i-mode Browser set. Select ring tone ( Full Browser set. Ring volume ( i-mode settings Common settings Keypad sound ( Check settings Sound Melody effect ( Reset i-mode setting Headset usage setting ( Full Browser Home Mail/Msg. ring time ( Charge sound Software list (phone) Display setting (...
- Page 87 MUSIC illumination Answer setting ( Illumination Check settings Setting when opened Kisekae Record display set i-concier Information disp. set. Disp. PH-book image Self mode Set call/receive No. Incoming call Lock all Ring time ( Personal data lock Info notice setting ( Secret mode ( V.phone while packet Secret data only (...
- Page 88 NW services Overseas NW search Machi-chara Overseas setting Chara-den Image Overseas service Additional service 1Seg Video Contact DOCOMO Position memory OFFICEED Document viewer Font Chaku-moji Side keys guard SD other fi les long press set. Character input method ( Battery/eco mode set.
- Page 89 Scan code Phone Bar code reader Add to phonebook Saved data Reading? Receive Ir data Receive Receive all Group? Refer microSD data Memory No.? microSD Backup/Restore Search phonebook Name? Phone number? ToruCa folders ToruCa Settings Mail address? Play/Erase msg. 2-touch dial? Copy Play/Erase VP msg.
- Page 90 Alarm ( Reset channel setting Schedule ( Reset storage area User settings ToDo ( Reset TV settings Text memo ( Check TV settings Calculator ( Digicam mode Common phrases Photo mode Phrase/own dict. Own dictionary Movie mode Download dictionary View photos Create learned wd list View movies MUSIC Player...
- Page 91 Camera Number of Approx. 5,100,000 pixels effective pixels ■Handset Number of recording Approx. 5,000,000 pixels pixels (maximum) Model P-07B Recording Number of Approx. 2,000 max. (default) Dimensions (when closed) Height: Approx. 110 mm recordable still Width: Approx. 50 mm ※1 images Depth: Approx.
- Page 92 Number of savable/ Function <Movie> registerable items File format (Extension) MP4, ASF (3gp, asf) Phonebook 1,000 ※1※3 Recordable time to P-07B Approx. 497 seconds max. Schedule 2,500 ※4 Recordable time to the microSD Approx. 180 minutes max. ※1※2 Mail Received mail 2,500 max.
- Page 93 ■SAR Certification Information TELEC: http://www.telec.or.jp/ENG/Index_e.htm NTT DOCOMO: http://www.nttdocomo.co.jp/english/product/sar/ This model phone P-07B meets the MIC’s* technical regulation for Panasonic Mobile Communications Co., Ltd.: http://panasonic.jp/mobile/ exposure to radio waves. (In Japanese only) The technical regulation established permitted levels of radio...
- Page 94 Conformity can be found on http://panasonic.net/pmc/support/index.html. permitted levels of RF energy for the general population. The guidelines are based ※The European RTTE approval of this product is limited to the use of the P-07B on standards that were developed by independent scientific organizations through periodic and thorough evaluation of scientific studies.
- Page 95 ■Important Safety Information Export Administration Regulations AIRCRAFT This product and its accessories might be covered by the Japan Switch off your wireless device when boarding an aircraft or whenever you are Export Administration Regulations (“Foreign Exchange and Foreign instructed to do so by airline staff. If your device offers a ‘flight mode’ or similar feature consult airline staff as to whether it can be used on board.
- Page 96 Other company names and product names described in the text are trademarks or “FOMA”, “i-mode”, “i-αppli”, “i-motion”, “Deco-mail”, “Chara-den”, “ToruCa”, “mopera”, registered trademarks of those companies. “WORLD CALL”, “WORLD WING”, “OFFICEED”, “2in1”, “docomo STYLE series”, and ■Others the logos of “FOMA”, “i-mode”, “i-αppli”, and “Music&Video Channel” are trademarks or registered trademarks of NTT DOCOMO, INC.
- Page 97 This product contains software licensed complying with GNU General Public License Content providers are using the digital rights management technology for Windows (GPL), GNU Lesser General Public License (LGPL), etc. Media contained in this device (“WM-DRM”) to protect the integrity of their content For more details, see “readme.txt”...
-
Page 98: Index
Index Camera ........5, 57 Shooting still images/moving AC adapter ........18 Early warning “Area Mail” ... 50 pictures ........58 After-sales services ..... 77 Earphone ........4 Viewing still images/moving Alarm ..........68 Earpiece .......... 4 pictures after shooting ....58 Antenna .......... - Page 99 i-mode ........... 53 i-mode fault diagnosis site ..78 Machi-chara ........31 Omakase lock ......36 i-mode mail ........46 Mail ..........46 One-push open button ....5 Compose ........46 Main menu ........24 Options ......... 82 Forward ........48 Main specifications .....
- Page 100 PUK (PIN unblock code) ..... 35 Site access ........53 SMS ..........50 Warranty ........77 Compose ........50 WORLD CALL ......39 QR code ........69 Receive ........51 WORLD WING....... 45 Software update ......79 Numerics Speaker ........... 5 Radio waves reception level ..
- Page 101 My docomo (http://www.mydocomo.com/) “お客様サポート (User support)” and My docomo are available in Japanese only. If you do not have or you have forgotten your “network ID” or “docomo ID/password”, You will need your “network ID” for the access from i-mode.
- Page 102 ● Please confi rm the phone number before you dial. ● For Applications or Repairs and After-Sales Service, please contact the above-mentioned information center or the docomo Shop etc. near you on the NTT DOCOMO website or the i-mode site.
- Page 103 Installing DOCOMO Connection Manager........
-
Page 104: Data Communication Available From Foma Terminal
FOMA terminal to an access point which does not support HIGH-SPEED or the terminal is outside the FOMA High-Speed Area, or when you use the device which does not support High-Speed such as DOCOMO’s PDA “sigmarion Ⅲ”. ≥The packet communication is charged according to the amount of data you sent and received. Note that you are charged a high communication fee for the massive data communication such as browsing Internet websites having many images or downloading data files. -
Page 105: Before Using Data Communication
≥The FOMA terminal does not support Remote Wakeup. ≥The FOMA terminal does not support the FAX communication. ≥You can perform data communications by connecting the FOMA terminal with DOCOMO’s PDA “sigmarion Ⅲ”. Before Using Data Communication Charge of Internet service provider To use the Internet, you need to pay the charge for the Internet service provider you use. - Page 106 Specification Rev1.1/2.0 compliant) Display resolution 800 x 600 dots, high color 16 bits or more recommended. ≥For DOCOMO Connection Manager, display resolution 1024 x 768 dots or more recommended. Windows 7 32-bit version/64-bit version (Japanese version) Windows Vista 32-bit version/64-bit version (Japanese version)
-
Page 107: Setup Flow For Data Transfer (Obex™ Communication)
Charge Function 02, install the “FOMA communication configuration file” (driver) from the provided “P-07B CD-ROM” onto the personal computer. You are advised to install “DOCOMO Connection Manager” which enables you to easily set up the APN or dial-up for communication. - Page 108 Connecting PC and the FOMA Terminal The following steps explain how to connect the FOMA USB Cable with Charge Function 02 (option). Check the direction of the Connector terminal connector terminal of the FOMA External connector terminal, then straight insert the (Face up the engraved FOMA external connector of the FOMA...
-
Page 109: Installing Foma Communication Configuration File (Driver)
≥Operate as the user who has the PC administrator right. ≥End all the programs resident on your personal computer before installing the FOMA communication configuration file (driver). Start Windows, then set the provided “P-07B CD-ROM” into the personal computer. Click “データリンクソフト・各種設... - Page 110 For Windows 7 “ [スタート (Start)]” 1Open “デバイスとプリンター (Devices and printers)”. Open “docomo STYLE series P-07B” 1Click the “ハードウェア (Hardware)” tab. Confirm the installed driver names. Confirm that all driver names are displayed. ≥The COM port number varies depending on the personal...
- Page 111 For Windows Vista, Windows XP “ [スタート (Start)]”1Open “コントロールパネル (Control panel)” 1Open “システムとメンテナンス (System and maintenance)”. <For Windows XP> “スタート (Start)”→Open “コントロールパネル (Control panel)” →“パフォーマンスとメンテナンス (Performance and maintenance)”→Open “システム (System)”. Open “ハードウェアとデバイスを表示 (Show hardwares and devices)” 1Click “続行 (Continue)”. <For Windows XP> Click the “ハードウェア...
- Page 112 “FOMA communication configuration file” (driver), the “FOMA communication configuration file” (driver) may not be installed correctly. In that case, execute “P07B_un.exe” on “P-07B CD-ROM” to delete the “FOMA communication ※ configuration file” (driver), and then install the files again.
-
Page 113: Docomo Connection Manager
DOCOMO Connection Manager “DOCOMO Connection Manager” is a convenient software program to perform flat-rate data communication and volume charging data communication. It enables you to sign up for “mopera U” and easily make PC settings according to your contract situation. It also enables you to check the estimate data traffic and usage amount with the charge counter function. -
Page 114: Before Installing Docomo Connection Manager
・Uかんたん接続設定ソフト (mopera U connection & setting tool) ・FOMA PC設定ソフト (FOMA PC configuration software) ・FOMAバイトカウンタ (FOMA byte counter) When you use Mzone (DOCOMO public wireless LAN service) with this software program, uninstall the following public wireless LAN connection software programs. ※You cannot use Mzone when they are simultaneously installed: ・U公衆無線LANユーティリティソフト (U public wireless LAN utility software) -
Page 115: Installing Docomo Connection Manager
When MSXML6 and Wireless LAN API are not installed on the Windows XP environment, you need to install them before installing “DOCOMO Connection Manager”. When a confirmation display appears, click “Install” and install MSXML6/Wireless LAN API. When you restart Windows after installation of MSXML6/Wireless LAN API is completed, installation of “DOCOMO Connection Manager” automatically starts. - Page 116 Click “次へ (Next)”. Confirm the display precautions and click “次へ (Next)”. Confirm the licensing contract contents. If you agree with the contents, select “使用許諾契約の条 項に同意します (Agree with the licensing contract contents)” and click “次へ (Next)”. Confirm the installation destination folder, then click “次へ...
- Page 117 Click “インストール (Install)”. Installation starts. Click “完了 (Finish)”. Installation is completed.
-
Page 118: Starting Docomo Connection Manager
When this is the first start-up, the setting wizard appears automatically. Hereafter, proceed operation/settings following the instruction of software to complete the preparation to access the Internet. For details, refer to “ドコモ コネクションマネージャ操作マニュアル.pdf (DOCOMO Connection Manager operation manual by PDF format)”. -
Page 119: Setting Dial-Up Network
AT command is required. “Hyper Terminal”, which is attached to Windows as the standard software, is used here for explanation. When using DOCOMO Internet access service “mopera U” or “mopera”, you do not need to set an access point name (APN) (see page 19). - Page 120 (driver). The confirmation method varies depending on the operating system of your personal computer. ≥When using DOCOMO Internet access service “mopera U” or “mopera”, you do not need to set an access point name (APN); therefore, you do not need to confirm the modem.
- Page 121 Open the “モデム (Modem)” tab, confirm the COM port number in the “接続先 (Access point)” field of “FOMA P07B”, then click “OK”. ≥The COM port number you confirmed is used to set an access point name (APN) (see page 19). ≥The contents on the property display and COM port number vary depending on your personal computer.
- Page 122 Set an Access Point Name (APN) This section explains how to set an access point name (APN) for packet communication. You can register up to 10 access point names (APNs), which are managed with cid1 to cid10 (see page 21). When using “mopera U”...
- Page 123 Select a connection method. <When you can select the COM port number of “FOMA P07B”> Select the COM port number with which you install the “FOMA P07B” in the “接続方法 (Connection method)” field, then click “OK”. Then, go to step 6. ≥Here, “COM3”...
- Page 124 Confirm that “OK” appears on the display. “ファイル (File)” menu1Select “ハイパーターミナルの終了 (Exit Hyper Terminal)” to exit Hyper Terminal. ≥If the message “現在、接続されています。切断してもよろしいですか? (Currently connected. Do you want to disconnect this line?”) appears, select “はい (Yes)”. ≥The message “セッションXXXを保存しますか? (Do you want to save session XXX?)” then appears. You do not need to especially save that session.
- Page 125 Confirm that “OK” appears on the display. Information ≥When using DOCOMO Internet access service “mopera U” or “mopera”, you need to set your caller ID to be “notified”. ≥If the entered AT command is not displayed, enter “ATE1 ”. ■Specifying “caller ID notified/not notified” in dial-up network Also by dial-up network setting (see page 25), you can add “186 (notify)”...
- Page 126 Set Dial-up Network for Windows 7 “ [スタート (Start)]” 1Open “コントロールパネル (Control panel)” 1“インターネットへの接続 (Connection to Internet)” 1Click “ダイヤルアップ接続 (Dial-up connection)”. ≥After the access point has been set, the confirmation display appears asking whether the existing connection is to be used.
- Page 127 Highlight the access point which is finished with setting, and select “プロパティ (Property)” after the right click 1Click the “全般 (General)” tab to confirm the setting contents. When two or more modems are connected to your personal computer, confirm that “モデム (Modem) - FOMA P07B” is checked in the “接続の方法...
- Page 128 Set Dial-up Network for Windows Vista “ [スタート (Start)]”1“接続先 (Access point)”1Click “接続または ネットワークをセットアップします (Setup the connection or network)”. Select “ダイヤルアップ接続を セットアップします (Setup the dial-up connection)”, then click “次へ (Next)”. If the display for selecting a modem appears, click “FOMA P07B”. ≥The display for selecting a modem appears only when you have registered two or more modems.
- Page 129 Click the “全般 (General)” tab to confirm the setting contents. When two or more modems are connected to your personal computer, confirm that “モデム (Modem) - FOMA P07B” is checked in the “接続の方法 (Connection method)” field. If it is not checked, check it. If two or more modems are checked, click the button to position the priority level of “モデム...
- Page 130 Set Dial-up Network for Windows XP “スタート (Start)”1“すべてのプログラム (All programs)” 1“アクセサリ (Accessories)”1“通信 (Communications)” 1Open “新しい接続ウィザード (New connection wizard)”. When the “新しい接続ウィザード (New connection wizard)” display appears, click “次へ (Next)”. Select “インターネットに接続する (Connect to the Internet)”, then click “次へ (Next)”. Select “接続を手動でセットアップする (Manually set up the connection)”, then click “次へ...
- Page 131 Enter an access point number in the “電話番号 (Phone number)” field, then click “次へ (Next)”. ≥When connecting to “mopera U”, enter “¢99¢¢¢3#” as the access point number. See page 21 for access point numbers other than “mopera U”. Enter the user name and password supplied from your Internet service provider or network administrator in the...
- Page 132 Click the “全般 (General)” tab to confirm the setting contents. When two or more modems are connected to your personal computer, confirm that “モデム (Modem) - FOMA P07B” is checked in the “接続方法 (Connection method)” field. If it is not checked, check it. If two or more modems are checked, click the button to position the priority level of “モデム...
-
Page 133: Making Dial-Up Connection
Making Dial-up Connection Making Dial-up Connection for Windows 7 Perform the operation on page 5 to connect the FOMA terminal to your personal computer. “ [スタート (Start)]”1Open “コントロールパネル (Control panel)” 1Click “インターネットへの接続 (Connection to Internet)”. Check “はい、既存の接続を選びま す (Yes, I choose the existing connection)”, then select the access point, and click “次へ... - Page 134 Making Dial-up Connection for Windows Vista Perform the operation on page 5 to connect the FOMA terminal to your personal computer. “ [スタート (Start)]”1Open “接続先 (Access point)”. Select access point and click “接続 (Connect)”. Confirm the contents and click “ダイヤル (Dial)”. ≥When connecting to “mopera U”...
- Page 135 Making Dial-up Connection for Windows XP Perform the operation on page 5 to connect the FOMA terminal to your personal computer. “スタート (Start)”1“すべてのプログラム (All programs)” 1“アクセサリ (Accessories)”1“通信 (Communications)” 1Open “ネットワーク接続 (Network connection)”. Open the access point to be used. Select the access point icon of the ISP name (see page 27) you specified in “Set Dial-up Network”, then “ネットワークタ...
- Page 136 Your personal computer ・ Confirm whether your personal computer satisfies the operating environment (see page 3). cannot recognize “P-07B” ・ Confirm whether “FOMA communication configuration file” (driver) is installed in your personal computer. ・ Confirm whether the FOMA terminal is connected to your personal computer and powered on.
-
Page 137: At Command
AT Command AT commands are used to specify and modify the functions of the FOMA terminal through the personal computer. ※The following abbreviations are used in the AT command list: [AT]: Commands which are available at the FOMA P07B Command Port. [M]: Commands which are available in the FOMA P07B (modem). -
Page 138: At Command List
AT Command List Command execution AT command Outline Parameter/Explanation example Re-executes the last executed − command. No carriage return is required. AT%V Displays the version of the AT%V − FOMA terminal. Ver1.00 AT&Cn Selects the operating conditions n=0: CD is always ON. AT&C1 of the circuit CD signal sent to n=1: CD varies according to the carrier of the other... - Page 139 Command execution AT command Outline Parameter/Explanation example AT¢DGPIR=n This command is valid at dialing/ n=0: Uses the APN as it is. (default) AT¢DGPIR=0 receiving calls. n=1: Adds “184” to the APN. (always not notify) In the dial-up network setting, n=2: Adds “186” to the APN. (always notify) AT¢DGPIR? you can add “186”...
- Page 140 Command execution AT command Outline Parameter/Explanation example AT+CGREG=n Sets whether the network n=0: Not notified. (default) AT+CGREG=1 registration state is notified. n=1: Notified at switching between the inside and Displays whether you are inside outside of the service area. (set to “Notified”) or outside the service area (Inquiry) AT+CGREG?
- Page 141 Command execution AT command Outline Parameter/Explanation example AT+COPS=n,2,m Selects the carrier to be n=0: Automatic (searches the network and switches the AT+COPS=1,2,"44F001" connected. network operator automatically) (default) n=1: Manual (connects to the network operator specified in “m”) n=2: Disconnects the connection to the network operator n=3: Mapping is not performed.
- Page 142 AT+GMI Displays the manufacturer name AT+GMI − (Panasonic). Panasonic AT+GMM Displays the product name AT+GMM − (FOMA P-07B) of the FOMA FOMA P07B terminal. AT+GMR Displays the version of the AT+GMR − FOMA terminal. Ver1.00 AT+IFC=n,m Selects the flow control method. n: DCE by DTE...
- Page 143 Command execution AT command Outline Parameter/Explanation example ATIn Displays the ID code. n=0: Displays “NTT DoCoMo”. ATI0 n=1: Displays the product name. (same as +GMM) NTT DoCoMo n=2: Displays the version of the FOMA terminal. (same as +GMR) ATI1 n=3: Displays ACMP information element.
- Page 144 Command execution AT command Outline Parameter/Explanation example ATZn Resets the setting to the Only n=0 is specifiable. (Can be omitted) (In online) contents of the nonvolatile memory. If this command is NO CARRIER entered during communication, (In offline) the line is disconnected. AT¥Sn Displays the contents of the each Only n=0 is specifiable.
- Page 145 ≥Command name: +CGEQMIN=[parameter] ・ Outline This command registers the reference value to judge whether the system permits QoS (Quality of service) reported from the network at establishment of the packet communication. You can specify four setting patterns described in the command execution example below. ・...
- Page 146 Disconnection Reason List ■64K Data Communication Value Reason The specified number does not exist. The line was normally disconnected. Cannot communicate because the other party is communicating. Dialed but no response has come in within the specified duration. Cannot communicate because the other party is dialing. The other party rejected to receive the call.
- Page 147 For &E1 Numeric Character notation Connection speed notation CONNECT 1200 1,200bps CONNECT 2400 2,400bps CONNECT 4800 4,800bps CONNECT 7200 7,200bps CONNECT 9600 9,600bps CONNECT 14400 14,400bps CONNECT 19200 19,200bps CONNECT 38400 38,400bps CONNECT 57600 57,600bps CONNECT 115200 115,200bps CONNECT 230400 230,400bps CONNECT 460800 460,800bps...
- Page 148 P-07B Kuten Code List...
- Page 149 <How to read Kuten Code List> First enter the number for “Kuten digit 1 to 3”, and enter the number for “Kuten digit 4”. ≥Some characters in Kuten Code List may appear different on the display. Kuten Kuten Kuten Kuten digit 4 Kuten digit 4 Kuten digit 4 digit...
- Page 150 Kuten Kuten Kuten Kuten digit 4 Kuten digit 4 Kuten digit 4 digit digit digit 1 to 3 1 to 3 1 to 3 讃 賛 酸 餐 斬 暫 残 【 た 】 函 箱 硲 箸 肇 筈 櫨 幡 肌 【...
- Page 151 Kuten Kuten Kuten Kuten digit 4 Kuten digit 4 Kuten digit 4 digit digit digit 1 to 3 1 to 3 1 to 3 揚 揺 擁 曜 楊 様 洋 溶 熔 用 圷 圸 坎 圻 址 坏 坩 埀 垈 坡 椢...
- Page 152 Kuten Kuten Kuten Kuten digit 4 Kuten digit 4 Kuten digit 4 digit digit digit 1 to 3 1 to 3 1 to 3 竊 竍 竏 竕 竓 站 竚 竝 竡 竢 誨 誡 誑 誥 誦 誚 誣 諄 諍 諂 鷯...
Need help?
Do you have a question about the P-07B and is the answer not in the manual?
Questions and answers