
Related Manuals for Jetson JBOLT-BLK


Summary of Contents for Jetson JBOLT-BLK
- Page 1 Bolt Folding Electric Ride-On. A guide for your ride. IMPORTANT: READ CAREFULLY AND RETAIN FOR FUTURE REFERENCE. MODEL: JBOLT-BLK Designed in Brooklyn | Made in China...
-
Page 3: Table Of Contents
Table Of Contents Safety Warnings ............. ..2 Product Overview . -
Page 4: Safety Warnings
Safety Warnings • Before use, please read the user manual and safety warnings carefully, and make sure you understand and accept all the safety instructions. The user will be responsible for any loss or damage caused by improper use. • Before each cycle of operation, the operator shall perform the preoperation checks specified by the manufacturer: That all guards and pads originally supplied by the manufacturer are in proper place and in serviceable condition;... - Page 5 • The brake may become hot while operating, do not touch the brake with your bare skin. • If the brake loosens, please adjust with the hexagon wrench, or please contact the Jetson Care Team.
- Page 6 Jetson's user manuals refer to www.ridejetson.com/support). Under this warranty, you will be able to direct your claims to Jetson even in situations where you purchased the Jetson Product from one of our authorized retailers.
-
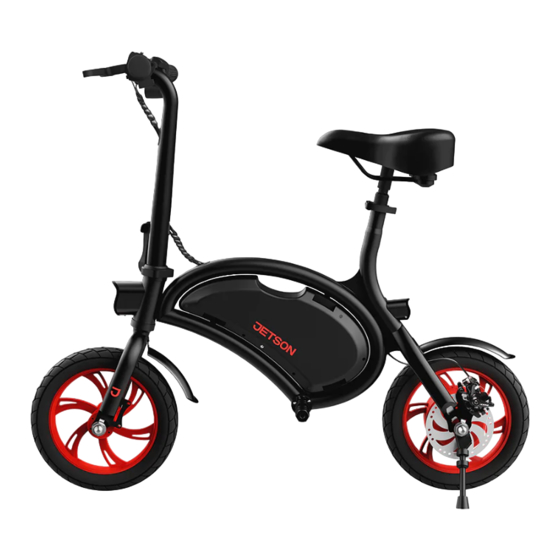
Page 7: Product Overview
Product Overview Front Tire 11. Rear Disc Brake 2. Headlight 12. Rear Tire 3. Stem Quick Release 13. Kickstand 4. Handbrake 14. Foot Rest 5. Handlebar 15. Front Fender 6. Carrying Handle 16. Charging Cable Seat 17. Charger 8. Seat Clamp Tools &... -
Page 8: Specs & Features
Specs & Features • Product Dimensions: 40 in × 19.2 in × 37 in • Weight Limit: 265 lbs • Product Weight: 34 lbs • Tire Size: 12 in • Speed: Up to 15.5 mph • Range: Up to 15 miles •... -
Page 9: Attaching The Seat
1. Getting Started Attaching the Seat Open the Seat Clamp lever and loosen the knob to widen the Clamp opening. Slide Seat Post into Stem Tube. Turn the knob clockwise to tighten the Seat Clamp. Close the Seat Clamp. -
Page 10: Attaching The Foot Rests
Attaching the Foot Rests Slide one Foot Rest onto each side of the Axle. Twist Foot Rests clockwise to tighten and secure. -
Page 11: Attaching The Rear Fender
Attaching the Rear Fender Remove pre-attached bolt and nut from the frame above the Rear Wheel. Place Rear Fender in position so that the pre-drilled hole in the Fender is aligned with the hole in the frame. Slide the bolt through the Fender and frame, and tighten the bolt using the screwdriver tip of the tool. -
Page 12: Charging The Battery
Charging the Battery Important: • • Use only the included Charger. • Plug the Charger into the wall outlet before plugging into the Charging Port. • Do not turn on the Bolt while it’s charging. • Charge the battery until it is fully charged - up to 5 hours. •... -
Page 13: Unfolding The Handlebar
Unfolding the Handlebar Slowly lift the Handlebar up. Press the Stem Quick Release in to locked/closed position. To fold the Handlebar, open/unlock the Stem Quick Release and slowly lower the Handlebar down. Rotate the Stem Clamp lock clockwise to secure the Stem Quick Release. -
Page 14: Operating The Bolt
2. Make Moves Operating the Bolt Light Switch Battery Indicator Bell Screen Twist Throttle Power Button Cruise Control Button Power Button: Press to turn the Bolt on or off. Light Switch: Push the switch up to turn the headlight and taillight on. Push it down to turn the lights off. -
Page 15: Helmet Safety
Helmet Safety PROPER POSITIONING: The Forehead is covered by the helmet. IMPROPER POSITIONING: The forehead is exposed. A fall could result in serious injury. * Wear a helmet, appropriate clothing, shoes, and safety gear. Avoid clothing that can get caught into or under the wheels. Closed-toe, flat shoes are recommended. -
Page 16: Riding The Bolt
Riding the Bolt Before each ride, check that the Handlebar and Seat are secure, the tire pressure is 35-40 PSI, and the brake system works correctly. Keep your feet on the Foot Rests. Do not ride with your feet dangling over the sides. Always stay seated while riding. -
Page 17: Care & Maintenance
• Protect from water or moisture. • Do not disassemble the Bolt or its battery. • If there are any issues with the battery, please contact the Jetson Care Team. Storing the Bolt • Fully charge the battery before storing. - Page 18 Stay connected. Be sure to follow @ridejetson on social media to learn about fantastic offers, giveaways, and all the latest Jetson news. Loving your ride? Then be sure to leave a review at ridejetson.com/reviews. We can’t wait to hear from you! #MakeMoves Questions? Let us know.
- Page 20 Manufactured in Shenzhen, China Imported by Jetson Electric Bikes LLC. P.O. Box 320149, 775 4th Ave #2, Brooklyn, NY 11232 www.ridejetson.com US CA AU UK IS CA FR MX ES RECYCLABLE BOITE EN CARTON CAJA DE CARTÓN PAPERBOARD BOX RECYCLABLE...
Need help?
Do you have a question about the JBOLT-BLK and is the answer not in the manual?
Questions and answers
My Jetson JBOLT-BLK fell over onto the throttle side, now when I use it, it only goes 1/2 as fast as before, what can I due to fix it, is there a repair for it?
Try restarting the Bolt by turning it off and then on. Click the Scan button to refresh. Restart the Ride Jetson app. If the issue persists, contact Jetson Customer Support for assistance. Do not attempt to disassemble, modify, repair, or replace any components without instruction from Jetson Customer Support, as this may void the warranty and cause malfunctions.
This answer is automatically generated
My Jetson JBOLT-BLK fell over onto the throttle side, now when I use it, it only 1/2 as fast, is there a fix for this, is there a repair that can be done to it? Where would I take it to for a repair?
i was riding my jetsen around and i slammed the brakes and noticed that the bolt connecting my handle bars to my bike that holds the tires and seat etc. fell off. where can i buy a new bolt that holds the screw in place?