Hans Grohe Raindance Select Showerpipe 27112001 Installation/User Instructions/Warranty
Hide thumbs
Also See for Raindance Select Showerpipe 27112001:
- Installation/user instructions/warranty (32 pages) ,
- Installation/user instructions/warranty (17 pages)

Subscribe to Our Youtube Channel
Related Manuals for Hans Grohe Raindance Select Showerpipe 27112001


Summary of Contents for Hans Grohe Raindance Select Showerpipe 27112001
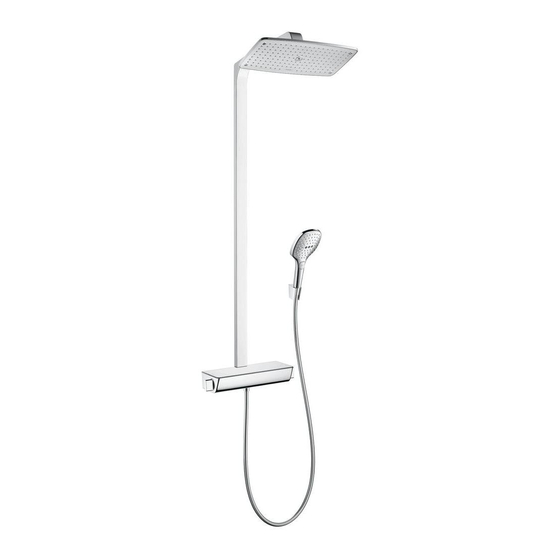
- Page 1 Installation / User Instructions / Warranty Instructions de montage / Mode d'emploi / Garantie Instrucciones de montaje / Manejo / Garantía Raindance Select Showerpipe 27112001 / 27112401...
-
Page 2: Technical Information
English Français Données techniques Technical Information Recommended water pressure 15 - 75 PSI Pression d’eau recommandée 15 - 75 PSI Pression d’eau maximum 145 PSI Max. water pressure 145 PSI Température recommandée 120° - 140° F* Recommended hot water temp. 120°... -
Page 3: Datos Tecnicos
Español Datos tecnicos Tools Required / Outiles Utiles / Herramientas Útiles Presión recomendada en servicio 15 - 75 PSI Presión en servicio max. 145 PSI Temperatura recomendada del 120� - 140� F* agua caliente 3 mm 27 mm Temperatura del agua caliente max. 176�F* 5 mm 19 mm... - Page 4 Installation Suggestions / Suggestions d'installation / Sugerencias para la instalación 19⅛" 14⅛" 15½" ⅞" 6" 6" 1¾" 1½" 8" 5⅞" G½ 2½" 11¹³⁄₁₆" 5⅛"...
- Page 5 Replacement Parts / Pièces détachées / Repuestos 95959000 95958001 95960000 98119000 97735000 (9x2) 95416000 95986000 28588xx1 98918000 94246000 95772001 28331000 98282000 95770000 95773000 95771000 (29x3) 98913000 98199000 98119000 (17x2) 98913000 (9x2) 95957000 98129000 (14x2) 98283000 98058000 94074000 28276003...
- Page 6 English Roughing-in The Raindance Select must be installed with shower- pipe rough set 16181181 (not included). To insure correct operation of the thermostatic mixing valve, the hot supply must be on the left and the cold supply must be on the right. Turn the water off at the main.
-
Page 7: Piezas Interiores
Français Español Pièce intérieure Piezas interiores Le Raindance Select doit être installé avec l’ensemble El Raindance Select debe ser instalado con un juego de pièce intérieure pour tuyau de douche 16181181 de piezas interiores del tubo de ducha 16181181 (no (non inclus). -
Page 8: Installation
English Mark a point on each nipple ⅝" from the surface of the finished wall Carefully cut the nipple at this point. ¾ " ⅝ " Installation Seal the wall around the nipples with waterproof sealant. Flush the hot and cold supplies thoroughly Damage to the Raindance Select caused by debris is not coverd by the Hansgrohe warranty. -
Page 9: Instalación
Français Español Marque un punto en cada niple de ⅝" desde la Faites une marque sur chaque raccord fileté à ⅝ po superficie de la pared terminada. de la surface du mur fini. Corte cuidadosamente el niple en este punto. Coupez soigneusement le raccord fileté... - Page 10 English Use the spacing jig to confirm that the adapters are positioned correctly and are level. Lightly lubricate the adapter o-rings using white plumber's grease. Install the mixer. Tighten the screws Overtightening the screws will result in product damage. 3 mm Remove the screw from the top mounting piece.
- Page 11 Français Español Utilisez le gabarit d’espacement pour vous assurer Use la plantilla espaciadora para confirmar que los que les adaptateurs sont positionnés correctement et adaptadores estén bien colocados y nivelados. au niveau. Lubrifiez légèrement les joints sur l’adapteur en util- Lubrique levemente las juntas del adaptador con isant de la graisse de plomberie blanche.
- Page 12 English Lubricate the riser o-ring using white plumber's grease. Install the screw. Lubricate the bottom riser o-ring. Install the riser on the mixer. Make sure that the riser is level. Mark the positions of the screw holes.
- Page 13 Français Español Lubrifiez légèrement les joints sur le tuyau en utilisant Lubrifiez ligeramente las juntas sobre el tubo con de la graisse de plomberie blanche. grasa blanca para plomería. Installez la vis. Instale el tornillo. Lubrifiez légèrement les joints sur le tuyau en utilisant Lubrifiez ligeramente las juntas sobre el tubo con de la graisse de plomberie blanche.
- Page 14 English Remove the riser. Seal the gap between the top of the mixer and the wall. Select a sealant that is safe for use on glass. Protect the mixer with a plastic sheet.
- Page 15 Français Español Enlevez la tuyau. Quite el tubo. Scellez le mur autour de la partie supérieure du Selle la pared alrededor de la parte supe- produit à l’aide d’un agent d’étanchéité. rior del producto con la ayuda de un agente de impermeabilidad.
- Page 16 English Hold the handshower holder against the wall at the desired location. Mark the positions of the screws. Drill the holes. ¼"/6 mm Install the anchors. Seal the wall around the anchors using waterproof sealant. Failure to seal the wall may result in water damage.
- Page 17 Français Español Placez le support de douchette sur la surface de Coloque el soporte de la ducha cabezal sobre la montage. superficie de montaje. Marquez les positions des deux trous de vissage. Marque las posiciones de los orificios para tornillos. Percez les trous.
- Page 18 English Install the handshower holder using screws and washers. Drill the screw holes for the showerpipe mounting piece. Install the anchors. Seal the wall around the anchors using waterproof sealant. Failure to seal the wall may result in water damage. ¼"/6 mm...
- Page 19 Français Español Installez le support de douchette. Instale el soporte de douchette. Percez les trous pour la pièce de montage. Perfore los orificios para tornillos. Installez les chevilles. Instale los pernos de anclaje. Scellez le mur autour des chevilles à Selle la pared alrededor de los l'aide d'un agent d'étanchéité.
- Page 20 English Install the riser on the mixer. Install the screws. If the tile does not go all the way up the wall, use the tile spacer.
Need help?
Do you have a question about the Raindance Select Showerpipe 27112001 and is the answer not in the manual?
Questions and answers