Table of Contents
Advertisement
Quick Links
Technical Reference Guide
Product Overview
Describes features and general specifications for the product.
Setup
Describes setup and installation of the product and peripherals.
Application Development Information
Describes how to control the printer and necessary information
when you develop applications.
Handling
Describes how to handle the product.
Maintenance of the TM-C610
Describes to administrator for necessary information to administer
TM-C610 in the system such as distributing driver or installing
new printer or replacing the printer.
M00022701
Rev.B
Advertisement
Table of Contents

Related Manuals for Epson TM-C610


Summary of Contents for Epson TM-C610
- Page 1 Handling Describes how to handle the product. Maintenance of the TM-C610 Describes to administrator for necessary information to administer TM-C610 in the system such as distributing driver or installing new printer or replacing the printer. M00022701 Rev.B...
- Page 2 • Neither is any liability assumed for damages resulting from the use of the information contained herein. • Neither Seiko Epson Corporation nor its affiliates shall be liable to the purchaser of this product or third parties for damages, losses, costs, or expenses incurred by the purchaser or third parties as a result of: accident, misuse, or abuse of this product or unauthorized modifications, repairs, or alterations to this product, or (excluding the U.S.) failure to strictly comply with Seiko Epson Corporation’s operating...
-
Page 4: For Safety
For Safety Key to Symbols The symbols in this manual are identified by their level of importance, as defined below. Read the following carefully before handling the product. You must follow warnings carefully to avoid serious bodily injury. WARNING Provides information that must be observed to prevent damage to the equipment or loss of data. -
Page 5: Warnings
Shut down your equipment immediately if it produces smoke, a strange odor, or unusual noise. Continued use may lead to fire. Immediately unplug the equipment and contact your dealer or a Seiko Epson service center for advice. Never attempt to repair this product yourself. Improper repair work can be dangerous. -
Page 6: Cautions
Cautions Do not connect cables in ways other than those mentioned in this manual. Different connections may cause equipment damage or fire. Do not connect cables in ways other than those mentioned in this manual. CAUTION Different connections may cause equipment damage or fire. ... -
Page 7: About This Manual
POS systems and development and design of printer applications for developers. Manual Content The manual is made up of the following sections: Chapter 1 Product Overview Chapter 2 Setup Chapter 3 Application Development Information Chapter 4 Handling Chapter 5 Maintenance of the TM-C610... -
Page 9: Table Of Contents
Contents ■ For Safety ..........................4 Key to Symbols ............................4 Warnings ..............................5 Cautions ..............................6 ■ Restriction of Use ........................6 ■ About this Manual ........................ 7 Aim of the Manual ..........................7 Manual Content .............................7 ■ Contents..........................9 Product Overview ................ 13 ■... - Page 10 Setup .....................35 ■ Flow of Setup ........................35 ■ Installing the Printer......................36 Important Notes on Installation ......................36 ■ Connecting the USB/Ethernet cable ................38 ■ Connecting the Power Supply ..................39 ■ Arranging the Cables ......................40 ■ Loading the Roll Paper ...................... 42 ■...
- Page 11 Before Long-term Storage .........................101 After Long-term Storage........................101 ■ Troubleshooting ........................ 102 Lighting and Flashing ERROR LED .....................102 Maintenance of the TM-C610........... 103 ■ Necessary Information for an Administrator of the Printer ........... 104 Printer Driver Functions........................104 Destination for the Printer Driver Setting ..................105 Installing Multiple Printer Drivers on One Client Computer............106...
-
Page 13: Product Overview
Chapter 1 Product Overview Product Overview This chapter describes features and specifications of the product. Features The TM-C610 is a 3-color ink jet printer that offers high-speed, easy operability, and high reliability required for commercial applications. Printing • High-speed printing ... - Page 14 Printer driver • Can print easily with Windows printer driver. • The printer driver has a built-in barcode font, which is available from .NET application. • Supported OS Microsoft Windows Server 2008 R2 (64bit) Microsoft Windows Server 2008 SP2 (32/64bit) ...
-
Page 15: Product Configuration
Chapter 1 Product Overview Product Configuration Interface • USB interface model (USB 2.0 high speed) • Ethernet interface model (100 Base-TX/10 Base-T) Color White Accessories Unpacking • Roll paper • Ink cartridge (Model number: SJIC15P) • AC Adapter • User’s Manual... -
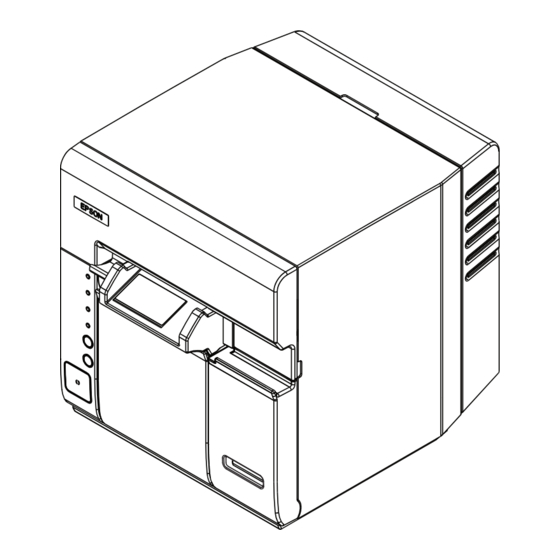
Page 16: Parts Name And Function
Parts Name and Function Front Paper ejection guide Release lever Control panel Roll paper cover Ink cartridge cover Paper ejection guide Printed coupons are ejected through the paper ejection guide. Ink cartridge cover Open the ink cartridge cover to load or replace the ink cartridge. Roll paper cover Open the roll paper cover to load or replace roll paper. -
Page 17: Control Panel
Chapter 1 Product Overview Control Panel (Power) LED ERROR LED INK LED PAPER OUT LED CLEANING button FEED button Power switch (Power) LED: Green • Lights when the power is on. • Off when the power is off. • Flashes when the printer is operating (initializing, charging ink, head cleaning, or printing) or in an error state. - Page 18 INK LED: Red • Flashes when the ink is low or waste ink in the ink cartridge is nearly full. • Lights when it is time to replace the ink cartridge, when the ink cartridge is not installed or is not correctly installed, and when waste ink in the ink cartridge is full.
- Page 19 Chapter 1 Product Overview Back Self-test button Rear cover Connectors Cable hook Rear cover Remove it to connect the cables, or perform the self-test (only for the Ethernet interface model). Cable hook Hooks the cables to fix them. Self-test button (only for the Ethernet interface model) For the Ethernet interface model, press this button to print the network setting information and the nozzle check pattern.
-
Page 20: Connectors
Connectors All cables are connected to the connector on the lower rear of the printer. USB interface model Ethernet interface model Ethernet connector USB connector Power connector Power connector USB/Ethernet connector Connects the printer with the host computer via each interface. Power connector Connects the cable of the AC adapter. -
Page 21: Status/Error Indications
Chapter 1 Product Overview Status/Error Indications The printer status is displayed with combination of lighting and flashing of LEDs. When an error occurs, you can find out the cause and the remedy from the LED indication for the error. : Lights : Flashes : No change —... -
Page 22: Buzzer
Buzzer The buzzer beeps when an error occurs (when the ERROR LED lights or flashes). Also, you can change whether or not the buzzer beeps for an error (see "Buzzer Setting at the Time of Errors" on page 71), and can set the buzzer to beep when printing finishes (see "Autocutting and Buzzer Setting after Printing"... -
Page 23: Software
Status API an error occurs. Though Status API is prepared with the printer driver, you need to install it separately. Developing Sample programs for using the TM-C610. (VB.NET applications and C for all programs. VB 6.0 and C# for some programs.) Sample Program Header files and assembly files for .Net are... -
Page 24: Product Specifications
Product Specifications Printing method Serial ink jet, dot matrix Three-color (CMY) printing Paper feed Forward friction feed Autocutter Cutting method By separated-blade scissors Autocut type Partial cut (one center point uncut) Graphic resolution 360 dpi × 180 dpi, 360 dpi × 360 dpi Print speed 96 mm/s (printing width 53 mm, 360 dpi ×... -
Page 25: Hardware Requirements
Chapter 1 Product Overview Hardware Requirements Microsoft Windows Server 2008 R2 (64bit) Microsoft Windows Server 2008 SP2 (32/64bit) Microsoft Windows Server 2003 R2 SP2 (32/64bit) Microsoft Windows 7 (32/64bit) Microsoft Windows Vista SP2 (32/64bit) Microsoft Windows XP SP3 (32bit) Microsoft Windows XP SP2 (64bit) Computer Must support computers that run the above operating systems. -
Page 26: Paper Specifications
GS1 DataBar Omnidirectional, GS1 DataBar Truncated, Identification rate: code printing ANSI rank D GS1 DataBar Limited, GS1 DataBar Expanded (based on Seiko Epson Corporation standard) Two-dimensional GS1 DataBar Stacked, code printing GS1 DataBar Stacked Omnidirectional, GS1 DataBar Expanded Stacked... - Page 27 Chapter 1 Product Overview Creating the graphic data for barcode If you want to create graphic data for barcodes, create data which meet the following conditions. Use black as the print color of the barcode on blank paper (not pre-printed). ...
-
Page 28: Print Area And Cutting Position
Print Area and Cutting Position The minimum top margin (indicated as “A” in the illustration below) of a coupon after a previously printed one is described in the table below. Minimum top margin A 0.14 0.14 a: Resolution in paper feed direction of the previous printing b: Resolution in paper feed direction of the next printing Paper width: 57 ±... -
Page 29: Ink Cartridge
Chapter 1 Product Overview Ink Cartridge Model number SJIC15P Type 3-color exclusive integrated ink cartridge Ink color Cyan, magenta, yellow Ink type Pigment ink Ink life 6 months after loading to the printer, 2 years after manufacturing Number of sheets printable 3700 coupons/cartridge *(Print area 50 178 mm {1.97 ... -
Page 30: Electrical Characteristics
Electrical Characteristics Power supply Power supplied by dedicated AC adapter Input voltage (rated) AC 100 to 240V Frequency (rated) 47 Hz to 63 Hz Power Operating Approximately 13 W consumption Idling Approximately 3 W Be sure to use the dedicated AC adapter included in the product package. Reliability Life Print head... -
Page 31: Environmental Conditions
700 to 1060 hPa (approximately 0 to 2500 m above sea level) (including in transportation) Acoustic noise During Approximately 53 dB (ANSI Bystander position) operation (Based on Epson evaluation conditions including the use of the (including using autocutter) the autocutter) -
Page 32: External Dimensions
External Dimensions • Height: 185 mm {7.28"} • Width: 200 mm {7.87“} • Depth: 195 mm {7.68”} 200 mm 195 mm 185 mm... -
Page 33: Restrictions
• Drivers for TM printers (APD, OPS/JavaPOS) of Seiko Epson Corporation cannot be used for this printer. The TM-C610 printer driver can be installed and used on a computer with the APD and OPS/ JavaPOS installed. Installation environment for the printer driver •... - Page 34 Printing • For the USB interface model, it takes time for the next printing if you turn the printer off and on after printing. • The ink cartridge contains 3 colors of ink. Even when one particular color is specified, all 3 col- ors of ink are used for printing and for keeping the print head in good condition.
-
Page 35: Setup
Chapter 2 Setup Setup This chapter describes setup and installation of the product and peripherals. Flow of Setup This chapter consists of the following sections along with the setup flow of the product and peripherals. Installing the Printer (page 36) Connecting the USB/Ethernet cable (page 38) Connecting the Power Supply (page 39) Arranging the Cables (page 40) -
Page 36: Installing The Printer
Installing the Printer Install the printer in an appropriate location with sufficient space around it. Important Notes on Installation • Do not place the printer in a dusty location. • The printer must be installed horizontally. • Leave enough space in front of the printer for the ink cartridge cover and the roll paper cover to be fully opened, and be careful not to place an obstacle in front of the printer, especially when you install the printer on a mounting table. - Page 37 Chapter 2 Setup • When installing the printer on a mounting table, secure the printer with two screws (M4) or fix it with affixing tape. Use screws between 7 and 10 mm {0.28 and 0.39"} long from the ground point of the rubber foot on the printer. Printer 7 ~ 10 mm 85 mm...
-
Page 38: Connecting The Usb/Ethernet Cable
Connecting the USB/Ethernet cable For the USB interface model, connect the USB cable, for the Ethernet interface model, connect the Ethernet cable to the printer. When Ethernet cables are installed outdoors, make sure devices without proper surge protection are cushioned by being connected through devices that do have surge protection. -
Page 39: Connecting The Power Supply
Chapter 2 Setup Connecting the Power Supply Connect the included AC adapter to the printer. Always use the included AC adapter. Using a nonstandard power supply can result in electric shock or fire. Use an AC cable that meets safety standards of each country. WARNING ... -
Page 40: Arranging The Cables
Arranging the Cables Hook all the connected cables on the cable hook. cable hook Align the 2 tabs at the bottom of the printer back with the holes in the rear cover, and close the rear cover. Tabs... - Page 41 Chapter 2 Setup Make sure the cables pass through the notch at the bottom of the rear cover, and are not pinched. Be sure to use the printer with the rear cover attached. Insert the power plug of the AC cable into the wall socket. ...
-
Page 42: Loading The Roll Paper
Loading the Roll Paper Follow the steps below to load the roll paper. Turn on the printer. Press down the release lever, and pull it to the front to open the roll paper cover. Load the roll paper in the orientation shown below. - Page 43 Chapter 2 Setup Pull out the paper end to the paper exit along the paper ejection guide. Paper ejection guide Close the roll paper cover. Roll paper is automatically fed about 10 cm {3.9”}, and then autocutting is performed.
-
Page 44: Loading The Ink Cartridge
Loading the Ink Cartridge Always use the EPSON SJIC15P ink cartridge. Do not open the package of the ink cartridge until you are ready to load it in the printer. Pull the ink cartridge cover to the front to open it. -
Page 45: Setting The Printer Ip Address
This setting is necessary only for the Ethernet interface model. Connect the printer to the network via a hub using the Ethernet cable. Set an IP address to the printer with EPSON TMNet Config. You can download EPSON TMNet Config from the following URL. -
Page 46: Adding A Tcp/Ip Port
Adding a TCP/IP Port This procedure is necessary only for Ethernet model, and unnecessary for the USB interface model. Follow the steps below to add a TCP/IP Port. Make sure the Ethernet cable is connected to the printer, and the printer is turned on. Select [Start] - [Control Panel] - [Printer] on the computer. - Page 47 Chapter 2 Setup Select [Create a new port:], select [Standard TCP/IP Port] in “Type of port,” and click [Next]. Set the items by referring to the table below, and click [Next]. Item Setting value Device type TCP/IP Device Hostname or IP address IP address set to the printer Setting values in “Hostname or IP address”...
- Page 48 Select [Standard], and [Generic Network Card] in “Device Type.” Then click [Next]. Click [Cancel]. Do not install the printer driver in this step. The addition of the TCP/IP port is completed.
-
Page 49: Installing The Printer Driver
Turn off the printer before installing. You need to turn it on during installation by following the instructions. For a 32bit OS, double-click the icon “c61d32_xxxx.exe.” For a 64bit OS, double-click the icon “c61d64_xxxx.exe.” If the “User Account Control” screen is displayed, click [OK]. Select [EPSON TM-C610], and click [OK]. - Page 50 Read the Licence Agreement, and click [Accept]. Make sure the printer is connected to the computer, and turn on the printer. The following screen is displayed, and installation of the driver starts.
-
Page 51: For Ethernet Interface Model
Follow the steps below to install the printer driver. For a 32bit OS, double-click the icon “c61d32_xxxx.exe.” For a 64bit OS, double-click the icon “c61d64_xxxx.exe.” If the “User Account Control” screen is displayed, click [OK]. Select [EPSON TM-C610], and click [OK]. - Page 52 Read the Licence Agreement, and click [Accept]. Click [Manual].
- Page 53 Chapter 2 Setup From “Available Ports,” select the port added in "Adding a TCP/IP Port" on page 46, and click [OK]. The installation of the printer driver starts. When the installation finishes, the following screen is displayed. Click [OK] to close the screen. The installation of the printer driver is completed.
-
Page 54: Installing Status Api
For a 32bit OS, double-click the icon “c61sapi32_xx.exe.” For a 64bit OS, double-click the icon “c61sapi64_xx.exe.” Destination for “c61sapi32_xx.exe”: <execution folder for "c61d32_xxxx.exe”>/c61d32_xxxx/WINVISTA_XP_2K/STATUSAPI Destination for “c61sapi64_xx.exe”: <execution folder for "c61d64_xxxx.exe”>/c61d64_xxxx/WINVISTA_XP_2K/STATUSAPI The "EPSON TM-C610 StatusAPI - InstallShield Wizard“ screen is displayed. Click [Next]. - Page 55 Chapter 2 Setup The “License Agreement" screen is displayed. Read the Licence Agree- ment, and select [I accept the terms in the license agreement]. Then Click [Next]. The "Ready to Install the Program" screen is displayed. Click [Install] to start the installation.
- Page 56 If the "User Account Control" screen is displayed, click [Continue]. The "InstallShield Wizard Completed" screen is displayed. Click [Finish]. The installation of Status API is completed.
-
Page 57: Application Development Information
❏ Dedicated sample programs for the TM-C610 are available. Use them as a reference for developing applications. This printer cannot use the APD or OPOS/JavaPOS provided by EPSON. Printer Driver The printer driver has the following functions, so it is not necessary to implement them in applications. -
Page 58: Status Api
(Header files and assembly files for .Net are included in the sample programs.) Sample Program Refer to the TM-C610 sample programs to develop the application using this printer. ❏ Features of TM-C610 sample programs • Programs are provided in the step-up method from the basic ones to the advanced ones.... - Page 59 Chapter 3 Application Development Information Language Level Program name Specification Step 5. When the condition of the printer Call-back process changes , the pr inter can cause — — actions to occur in the application, Basic and executes error handling. Complete basic ...
-
Page 60: Utilities And Manuals
Web browser. One printer can be set and checked. Sample Programs These is the sample programs to use with the TM-C610. (C++, VB.NET, C#, and VB6.0 are prepared as development languages. However, C# and VB6.0 are not provided for some... -
Page 61: Handling
When the INK LED (red) lights, the ink cartridge needs to be replaced. Follow the steps below to replace the ink cartridge. Always use the EPSON SJIC15P the ink cartridge. Do not open the package of the ink cartridge until you are ready to install it in the printer. - Page 62 Pull out the used ink cartridge to remove it. Do not leave the printer without an ink cartridge installed. Otherwise, the print head may dry and clog. CAUTION Shake the new ink cartridge package 4 or 5 times before opening it and take out the ink cartridge out of the package.
-
Page 63: Replacing The Roll Paper
Chapter 4 Handling Replacing the Roll Paper When the roll paper is out, the PAPER OUT LED (red) and the ERROR LED (red) light. Follow the steps below to replace the roll paper. Do not open the roll paper cover or touch the paper during printing. Otherwise, the printer may be damaged. - Page 64 Pull out the paper end to the paper exit along the paper ejection guide. Paper ejection guide Close the roll paper cover. When the printer power is on, roll paper is automatically fed about 10 cm {3.9”}, and then autocutting is performed.
-
Page 65: Removing Jammed Paper
Chapter 4 Handling Removing Jammed Paper When a paper jam occurs, never pull out the paper forcibly. Open the roll paper cover, and remove the jammed paper. If the roll paper cover cannot open, follow the steps below. Turn off the printer. Remove the autocutter cover by pulling the part of the autocutter cover indicated in the circle in the illustration below. -
Page 66: How To Use The Printer Driver
[Start] - [Control Panel] - [Printers] Windows XP [Start] - [Control Panel] - [Printers and Faxes] Right-click [EPSON TM-C610], and click [Printing References]. The printer driver screen is displayed. The above icon name is displayed when the printer’s name registered as [EPSON TM-C610]. -
Page 67: Registering User Defined Media
Chapter 4 Handling Registering User Defined Media If the paper size to use is not in [Media Layout], register user defined media. The registered layout will be stored in [Favorite Setting] to use from user applications. Registering User Defined Media Click [Add/Del] of [Media Size] on the [General] tab. -
Page 68: Favorite Setting
Favorite Setting [Favorite Setting] is the function to administer several printer driver settings into one. The settings from the [General] and [Page Layout] tabs such as Media Type, Media Layout (including User Defined Media) are included. [General] tab Favorite setting [Page Layout] tab... - Page 69 Chapter 4 Handling Features • When printing from your application, the print setting registered in [Favorite Setting] can be selected as the default setting. It is recommended to register the setting in favorite setting after executing print setting by clicking [Save As Favorite Setting]. •...
-
Page 70: Information For User Definition
• User Defined Media • Registering barcode font • Replacing font in the .NET environment The user definition is set on each client computer. When a number of TM-C610 printer drivers are installed in one computer, these are used mutually. -
Page 71: Buzzer Setting At The Time Of Errors
Chapter 4 Handling Buzzer Setting at the Time of Errors Whether the buzzer beeps when an error occurs can be set. Follow the steps below to make the setting. Turn on the printer. Display the printer driver. (For how to display, see "How to Use the Printer Driver"... -
Page 72: Autocutting And Buzzer Setting After Printing
Autocutting and Buzzer Setting after Printing Whether autocutting is performed and whether the buzzer beeps after printing can be set in [Post-printing Operation Settings] in the [General] tab of the printer driver. (For how to display the printer driver, see "How to Use the Printer Driver"... -
Page 73: Barcode Printing
Chapter 4 Handling Barcode Printing The printer driver has a built-in barcode font. Barcode printing is available if a barcode is not created on the application side. Setting the barcode font Barcode print settings can be changed on [Barcode and 2D Symbol] on [Driver Utilities] tab. Change settings of the following. - Page 74 • Rotation Settings: Select a setting when printing the barcode rotated by the specified rate. • Hexadecimal Entry Mode: Turn on the check box when the data for barcode is specified on Hexadecimal Entry Mode. • Composite: Turn on the check box to print barcode with a composite symbol. Separate the data specified to a composite symbol and a barcode with “\ |”...
- Page 75 Chapter 4 Handling When “Module” is set to an odd number and the resolution is changed by changing [Print Resolution], the printed barcode size may be changed. The barcode size can be checked by using the [Size Display] button. • Bar Height: Sets the element height with dots.
- Page 76 When the total width of the HRI character is larger than that of the barcode, the HRI character width is set as the barcode width. UPC-A ❏ Normal • Specify the data of 11 to 12 digits. • The first digit is an unchecked number system character. •...
- Page 77 Chapter 4 Handling JAN8(EAN) ❏ Normal • Specify the data of 7 to 8 digits. • For data of 7 digits, a check digit is automatically added. • For data of 8 digits, the 8th digit is regarded as a check digit, but not proved. ❏...
- Page 78 Printing method Specify the selected barcode font, specified point and language to the printing data, and then print it. The font size of the barcode cannot be changed by [Specified Point] value. The barcode is not printed when other values are selected.
-
Page 79: 2D Symbol Printing
Chapter 4 Handling 2D Symbol Printing The printer driver has built-in 2D symbol fonts. 2D symbol printing is available if the 2D symbol is not created on the application side. Setting the 2D Symbol font 2D symbol printing settings can be changed on [Barcode and 2D Symbol] on [Driver Utilities] tab. - Page 80 • Composite: Turn on the check box to print the 2D symbol with a composite sym- bol. Separate the data specified to a composite symbol and a 2D symbol with “\ |” or “| \”. Describe the data in the order of the composite symbol and the 2D symbol. Example: 1234567890\ |012345678905 •...
- Page 81 Chapter 4 Handling Click [Add]. The selected 2D symbol font is saved and the font name is added to the font list. Up to 30 2D symbol fonts can be registered. The 2D symbol font setting can be overwritten by clicking [Save] after selecting the font name from the font list and changing the setting.
- Page 82 Printing method Specify the selected 2D symbol font, specified point and language to the printing data, and print The font size of the 2D symbol cannot be changed by [Specified Point] value. The 2D symbol is not printed when other values are selected.
-
Page 83: Barcode And 2D Symbol Font Printing On .Net Environment
Chapter 4 Handling Barcode and 2D Symbol Font Printing on .NET Environment Since .NET Framework supports only TrueType fonts and Open Type fonts, the barcode and 2D symbol fonts that are registered in the printer driver cannot be printed from an application. Therefore, TrueType fonts are replaced with barcode and 2D symbol fonts with the font replacement function of the printer driver. - Page 84 Printing barcodes and 2D symbols Sets specified number of point, language of the replaced TrueType font by barcode and 2D symbol font to the print data. The number of point for barcode and 2D symbol is specified; check it from [Barcode and 2D Symbol] on [Driver Utilities].
-
Page 85: Functions Of The Printer Driver
Chapter 4 Handling Functions of the Printer Driver The printer driver has “General,” “Page Layout,” “Driver Utilities,” and “Maintenance And Utilities” tabs to change various settings and for adjustments. [General] tab Favorite Setting Selects one of the registered print settings from the list. This is the default setting when printing. Changes to setting when installing the printer driver if [Default settings] is selected. - Page 86 [Page Layout] tab Favorite Setting Selects one of the registered print settings from the list. This is the default setting when printing. Changes to setting when installing the printer driver if [Default Settings] is selected. Orientation Changes settings of the printing direction (Portrait, Landscape, Rotate 180). Copies Sets the number of prints.
- Page 87 2D symbol fonts. Driver Preferences Changes settings for various functions related to the printer driver. EPSON Log File Settings Changes settings for the saving method for quick analysis when an error occurs. Import/Export Settings Imports or exports all the settings on the printer driver as a file.
- Page 88 [Maintenance And Utilities] tab Makes the following settings to the printer. Notification Settings Sets whether the buzzer beeps when an error occurs. Head Cleaning Performs head cleaning. The result of the head cleaning can be checked by the nozzle check pattern printing.
-
Page 89: Uninstallation
[Start] - [Control Panel] - [Uninstall a program] Windows XP [Start] - [Control Panel] - [Add or Remove Programs] Select [EPSON Printer Software], and click [Uninstall/Change]. The following screen is displayed. Select the printer driver to be uninstalled from the [Printer Model] tab. - Page 90 If you are using other EPSON printers and more than one [EPSON Network Utility] is dis- played, do not delete them. If they are displayed even if you are not using other EPSON printers, check all of them to delete.
-
Page 91: Uninstalling Status Api
Chapter 4 Handling “Uninstallation complete.” is displayed. Click [OK]. The uninstallation of the printer driver is completed. Uninstalling Status API Follow the steps below to uninstall Status API. To uninstall without displaying the screen, add the command (/s /v"/qn REMOVE=ALL") to the installation file name of Status API. - Page 92 Select [Remove], and click [Next]. Click [Remove]. Status API is uninstalled.
- Page 93 Chapter 4 Handling The uninstall completion screen is displayed. Click [Finish]. The uninstallation of Status API is completed.
-
Page 94: Self-Test
Self-test The self-test is performed by using the control panel. For the Ethernet interface model, using the self-test button on the printer back enables you to check the printer setting such as IP address. Procedure for the Self-test You can check the following items by performing the self-test using the control panel. •... - Page 95 Chapter 4 Handling Self-test using the self-test button (only for the Ethernet interface model) For the Ethernet interface model, You can check the following items by performing the self-test using the self-test button. • Printer setting information • Firmware version •...
- Page 96 The self-test result is printed. ★ EPSON Network Sheet ★ MAC address MAC xx:xx:xx:xx:xx:xx HW/SW XX.XX/XX.XX IP address IP XXX.XXX.XXX.XXX LN TM-C610-xxxxxx ★ Printer Sheet ★ Firmware version WTK xxxxx QP xxxxxx Nozzle check pattern The values for “X” in the above print result are different from each printer.
-
Page 97: Nozzle Check
Chapter 4 Handling Nozzle Check Printing the nozzle check pattern enables you to check whether the nozzles are clogged or not. The nozzle check can be performed in two methods: by the self-test, and by the printer driver. Nozzle Check using the Self-test Perform the self-test referring to "Self-test"... -
Page 98: Cleaning
Cleaning Cleaning the Printer Case To clean the printer case, wipe the dirt off the printer case with a dry cloth or a damp cloth. Be sure to turn off the printer before cleaning. Never clean the product with alcohol, benzine, thinner, or other such solvents. Doing so may damage or break the parts made of plastic and rubber. - Page 99 Chapter 4 Handling Head cleaning Using the CLEANING button Turn on the printer. Press the CLEANING button for 3 seconds or more. Head cleaning starts. The (Power) LED flashes during the head cleaning. CLEANING button When head cleaning finishes, the (Power) LED stays on.
-
Page 100: Transporting The Printer
Transporting the Printer For transporting the printer, be sure to follow the instructions below to prevent ink leakage under the reduced pressure occurring during air transportation. Make sure the (POWER) LED is turned on. (Wait about 10 seconds after the printer has finished its operations. Open the ink cartridge cover. -
Page 101: Storing Long-Term
Chapter 4 Handling Storing Long-term Before Long-term Storage Follow the steps below to store the printer after ink is charged. Perform the nozzle check. (See "Nozzle Check" on page 97.) If dots are missing in the print result, perform the head cleaning. (See "Head Cleaning"... -
Page 102: Troubleshooting
Troubleshooting Lighting and Flashing ERROR LED Recover from the error as follows when the ERROR LED is on or flashing. (For LED lighting/flashing patterns, see "Status/Error Indications" on page 21.) • Make sure that the roll paper cover or the ink cartridge cover is closed. Close the cover if it is open. -
Page 103: Maintenance Of The Tm-C610
Chapter 5 Maintenance of the TM-C610 Maintenance of the TM-C610 This chapter describes the necessary information for an administrator of the TM-C610, such as how to distribute the printer driver and add/replace the printer, or manage the printer in the system. -
Page 104: Necessary Information For An Administrator Of The Printer
Necessary Information for an Administrator of the Printer This section describes the necessary information for the administrator of the printer. Printer Driver Functions The TM-C610 printer driver has the following functions. ❏ Printing ❏ Printer driver settings • Print setting •... -
Page 105: Destination For The Printer Driver Setting
Chapter 5 Maintenance of the TM-C610 Destination for the Printer Driver Setting The following printer driver settings can be saved in a file. Saved as a BSF file Usage: - Exporting/importing from the printer driver - Creating an install package with the Install Assistant... -
Page 106: Installing Multiple Printer Drivers On One Client Computer
When installing multiple printer drivers on one client computer, there are separate setting items for each printer driver, and also common items for all the TM-C610 printer drivers. When a common setting item is changed in one printer driver, the same setting is applied to other TM-C610 printer drivers. - Page 107 Chapter 5 Maintenance of the TM-C610 Adding a printer driver using the install package When adding a printer driver using the install package created with the Install Assistant, the setting list of [Favorite Setting] and [User defined Media] settings is changed.
- Page 108 3. Install the install package for printer driver B. The “Favorite Setting“ list in the install package is for User Definition B; Client Computer therefore, the setting list is overwritten and User Definition A is deleted. Driver A Current Favorite Setting “Current Settings”...
- Page 109 Chapter 5 Maintenance of the TM-C610 Creating the install package The following steps are recommended to create the install package. Register all the print settings of the printer driver on the client computer to the “Favorite Setting” list, and create the BSF files.
-
Page 110: Using One Network Printer With Multiple Client Computers
Using One Network Printer with Multiple Client Computers To use one network printer with multiple client computers, create an Install Package for the printer, and install it to the client computers. Install Package Client Client Client Client Computer Computer Computer Computer Printer... -
Page 111: Distributing The Printer Driver And Making Printer Settings
• For the Ethernet interface model, creates an install package for each printer. • For the USB interface model, creates the install package for each printer driver setting. ❏ EPSON TMNet WinConfig (For details, see the Help in the EPSON TMNet WinConfig.) • Makes the network setting for the Ethernet interface model.... -
Page 112: Preparation For The Administrator
❏ Install package • Performs the printer driver installation/printer setting/port setting automatically. • Created by the Install Assistant using the BSF file and the TM-C610 printer driver. • For the Ethernet interface model, an install package is created for each printer. -
Page 113: Distribution Of The Printer Driver
Chapter 5 Maintenance of the TM-C610 Distribution of the Printer Driver Distribution Method for USB Interface Model The basic flow of the distribution method is described below. Client Computer Auto-install Driver Double-click Printer Favorite Setting List Install User Definition A... -
Page 114: Setup Of The Printer
BSF File Client Client Computer Computer For a shared printer, install to the print server using the TM-C610 printer driver. Do not install using the install package. Setup of the Printer Chapter 2 "Setup" to complete the setup of the printer. -
Page 115: Maintenance
Chapter 5 Maintenance of the TM-C610 Maintenance This section describes the following contents. ❏ Adding a client computer (for the Ethernet interface model) (page 115) ❏ Adding a printer (page 116) ❏ Adding a paper type/changing the print setting (page 117) ❏... -
Page 116: Adding A Printer
Prepare the BSF file for the existing printer driver and the install package including the net- work information. ❏ What to do after distribution ➀ Set the network information for the printer to add using EPSON TMNet WinConfig. ➁ Double-click the icon of the install package on the client computer to install the printer driver. -
Page 117: Adding A Paper Type/Changing The Print Setting
Chapter 5 Maintenance of the TM-C610 Adding a Paper Type/Changing the Print Setting Follow the steps below to add a paper type or change the print setting of the printer driver on each client computer. ❏ Item to be prepared by the administrator •... - Page 118 Set the new printer the network settings such as the IP address of the existing printer. Setting is made with EPSON TMNet WinConfig. The printer driver setting is not necessary. ❏ Preparation • Obtain the network information (such as IP address) of the existing printer using EPSON TMNet WinConfig. ❏ Replacing procedure ➀...
Need help?
Do you have a question about the TM-C610 and is the answer not in the manual?
Questions and answers