Advertisement
Available languages
Available languages
Quick Links
CV 300 & CV 380
WARNING:
This product and accessories may contain a chemical
State of California to cause cancer and birth defects or other
reproductive harm.
For more information about this regulation:
If Serial Number not listed, Contact Manufacturer
known
to the
www.P65Warnings.ca.gov
Operating instructions (ENG)
MODELS:
From Serial No. # D168002326 for CV 300
# D169004202 for CV 380
86404600-D 03/02/18
Vacuum
CV 300
1.012-059.0
CV 380
1.012-060.0
Advertisement
Chapters

Subscribe to Our Youtube Channel
Related Manuals for Kärcher CV 380


Summary of Contents for Kärcher CV 380
- Page 1 CV 300 & CV 380 Vacuum Operating instructions (ENG) MODELS: CV 300 1.012-059.0 CV 380 1.012-060.0 From Serial No. # D168002326 for CV 300 # D169004202 for CV 380 If Serial Number not listed, Contact Manufacturer WARNING: This product and accessories may contain a chemical...
-
Page 2: Machine Data Label
Machine Data Label Warranty Registration Thank you for purchasing a Kärcher North America product. Warranty registration is quick and easy. Your registration will allow us to serve you better over the lifetime of the product. To register your product go to : http://warranty.karcherna.com/ For customer assistance: 1-800-444-7654... -
Page 3: Table Of Contents
Table of Contents Machine Data Label ......2 Table of Contents ......3 How To Use This Manual . -
Page 4: How To Use This Manual
How To Use This Manual This manual contains the following sections: The OPERATIONS section is to familiarize the operator with the operation and function of the • How to Use This Manual machine. • Safety The MAINTENANCE section contains preventive •... -
Page 5: Safety
Safety IMPORTANT SAFETY INSTRUCTIONS When using an electrical appliance, basic precaution must always be followed, including the following: READ ALL INSTRUCTIONS BEFORE USING THIS MACHINE. To reduce the risk of fire, electric shock, or injury: Do not leave appliance when plugged in. Unplug from outlet when not in use and before servicing. Do not use outdoors or on wet surfaces. -
Page 6: Important Safeguards
Safety Important Safeguards Accidents due to misuse can only be prevented by those using the machine. To guard against injury, basic safety precautions should be observed, including the following: WARNING: ELECTRICSHOCK COULD OCCUR IF USED OUTDOORS OR ON WET SURFACES Read and follow all safety instructions. -
Page 7: Grounding Instructions
Safety GROUNDING INSTRUCTIONS This appliance must be grounded, if it should malfunction or breakdown, grounding provides a path of least resistance for electric current to reduce the risk of electric shock. This appliance is equipped with a cord having an equipment–grounding conductor and grounding plug. The plug must be inserted into an appropriate outlet that is properly installed and grounded in accordance with all local codes and ordinances. -
Page 8: Operations
Operations Technical Specifications Vacuum Portion: (Carry unit) ITEM DIMENSION/CAPACITY Vacuum Motor High Performance, single stage Vacuum Motor Rated Power 1000 Watts Vacuum Motor Maximum Power 1200 Watts Suction 225 Mbar (2300 mm WS) Waterlift 92 in (234 cm) Air Flow 102 cfm (48 l/s) Filter Bag Capacity 3.5 liters, 3 layer, enclosed, top-loading... -
Page 9: Components/Controls
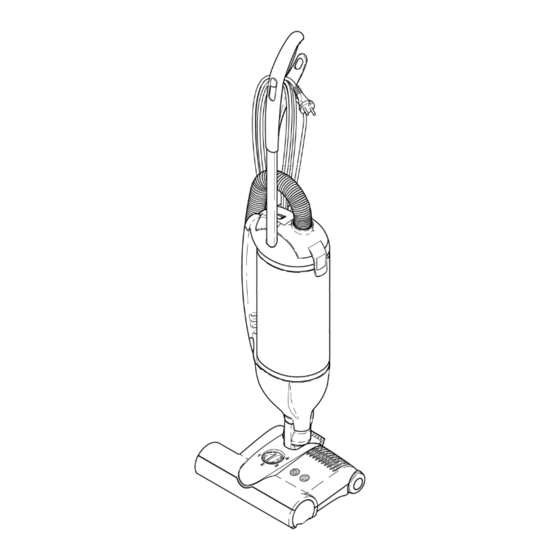
Operations Components/Controls 1. Handle 2. Tube 3. Dust Bag Housing 4. Filter Cover 5. Cable Hook 6. Hose 7. Hose Handle 8. Carrying Handle 9. Exhaust Filter 10. Filter Retaining Rings 11. Neck 12. Foot Pedal 13. Power Head (12" - 15") A. -
Page 10: Assembly
Operations Assembly Please read all instructions before using this machine. 1. Carefully attach the brush nozzle to the vacuum cleaner through the fitting at the bottom of the vacuum until it locks. [See below] 2. Push the black end of the hose [A] into the connection on the filter cover [B]. - Page 11 Operations Power Head The rotating design of the swivel neck allows the power head to move in any direction, making it easily Important instructions for use on the power head. maneuverable around obstacles. The brush roller is off and stopped when the machine The power head also has an adjustable brush height is in the upright position and the handle is completely and to-the-edge brush action for effective all around...
-
Page 12: Indicator Lights
Operations Indicator Lights The electronic brush control constantly monitors the status of the brush, communicating the status through the lights on top. Green On/Off Light: Brush is on and spinning. Red Light: The brush is not fully engaged in the carpet. -
Page 13: Maintenance
Maintenance Brush Roller Changing Filters To remove the brush roller, press the button and turn Motor Protection Filter the bearing downward. NOTE: This filter can only be accessed by removing Turn the brush slightly to the right and pull it out. the filter bag. -
Page 14: Removing Blockages
Maintenance Removing Blockages If your bag full indicator light remains lit after you have changed bags and/or filters this is an indication that there may be a blockage somewhere in your unit. It is important to keep all areas of the system free from blockage, as this may damage your unit or its compo- nents. - Page 15 CV 300 & CV 380 Vacuum Instrucciones de funcionamiento (SPA) MODELS: CV 300 1.012-059.0 CV 380 1.012-060.0 De Serial No. # D168002326 for CV 300 # D169004202 for CV 380 Si Número de serie no aparece,Contacto Fabricante 86404600-D 03/02/18...
-
Page 16: Etiqueta De Datos De La Máquina
Etiqueta de Datos de la Máquina Modelo: Fecha de la compra: Número de serie: Distribuidor: Dirección: Nº de teléfono: Representante de ventas: Registro de Garantía Gracias por comprar un producto de Kärcher North America. El registro de la garantía es rápido y fácil. Su registro permitirá que le sirvamos mejor sobre el curso de la vida del producto. - Page 17 Índice Etiqueta de Datos de la Máquina ... . . 2 Índice ........3 Cómo Utilizar El Manual .
-
Page 18: Cómo Utilizar El Manual
Cómo Utilizar El Manual El manual contiene las siguientes secciones: El objetivo de la sección FUNCIONAMIENTO es familiarizar al operario con el manejo y el funciona- • Cómo Utilizar El Manual miento de la máquina. • Seguridad La sección MANTENIMIENTO incluye instrucciones •... -
Page 19: Seguridad
Seguridad INSTRUCCIONES IMPORTANTES DE SEGURIDAD Al usar un aparato eléctrico, siempre se deben tomar precauciones básicas, entre las que se incluyen las siguientes: LEA TODAS LAS INSTRUCCIONES ANTES DE UTILIZAR LA MÁQUINA. Para reducir el riesgo de incendio, descargas eléctricas y lesiones: No deje la máquina enchufada. -
Page 20: Precauciones Importantes
Seguridad Precauciones Importantes Los accidentes por uso inapropiado sólo podrán evitarse por las personas que utilicen la maquina. Para preve- nirse de daños, deben observarse las precauciones básicas de seguridad, incluyendo las siguientes: Lea y siga todas las instrucciones ADVERTENCIA: SI SE UTILIZA AL AIRE LIBRE O SOBRE SUPERFICIES de Seguridad. -
Page 21: Instrucciones Para La Puesta A Tierra
Seguridad INSTRUCCIONES PARA LA PUESTA A TIERRA Este dispositivo tiene que ser puesto debidamente a tierra. Si se produce una avería o rotura, la conexión a tierra constituye el camino de menor resistencia para la corriente eléctrica, reduciéndose el riesgo de descargas peligrosas. -
Page 22: Funcionamiento
Funcionamiento Especificaciones técnicas Pieza De Aspiración: (Unidad transportable) ELEMENTO DIMENSIÓN/CAPACIDAD Motor de aspiración De alto rendimiento, de una sola etapa Potencia nominal del motor de aspiración 1000 Vatios Potencia máxima del motor de aspiración 1200 Vatios Succión 225 Mbar (2300 mm WS) Altura de agua 92 pulgadas (234 cm) Caudal de aire... -
Page 23: Componentes/Controles
Funcionamiento Componentes/Controles 1. Manija 2. Caño 3. Alojamiento de la bolsa 4. Cubierta del filtro 5. Gancho para el cable 6. Manguera 7. Manija de la manguera 8. Manija 9. Filtro de escape 10. Anillos de retención del filtro 11. Cuello giratorio 12. -
Page 24: Ensamblado
Funcionamiento Ensamblado Por favor, lea todas las instrucciones antes de utilizar la máquina. Conecte cuidadosamente la boquilla del cepillo a la aspiradora, a través del accesorio ubicado en la base de la aspiradora, hasta que quede trabada. [Ver a continuación] Empuje el extremo negro de la manguera [A] dentro de la conexión ubicada en la tapa del filtro [B]. - Page 25 Funcionamiento Cabezal Motor El diseño rotativo del cuello giratorio permite que el Instrucciones importantes relacionadas con el cabezal cabezal motor se mueva en todas direcciones, facil- motor. itando su manipulación cuando hay obstáculos. Cuando la máquina está en posición vertical y la manija El cabezal motor tiene también altura regulable del está...
-
Page 26: Luces Indicadoras
Funcionamiento Luces Indicadoras El control electrónico del cepillo supervisa constante- mente el estado del cepillo y lo transmite mediante las luces ubicadas en la parte superior. Luz verde de encendido/apagado: el cepillo está activado y girando. Luz roja: el cepillo no está totalmente enganchado en la alfombra. -
Page 27: Mantenimiento
Mantenimiento Rodillo Cepillador Cambio De Los Filtros Para sacar el rodillo cepillador, oprima el botón y gire el Filtro de protección del motor cojinete hacia abajo. NOTA: Sólo se puede acceder a este filtro sacando la Gire el cepillo levemente hacia la derecha y tire del bolsa del filtro. -
Page 28: Desbloqueo De La Máquina
Mantenimiento Desbloqueo De La Máquina Si el indicador de bolsa llena sigue encendido después de cambiar las bolsas y / o los filtros, indica que alguna parte de la unidad puede estar bloqueada. Es importante mantener libres de bloqueos a todas las partes del sistema ya que los mismos pueden dañar su unidad o sus componentes. - Page 29 CV 300 & CV 380 Vacuum Instructions sure le fonctionnement (FRE) MODELS: CV 300 1.012-059.0 CV 380 1.012-060.0 De série n ° # D168002326 for CV 300 # D169004202 for CV 380 Si le numéro de série ne figure pas, contacter le fabricant...
- Page 30 Données de la Machine Modèle : Date d’achat : Numéro de série : Détaillant : Adresse : Numéro de téléphone : Représentant commercial: Enregistrement de la garantie Merci d'avoir acheté un produit Kärcher North America. L'enregistrement de la garantie est facile et rapide. Votre enregistrement nous permettra de mieux vous servir tout au long de la durée de vie de votre produit.
- Page 31 Table des matières Données de la Machine..... 2 Table des matières ......3 Comment Utiliser Ce Manuel .
-
Page 32: Comment Utiliser Ce Manuel
Comment Utiliser Ce Manuel Ce manuel comprend les parties suivantes La partie OPERATIONS est destinée à familiariser l'opérateur avec l'opération et la fonction de la • Comment Utiliser Ce Manuel machine. • Securite La partie ENTRETIEN contient un entretien préventif •... -
Page 33: Instructions Importantes Sur La
Sécurité INSTRUCTIONS IMPORTANTES SUR LA SECURITE Lors de l'utilisation d'appareils électriques, il faut toujours suivre des précau- tions de base, y compris ce qui suit: LISEZ TOUTES LES INSTRUCTIONS AVANT D'UTILISER LA MACHINE. Pour réduire les risques d'incendie, d'électrocution ou de blessure: Ne laissez pas l'appareil branché. -
Page 34: Mesures De Sécurité Importantes
Sécurité Mesures De Sécurité Importantes Lire et suivre toutesles instructions de ATTENTION: RISQUE DE CHOC ELECTRIQUE EN CAS D'USAGE sécurité A L'EXTERIEUR OU SUR SURFACE HUMIDE Cet aspirateur est conçu pour fonctionner sans danger lorsqu'il est utilise pour nettoyer. Au cas ou des pieces mécaniques ou électriques étaient endommagées, l'aspirateur doit être répare par entreprise de services d'entretien qualifiée avant d'être utilise à... -
Page 35: Instructions Visant La Mise À La Terre
Sécurité Instructions Visant La Mise À La Terre Cet appareil doit être mis à la terre. En cas de défaillance ou de panne éventuelles, la mise à la terre fournit au courant un chemin de moindre résistance qui réduit le risque de choc électrique. Cet appareil est pourvu d'un cordon muni d'un conducteur de terre et d'une fiche avec broche de terre. -
Page 36: Fonctionnement
Fonctionnement Specifications Techniques Partie Aspirateur (Unité portable) ELEMENT DIMENSION/CAPACITE Moteur de l'aspirateur Performance élevée. Un étage Puissance nominale 1000 Watts Puissance maximale du moteur 1200 Watts Aspiration 225 Mbar (2300 mm WS) Prise d'eau 92 in (234 cm) Débit d'air 102 cfm (48 l/s) Capacité... -
Page 37: Composants/Commandes
Fonctionnement Composants/commandes 1. Poignée 2. Tube 3. Logement du sac à poussière 4. Couvercle du filtre 5. Crochet du câble 6. Hôte 7. Poignée du tuyau 8. Poignée de transport 9. Fitre d'échappement 10. Bagues de retenue du filtre 11. Bascule 12. -
Page 38: Assemblage
Fonctionnement Assemblage Lors de l'utilisation du tuyau et accessoires, laissez la machine debout. Veuille z lire toutes les instructions avant d'utiliser cette machine. La poignée à tuyau peut être retirée du côté de l'aspi- rateur et peut être utilisée ave ou sans accessoires. 1. - Page 39 Fonctionnement Tete D' Alimentation La tête d'alimentation comporte aussi une hauteur Instructions importantes sur l'utilisation de la tête réglable de balai et une action du balai au bord pour d'alimentation. un nettoyage effectif général. Lez rouleau à brosses est arrêté si la machine est en Pedale position debout et si la poignée est bien verrouillée en place.
-
Page 40: Lumieres Indicatrices
Fonctionnement Lumieres Indicatrices La commande électronique des balais surveille constamment l'état des balais, en communiquant cet état par la lampe de dessus. Témoin de marche/arrêt vert : La brosse est en marche et elle tourne. Témoin rouge : La brosse n'entre pas complètement en contact avec le tapis. -
Page 41: Entretien
Entretien Rouleau A Balai Changement Des Filtres Pour enlever le rouleau à balai appuyer sur le bouton Filtre de protection du moteur et tourner vers le bas le roulement. REMARQUES: REMARQUES: On ne peut accéder Tourner le balai légèrement vers la droite et le tirer à... -
Page 42: Enlevement Des Bouchons
Entretien Enlevement Des Bouchons Si votre lampe indicatrice que le sac est plein reste allumée après le changement de sacs et/oui de filtres, ceci est une indication qu'il peut y avoir un bouchon quelque part dans l'unité. Il est important de garder toutes les zones libres de bouchons car cela peut endommager votre machine ou ses composants. - Page 43 Spare Parts List (1.012-059.0, 1.012-060.0) CV300 & CV380 From Serial Number #___________ If Serial Number not listed, Contact Manufacturer 86404600 CV...
- Page 44 Parts-Tools, Bags & Filters Power Head Optional Attachments Spare Parts 86404600 CV...
-
Page 45: Power Head
Parts-Tools, Bags & Filters Power Head ITEM PART NO. REF NO. DESCRIPTION NOTES 86324000 9964AX POWER HEAD 12” CV300 Only 86324010 9965AX POWER HEAD 15” CV380 Only Optional Attachments ITEM PART NO. REF NO. DESCRIPTION NOTES 86409710 1081sw CLIPS, ATTACHMENT, BLACK 86319300 1092sw CREVICE NOZZLE, BLACK... -
Page 46: Upper Housing
Upper Housing 86404600 CV... -
Page 47: Upper Housing
Upper Housing ITEM PART NO. REF NO. DESCRIPTION NOTES 86137750 7135GS AIR DUCT, GRAY BLACK 86146820 7065 INTERNAL WIRING ET 86142920 7096 INTERNAL CABLE 86144780 01016ER SCREW STS 4X16-T20 86146510 7057HG VALVE COVER 86139960 7102ER PRINTED CIRCUIT BOARD 120V 86145180 7098 SOUND INSULATION 86146380... -
Page 48: 12" Power Head
12” Power Head 86404600 CV... - Page 49 12” Power Head ITEM PART NO. REF NO. DESCRIPTION NOTES 86322210 2324SW CHASSIS ET1 12”, BLACK 86322220 2302sw BUMPER 12”, BLACK 86322230 2314gs BEARING BLOCK LEFT CPL. GS 86138220 2923 BELT 333 3M HTDII-6 86004950 5010WI BRUSH ROLLER 12” 86322240 2313sw BEARING BLOCK RH, BLACK 86145260...
-
Page 50: 15" Power Head
15” Power Head 86404600 CV... -
Page 51: 15" Power Head
15” Power Head ITEM PART NO. REF NO. DESCRIPTION NOTES 86322350 2325SW CHASSIS, ET2 15" BLACK 86322360 2303sw BUMPER, ET2,CPL 15” BLACK 86322230 2314gs BEARING BLOCK LEFT CPL. GS 86138220 2923 BELT 333 3M HTDII-6 86138490 2838WI BRUSH ROLLER, CPL. 86322240 2313sw BEARING BLOCK, RIGHT BLACK... - Page 52 Notes 86404600 CV...
- Page 53 Notes 86404600 CV...
- Page 54 86404600-C 06949KG...
Need help?
Do you have a question about the CV 380 and is the answer not in the manual?
Questions and answers