Element4 Modore 100H Installation Manual
Direct vent gas fireplaces
Hide thumbs
Also See for Modore 100H:
- Installation, operation and owner's manual (93 pages) ,
- User and installation manual (44 pages) ,
- Installation, operation and owner's manual (62 pages)
Table of Contents
Advertisement
Quick Links
Product
Trisore 100H
Information
Promotional Video
HOT GLASS WILL
CAUSE BURNS.
DO NOT TOUCH GLASS
UNTIL COOLED.
NEVER ALLOW CHILDREN
TO TOUCH GLASS.
A barrier designed to reduce the risk of burns from the hot viewing glass is provided with this appliance and shall be installed
for the protection of children and other at-risk individuals.
Une barrière conçu pour réduire le risque de brûlure par le verre de visualisation chaude est fournie avec cet appareil et doit
être installé pour la protection des enfants et autres personnes à risque.
WARNING:
FIRE OR EXPLOSION HAZARD
Failure to follow safety warnings exactly could
result in serious injury, death, or property damage.
- Do not store or use gasoline or other flammable
vapors and liquids in the vicinity of this or any
other appliance.
- WHAT TO DO IF YOU SMELL GAS
• Do not try to light any appliance.
• Do not touch any electrical switch; do not
use any phone in your building.
• Leave the building immediately.
• Immediately call your gas supplier from a
neighbor's phone. Follow the gas supplier's
instructions.
• If you cannot reach your gas supplier, call
the fire department.
- Installation and service must be performed
by a qualified installer, service agency or the
gas supplier.
INSTALLER: Leave this manual with the appliance.
CONSUMER: Retain this manual for future reference.
Element4 Gas Fireplaces
Installation Manual
Modore 100H
Bidore 100H
Trisore 100H
Direct Vent
Gas Fireplaces
Une surface vitrée chaude
peut causer des brûlures.
Laisser refroidir la surface
vitrée avant d'y toucher.
Ne permettez jamais á un enfant
de toucher la surface vitrée.
AVERTISSEMENT:
INCENDIE OU D'EXPLOSION
Le non-respect des avertissements de sécurité à la
lettre pourrait entraîner de graves blessures , la mort
ou des dommages matériels.
- Ne pas entreposer ni utilizer d'essence ni d'autres vapeurs
ou liquides inflammables dans le voisinage de cet appareil
ou de tout autre appareil.
- QUE FAIRE SI VOUS SENTEZ UNE ODEUR DE GAZ
• Ne pas tenter d'allumer d'appareil.
• Ne touchez á aucan interrupteur. Ne pas vous servir des
téléphones se trouvant dans le bátiment ou vous trouvez.
• Quitter immédiatement le bâtiment.
• Appelez immédiatment votre fournisseur de gaz depuis
un voisin. Suivez les instructions du fournisseur.
• Si vous ne pouvez rejoindre le fournisseur de gaz
appelez le service des incindies.
- Installation et l'entretien doivent être effectués par un
installateur qualifié, une agence de service ou le fournisseur
de gaz.
INSTALLATEUR: Laissez cette notice avec l'appareil.
CONSOMMATEUR: Conservez cette notice pour
consultation ultérieure.
1
April 20, 2016
EuropeanHome.com
Advertisement
Table of Contents

Related Manuals for Element4 Modore 100H


Summary of Contents for Element4 Modore 100H
- Page 1 Installation Manual Modore 100H Bidore 100H Trisore 100H Product Trisore 100H Information Promotional Video Direct Vent Gas Fireplaces HOT GLASS WILL Une surface vitrée chaude CAUSE BURNS. peut causer des brûlures. DO NOT TOUCH GLASS Laisser refroidir la surface UNTIL COOLED.
-
Page 2: Table Of Contents
TABLE OF CONTENTS Important Safety Information User Information Specifications and Dimensions Modore 100H Bidore 100H Trisore 100H Parts of the Fireplace Clearances Gas and Electric Venting Horizontal Vertical Restrictors Enclosing the Fireplace Non- combustible Materials List Convection Air Opening Rough Opening Dimensions... -
Page 3: Important Safety Information
Do not place furniture or other objects within 36” of the fireplace glass. SAVE THESE INSTRUCTIONS Make yourself fully aware of all the following instructions and the many features of the Element4 direct vent gas fireplace appliance. INSTALLER: Leave this manual with the appliance. - Page 4 Canada, consult with the local authority having jurisdiction for gas product installations to determine their The glass must only be removed by a qualified person. specific requirements for high altitude installations. Gloves should be worn when removing the glass. Element4 Gas Fireplaces EuropeanHome.com...
- Page 5 For convenience, the inches are rounded to the nearest 1/16” when converted. If greater accuracy is DO NOT USE abrasive cleaners on the panels. DO NOT required, use the metric dimensions. ATTEMPT to clean the glass panels when they are hot. Element4 Gas Fireplaces EuropeanHome.com...
-
Page 6: User Information
The Element4 fireplaces are direct vent fireplaces and, as such, the intake and exhaust are both handled through the vent pipe. The fireplace also provides convection air to your room. Figure 1 shows one of the unique features of the Element4 fireplaces - its use of warm, convection air flow. -
Page 7: Specifications And Dimensions
SPECIFICATIONS and DIMENSIONS APPLIANCE RATINGS Bidore 100H Model Modore 100H Trisore 100H Natural Propane Input Maximum Btu/hr 34,145 34,145 Input Minimum Btu/hr 15,025 17,075 in. w.c. Maximum Supply Pressure 1.74 2.74 in. w.c. Minimum Supply Pressure in. w.c. Manifold Pressure Maximum 0.53... - Page 8 Mantel / Linteau : 2” (5cm) Figure 3 Typical Rating Label A typical rating label is shown in Figure 3. It is attached to every Element4 fireplace and contains important certification information. It must not be removed from the fireplace.
-
Page 9: Modore 100H
SPECIFICATIONS and DIMENSIONS MODORE 100H Letter Inches Millimeters 77/8 51/16 393/8 1000 431/2 1104 155/8 393/8 1000 411/16 357/16 135/16 2911/16 MODORE 100H Element4 Gas Fireplaces EuropeanHome.com... -
Page 10: Bidore 100H
SPECIFICATIONS and DIMENSIONS BIDORE 100H Letter Inches Millimeters 77/8 51/16 383/16 415/8 1057 155/8 395/8 1005 411/16 357/16 135/16 2911/16 BIDORE 100H Element4 Gas Fireplaces EuropeanHome.com... -
Page 11: Trisore 100H
SPECIFICATIONS and DIMENSIONS TRISORE 100H Letter Inches Millimeters 77/8 51/16 383/4 415/16 1050 155/8 415/16 1050 411/16 357/16 135/16 2911/16 TRISORE 100H Element4 Gas Fireplaces EuropeanHome.com... -
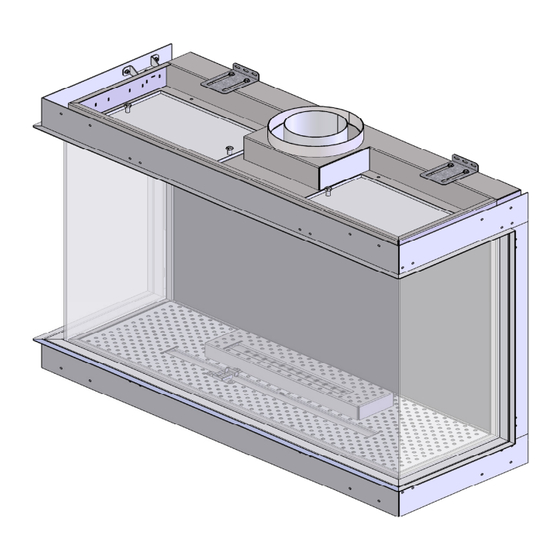
Page 12: Parts Of The Fireplace
SPECIFICATIONS and DIMENSIONS PARTS OF THE FIREPLACE Parts of the 100H fireplace are shown in Figures 4, 5 and 6. Figure 4 Figure 5 shows two Glass Clamps , after the front Finish Trim is removed. Figure 5 Element4 Gas Fireplaces EuropeanHome.com... - Page 13 Finish Trim - hides the Glass Clamps Interior Glass Panel (optional) Glass Clamp - holds the Glass Panel in place (4 ea. - Modore 100H, 6 ea. - Bidore 100H, 10 ea. - Trisore 100H) Vent Collar - accepts the 5” x 8” venting adapter (included) Relief Door - part of the safety system.
-
Page 14: Clearances
Do not place anything between the bottom of the firebox and the bottom of the feet. Ensure that the line set (which includes the gas valve, electrical wiring, and gas lines) does not impede the full operation of the relief doors. Element4 Gas Fireplaces EuropeanHome.com... - Page 15 Figure 7 Plan View - Modore 100H 26” 26” 660 mm 660 mm 11” 11” 11” 280 mm 280 mm 280 mm Figure 8 Front Elevation View - Modore 100H Figure 9 Side Elevation View - Modore 100H Element4 Gas Fireplaces EuropeanHome.com...
- Page 16 *drawings not to scale Figure 10 Plan View - Bidore 100H 26” 660 mm 26” 660 mm 11” 11” 280 mm 280 mm Figure 11 Front Elevation View - Bidore 100H Figure 12 Side Elevation View - Bidore 100H Element4 Gas Fireplaces EuropeanHome.com...
- Page 17 *drawings not to scale Figure 13 Plan View - Trisore 100H 26” 26” 660 mm 660 mm 11” 280 mm Figure 14 Front Elevation View - Trisore 100H Figure 15 Side Elevation View - Trisore 100H Element4 Gas Fireplaces EuropeanHome.com...
- Page 18 12”/300 mm MATERIAL CONSTRUCTION BEAMS NON- COMBUSTIBLE (TYPICAL) DETAIL C 1”/25 mm ETAIL C (1) 25 GLASS ALE 1 : 10 TOP OF TOP OF FIREPLACE FIREPLACE OPENING OPENING GLASS CONVECTION GAP Figure 16 Figure 17 Element4 Gas Fireplaces EuropeanHome.com...
- Page 19 Convection Air Outlet Area by Model Minimum Distances Square Square Room ceiling to 72” Model Inches Centimeters appliance bottom 1830 Modore 100H Room ceiling to top of 1” Convection Air Outlet Bidore 100H Trisore 100H Table 2 Table 3 Element4 Gas Fireplaces EuropeanHome.com...
-
Page 20: Gas And Electric
ELECTRICAL REQUIREMENTS The Element4 fireplaces use a receiver and remote control for their burner operation. The remote control comes with (3) AAA batteries and the receiver is powered by a 120V AC adapter, included. The fireplace should be powered by the AC adapter for improved reliability and customer satisfaction. -
Page 21: Venting
Your venting needs to be inspected annually, including any connected components, to ensure that the system is working as designed. For the M&G venting installation guide or power venting installation manuals please visit the link below. Element4 Gas Fireplaces EuropeanHome.com... - Page 22 VENTING rise Figure 19 APPROVED MANUFACTURERS and COMPONENTS Manufacturer Components only DirectVent Pro® M&G DuraVent, Inc. 5” x 8” venting components Table 5 Element4 Gas Fireplaces EuropeanHome.com...
-
Page 23: Horizontal
Dimension “V”. (See Graph 1) Dimension “V” (rise) can vary between 19”/500 minimum to 11’5”/3.5 m maximum depending on Dimension “H”. (See Graph 1) Note: Configurations with horizontal terminations may need a restrictor. See the INSTALLING A RESTRICTOR section. Element4 Gas Fireplaces EuropeanHome.com... - Page 24 90° elbow, a total run of 13’2”/4.0 is allowed. Example B: If the rise is 8’2”/2.5 then the run can be no longer than 14’10”/4.5 Example C: If the run is 16’5”/5.0 then the rise must be at least 9’10”/3.0 Element4 Gas Fireplaces EuropeanHome.com...
- Page 25 VENTING HORIZONTAL HORIZONTAL VENT TERMINATION CLEARANCES AND REQUIREMENTS Element4 Gas Fireplaces EuropeanHome.com...
-
Page 26: Vertical
Power vent systems are available for configurations beyond these limits. Distance "V" 1m - 11m (min - max) Note: Configurations with vertical terminations may need a restrictor. See the INSTALLING A RESTRICTOR section. Figure 21 Vertical Terminations with NO elbows Element4 Gas Fireplaces EuropeanHome.com... - Page 27 Power vent systems are available for configurations beyond these limits. Distance "V" =2x "H" (min) Note: Configurations with vertical terminations may need a restrictor. See the INSTALLING A RESTRICTOR section. Figure 22 Vertical Terminations with 90° elbows Element4 Gas Fireplaces EuropeanHome.com...
- Page 28 Power vent systems are available for configurations beyond these limits. Distance "V" =2x "H" (min) Note: Configurations with vertical terminations may need a restrictor. See the INSTALLING A RESTRICTOR section. Figure 23 Vertical Terminations with 45° elbows Element4 Gas Fireplaces EuropeanHome.com...
- Page 29 National Fuel Gas Code (ANSI Z223.1 in the USA) or the current standard of CAN/CSA-B149.1 in Canada. Chart 1 Termination Heights A second termination may be no closer than 12”/305 . (See Figure 24) Figure 24 Multiple Termination Clearance Element4 Gas Fireplaces EuropeanHome.com...
-
Page 30: Restrictors
When vertical section is up to 3’3”/1 no restrictor required When vertical section is greater than 3’3”/1 restrictor -------------------------------------------------------------------------------------------------------------------------------------- When Using a Vertical (Roof) Termination When rise is up to 6’6”/2 When rise is greater than 6’6”/2 Figure 25 Figure 26 Element4 Gas Fireplaces EuropeanHome.com... -
Page 31: Enclosing The Fireplace
ENCLOSING the FIREPLACE When enclosing your Element4 fireplace the use of non-combustible building materials is REQUIRED. Please read and understand the following. COMBUSTIBLE MATERIALS Materials that can catch fire and burn are considered combustible. Any material that is made of, or faced with, wood, wood pulp, paper, plastic or any other material that can catch fire and burn is considered combustible. -
Page 32: Convection Air Opening
1. Most important, these fireplaces are NOT zero-clearance fireplaces. Unlike zero-clearance fireplaces, there is not a metal box around the Element4 fireplaces. With no metal box there are no louvers to distract your view of the fire. However, we want the cooling advantage of a metal box so your site-built, non-combustible enclosure will substitute. - Page 33 ENCLOSING the FIREPLACE Modore 100H with Modore 100H with Convection Outlets Outlet Reveal Bidore 100H with Bidore 100H with Convection Outlets Outlet Reveal Trisore 100H with Trisore 100H with Convection Outlets Outlet Reveal Element4 Gas Fireplaces EuropeanHome.com...
- Page 34 Any support framing must be at least 2”/50 (NON-combustible framing ONLY) above and beside the fireplace. The entire weight of the non-combustible walls must be borne by a structure other than the fireplace. Dimension B Dimension A Figure 27 Element4 Gas Fireplaces EuropeanHome.com...
-
Page 35: Rough Opening Dimensions
ENCLOSING the FIREPLACE MODORE 100H Framing Dimensions (Noncombustible Framing) 471/2” / 1207mm 175/8” / 448mm 41” / 1041mm Figure 28 BIDORE 100H Framing Dimensions (Noncombustible Framing) 431/2” / 1105mm 1711/16” / 448mm 447/8” / 1140mm Figure 29 TRISORE 100H Framing Dimensions (Noncombustible Framing) 455/16”... - Page 36 LOCATING THE CONTROLS The control system for the Element4 fireplaces consist of three major components: the receiver, the transmitter and the gas valve. The transmitter is the remote control by which you operate the fireplace. The receiver and the gas valve are at one end of a line set which is approximately 50”/1270...
- Page 37 One of the tie wraps which secure the line set. Figure 32 Wall Access Door Frame Figure 31 Tighten bolt through mounting bosses (at arrows) Fit tab into bracket on Access Door Figure 33 Figure 34 Element4 Gas Fireplaces EuropeanHome.com...
- Page 38 ENCLOSING the FIREPLACE Figure 35 Receiver in Wall Access Door Figure 36 Access Door Installed Element4 Gas Fireplaces EuropeanHome.com...
-
Page 39: Operating The Fireplace
6. Place the three AAA batteries into the remote control and confirm that it will communicate with the receiver by pressing the ON/OFF. (See Figure 38) If necessary pair the remote and receiver. 7. Follow USING THE REMOTE CONTROL ELECTRONIC IGNITION SEQUENCE to setup and use remote. THIS PART WAS INTENTIONALLY LEFT BLANK Element4 Gas Fireplaces EuropeanHome.com... - Page 40 Temp - Daytime Temperature mode. The appliance must be in standby mode, pilot ignited. The room temperature is measured and compared to the set temperature. The flame height is then automatically adjusted to reach the daytime set temperature. Element4 Gas Fireplaces EuropeanHome.com...
- Page 41 2. The system shuts off the fire completely if there is no change in flame height for 5 days. 3. The system shuts off the fire if the main burner does not completely ignite approximately 20 seconds after ignition or after pushing the Ç button. Element4 Gas Fireplaces EuropeanHome.com...
- Page 42 Since it is a metal fireplace, the heat-up and cool-down cycles may produce some noises caused by the expansion and contraction of these metals. The premium materials and build quality of your fireplace will keep these sounds to a minimum. To see an Element4 fireplace starting and running normally please visit the link below.
-
Page 43: Installing The Fire Media
The use of this ash is optional. To use: -Sprinkle the ash onto the logs as desired. -Make sure that the ash DOES NOT get inside of the burner ports. If so, clogging may occur. Element4 Gas Fireplaces EuropeanHome.com... - Page 44 Figure 42 shows the pilot area (arrow) clear of media. Figure 43 shows the 2 thermocouple area (arrow) clear of media. Figure 42 Figure 43 To see how to arrange media in an Element4 fireplace please visit the link below. WWW.EUROPEANHOME.COM/RESOURCES/VIDEOS/ Element4 Gas Fireplaces EuropeanHome.com...
-
Page 45: Screen Installation
SCREEN INSTALLATION MODORE 100H BIDORE 100H TRISORE 100H Tabs Tabs Tabs Magnets Magnets Magnets Long Screen Long Screen Long Screen Short Screen Short Screen Short Screen (Long Screen) (Short Screen) Element4 Gas Fireplaces EuropeanHome.com... - Page 46 Once installed on the top left viewable corner, the tab installed should look like the photo above. One magnet will be holding the tab in place (not visible) and the other magnet will hold the screen to the front of the unit. Element4 Gas Fireplaces EuropeanHome.com...
- Page 47 Once the (2) top tabs are installed correctly, place the long screen’s (2) bottom tabs in the gap between the bottom trim and the flange. They should fall into place without any effort or resistance. Tilt the screen towards the top (2) tabs as shown below, magnets will catch the screen and hold it into place. Element4 Gas Fireplaces EuropeanHome.com...
- Page 48 SCREEN INSTALLATION Here is another view of the (2) top tabs in place before the screen is tilted into position. This is the final view of the front long screen installed correctly. Element4 Gas Fireplaces EuropeanHome.com...
- Page 49 (1) tab to be installed on the top, with a magnet holding the tab to the unit and the other magnet visible as shown below. The tab should look like the photo on the left once installed correctly. Element4 Gas Fireplaces EuropeanHome.com...
- Page 50 Once installed properly the screen should look like the photo to the left. If needed, slide the screen gently left or right until the edges of the screen touch. Element4 Gas Fireplaces EuropeanHome.com...
- Page 51 SCREEN INSTALLATION This is the final look of a screen installed correctly. (Bidore/Trisore shown) Element4 Gas Fireplaces EuropeanHome.com...
-
Page 52: Maintenance
In addition to the upper and lower clamps, the remaining glass panels are held by vertical clamps. Remove all of the clamps holding each glass panel. Remove each small glass panel and set aside. Glass Panel Standoff Frame Firebox Gasket Figure 46 Figure 47 Element4 Gas Fireplaces EuropeanHome.com... - Page 53 The fireplace glass should be cleaned before the fireplace is first lit and then after the fireplace has been through its four hour burn-in To see how to remove the glass from an Element4 fireplace cycle. This will reduce potential build up on your glass.
-
Page 54: Burner
Do not modify or substitute any part of this appliance. Inspect the external vent cap on a regular basis to make sure that no debris, plants, trees, or shrubs are interfering with the air flow. Element4 Gas Fireplaces EuropeanHome.com... -
Page 55: Thermocouple
MAINTENANCE THERMOCOUPLE MAINTENANCE The Element4 fireplaces have two thermocouples; one next to the pilot and one opposite the pilot side of the main burner. The completeness and operation of both must be checked. A qualified installer must confirm that both thermocouples are in place and not damaged. -
Page 56: Warranty
WARRANTY European Home Warranty Element4 Gas Fireplace European Home warrants these gas fireplaces against defects in materials and workmanship for a period of ONE (1) YEAR from the date of original retail purchase. Glass is expressly NOT covered by this warranty. -
Page 57: Massachusetts Certification
Gas Fitters has issued approval number G1-0515-495 for this appliance. The following must be observed when installing the Element4 fireplaces within the Commonwealth of Massachusetts: (a) For all side wall horizontally vented gas fueled equipment installed in every dwelling, building or structure used in whole... - Page 58 No reaction to transmitter Do not coil the ignition cable. command. Shorten the ignition cable, if possible. Ignition sequence stops, no pilot flame. Replace receiver batteries. Quality 1.5V AA Transmitter command is possible. alkaline recommended. (continued) Element4 Gas Fireplaces EuropeanHome.com...
- Page 59 Check 2 thermocouple wiring. Replace transmitter batteries. Quality 1.5V Receiver batteries low. AA alkaline recommended. Magnet unit drops while motor turns. 3 beeps. Ground Bolt NORMAL OPERATION Figure 3.1 Element4 Gas Fireplaces EuropeanHome.com...
- Page 60 APPENDIX THREE Element4 Gas Fireplaces EuropeanHome.com...
- Page 61 APPENDIX THREE To see how to convert the gas on an Element4 fireplace, please visit the link below. WWW.EUROPEANHOME.COM/RESOURCES/VIDEOS/ Element4 Gas Fireplaces EuropeanHome.com...
- Page 62 Increase the flame height: Press and hold the UP button. • Decrease the flame height: Press and hold the DOWN button. • For fine adjustment tap the UP or DOWN button as necessary. Figure 5.2 • Turn fireplace OFF: Press the ON/OFF button. Element4 Gas Fireplaces EuropeanHome.com...
- Page 63 Frequent ON and OFF cycles will limit life expectancy of the valve and will increase battery consumption. The fireplace should be powered by the AC adapter for improved reliability and customer satisfaction. Element4 Gas Fireplaces EuropeanHome.com...
- Page 64 FiRst FiRe 42 WARRAntY 56 Lp 60 onverting to nstaLLing the ressures listinG lABel 8 lP (P ROPAne OnveRsiOn MAintenAnce urner iLot herMocoupLes MAntels 18 nOn-cOMBUstiBle MAteRiAls iniMuM Learances Element4 Gas Fireplaces EuropeanHome.com...
- Page 65 NOTES Element4 Gas Fireplaces EuropeanHome.com...
- Page 66 Imported and distributed in North America by: EUROPEAN HOME a division of Europa Ja, Inc. 376 Washington Street Suite 203 Malden, MA 02148 www.europeanhome.com IGE412-160420 Element4 Gas Fireplaces EuropeanHome.com...
Need help?
Do you have a question about the Modore 100H and is the answer not in the manual?
Questions and answers