
Related Manuals for Dukane 9100WUSS


Summary of Contents for Dukane 9100WUSS
- Page 1 ® User's Manual DLP Projector 9100WUSS Thank you for purchasing this product. Read this manual before you use your projector. Keep the manual for future reference. 9100WUSS-Users-Manual-00...
- Page 2 Note: The Dukane model described in this document is manufactured by Hitachi and uses the same firmware, software programs, control code, and accessory parts. The equivalent Dukane to Hitachi model is 9100WUSS (LP-WU9100B).
- Page 3 INDEX Warning, Notices, and Safety Instructions Installation of the projector 1. Installing the projector towards the screen Notice 2. Removing the mount cap on the projector Contents of package Do not open 3. Selecting the correct input voltage depending About Electro-Magnetic Interference on your area Description pertaining to FCC Rules Part 15 4.
-
Page 4: Warning, Notices, And Safety Instructions
Warning, Notices, and Safety Instructions Warning, Notices, and Safety Instructions Notice This product is intended for the adults who have the ability to operate this machine. Write down your projector model number and serial number to keep the information for maintenance purposes in the future. - Page 5 Warning, Notices, and Safety Instructions This equipment generates, uses, and can radiate radio frequency energy and, if not installed and used in accordance with the instruction manual, may cause harmful interference to radio communications. Operation of this equipment in a residential area is likely to cause harmful interference in which case the user will be required to correct the interference at his own expense.
- Page 6 Warning, Notices, and Safety Instructions Do not overload outlets/extension cords Cleaning When cleaning the projector, be sure to unplug it from the outlet to prevent electric shock. Do not use liquid or aerosol cleaners. Use a dry/damp cloth with excessive moisture removed for cleaning.
-
Page 7: Replacing Parts
Warning, Notices, and Safety Instructions Install the projector on an even and stable surface Do not put the projector on unstable cart, tripod, table and so forth to prevent it from falling, being damaged, or causing injuries. Servicing not repair the projector by yourself so that you cannot be exposed to high voltage or other potential hazards. -
Page 8: Notices You Should Read Prior To The Installation Of The Projector
Warning, Notices, and Safety Instructions Notices you should read prior to the installation of the projector Installation environment for the projector Do not install the projector at place with excessive dampness, dust or smoke. If installation in such environment is unavoidable, be sure to clean the interior of the projector routinely to prolong the dispatched by your local dealer so do not clean the inside of the projector by yourself. -
Page 9: Positioning Precautions
Warning, Notices, and Safety Instructions When there are the obstacles on both sides of the projector. 30cm or greater 30cm or greater When there are the obstacles behind the projector. Lens 50cm or greater Positioning Precautions Although this projector can be installed in 360° range (including Portrait), life of optical parts will be shorten in the following situation: 1. -
Page 10: Caution For 3D
Warning, Notices, and Safety Instructions Take frequent breaks to rest your eyes Viewing the projected screen for a long time could strain your eyes. Be sure to rest your eyes adequately. Caution for 3D Do not let children view in 3D when they are not accompanied by adults. Refrain from 3D viewing for children under the age of six due to the possibility of vision impairment. -
Page 11: Laser Warning
Warning, Notices, and Safety Instructions LASER WARNING This symbol indicates that there is a potential hazard of eye exposure to laser radiation unless the instructions are strictly followed. CLASS 3R LASER PRODUCT This Laser Product is designated as Class 3R during all procedures of operation. LASER LIGHT - AVOID DIRECT EYE EXPOSURE. - Page 12 Warning, Notices, and Safety Instructions Product labels The position of the labels is shown in the drawing below. LENS INPUT AUTO ASPECT BLANK CONTROL B/Cb/Pb R/Cr/Pr COMPUTER IN 1 CENTERING 12V OUTPUT (OPTION) COMPUTER IN 2 LENS FOCUS ZOOM MENU EXIT SHIFT REMOTE CONTROL...
- Page 13 Warning, Notices, and Safety Instructions a. Hazard Warning Symbol b. Aperture Warning d. Explanation LASER RADIATION RISK GROUP 2 AVOID DIRECT EYE EXPOSURE CAUTION CLASS 3R LASER PRODUCT LASER APERTURE Wavelength : 450-460 nm Possibly hazardous optical radiation emitted from this product. Max.
-
Page 14: Location Of Laser Aperture
Warning, Notices, and Safety Instructions Location of laser aperture The following is the laser aperture location. Be careful not to see the light directly. Laser aperture Interlock switches This projector has interlock switches to prevent the laser light leakage. The switch will power off the system when the top cover is opened. The switch will power off the system when the lens is removed or not installed correctly. -
Page 15: Projector Parts And Functions
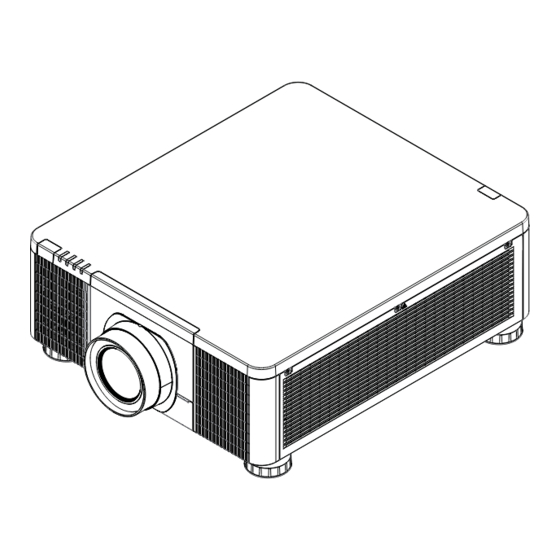
Projector parts and functions Projector parts and functions Front view LED Indicator Ventilation inlet Remote sensor The internal cooling fan draws cool air from the ventilation Lens inlet into the projector. Ventilation inlet Adjustable foot The internal cooling fan draws cool air from the ventilation inlet into the Adjust the height and angle of the projector. -
Page 16: Rear View
Projector parts and functions Rear view Control panel Remote sensor Power inlet Power switch Ventilation outlet -> on Voltage Selector (115V by default) Adjustable foot Ports Control panel MENU STANDBY/ON Displays or hides the menu. Starts up or shuts down the projector BUTTONS INPUT Switches input signal source. - Page 17 Projector parts and functions Ports COMPUTER IN 2 Connects to BNC inputs for RGB (R/B/G/H/V) or component (YPbPr) source. COMPUTER IN 1 CONTROL Standard 15-pin VGA connection socket to 9-pin D-sub socket. Connects to your PC or automatic home theater /control system. or PC.
-
Page 18: Bottom View
Projector parts and functions Bottom view Screw hole for Mounting bracket Used to mount the projector to its designated mounting bracket using 6 M4x16 screws. Adjustable foot Adjusts the height and angle of the projector. Note: Shorten the adjustable feet completely when transporting the projector. -
Page 19: Installing Batteries In The Remote Control
Projector parts and functions Effective range of remote control signal The illustration below shows effective range of remote control signal. (When new batteries are used.) 0° 0° (approx.) Note: Do not put the remote control at places with high temperature or humidity as it could cause the remote control to malfunction. -
Page 20: Installation Of The Projector
Installation of the Projector Installation of the projector 1. Installing the projector towards the screen Screen 2. Removing the mount cap on the projector 3. Selecting the correct input voltage depending on your area Select 200-240V Select 100-130V 4. Connecting the power cord to the projector Be sure that the power cord is not damaged and already connected to the power outlet properly. -
Page 21: Starting Up The Projector
Installation of the Projector 6. Starting up the projector Make sure that the POWER indicator is lighting in steady red. Press the button on the projector or the ON button on the remote control. The projector will be turned on and the POWER indicator will begin blinking in green. -
Page 22: Correcting The Distortion
Installation of the Projector Note for adjusting the lens shift 1. Adjust the lens shift / zoom / focus 30 minutes after turning on the projector. 2. Slight changes in the image position and/or focus may occur within 30 minutes after turning on the projector. -
Page 23: Turning Off The Projector
Installation of the Projector The picture after adjustment Fig 1 Focus Adjusted Fig 2 Adjusted Vertical Keystone Zoom Out Fig 3 Horizontal Keystone Zoom In 9. Turning off the projector Press STANDBY button on the remote control or button on the projector keypad to turn off the projector. -
Page 24: Throw Distance
Installation of the Projector Throw distance Throw Distance (TD) = Screen Width (W) x Throw Ratio (TR) Screen Width(W) Throw Distance(TD) Coupled with the available projection lenses, the projector offers the following throw ratios: FL-920 (0.38 : 1 100-350inch) SL-902 (1.1~1.7 : 1 50-600inch) Note: SD-903 (1.6~2.4 : 1 50-600inch) Projection lenses are optional accessories. - Page 25 Installation of the Projector Front/Ceiling Rear/Ceiling Refer to " Page 30 : Front/Ceiling " Refer to " Page 31 : Rear/ceiling " Advantage: The projector is completely hidden. draw attention to it. This setup usually offers better Eliminates the possibility that reduction of ambient noise.
-
Page 26: Horizontal And Vertical Lens Shift
Installation of the Projector Horizontal and vertical lens shift In addition to using the adjustable feet to adjust projection angle, you can also use the Lens Shift function to adjust the projected picture. Moving the lens vertically The distance of vertical lens shift is +60% or -22% of the screen height in both directions. For instance, if you are using a 2.15m ×... -
Page 27: Connecting The Projector To Other Devices
Installation of the Projector Connecting the projector to other devices HDMI / DVI connection Signals from picture source offer the best projection picture quality when using HDMI/DVI. Therefore, try to use input devices with HDMI/DVI output as the source of picture. 12V OUTPUT CONTROL B/Cb/Pb... -
Page 28: Rgb Connection
Installation of the Projector RGB connection Connect PC or other devices with RGB output to the COMPUTER IN1 input. Desktop or laptop computer 12V OUTPUT (OPTION) Connect RGB (R/B/G/H/V) or component (YPbPr) source to COMPUTER IN2 inputs. Desktop or laptop computer 12V OUTPUT (OPTION) HDBaseT / LAN connection... -
Page 29: Turning On The Projector
Installation of the Projector SDI connection This projector can be connected with other device that has SDI connector, but the projector may not work properly with some devices. Use a cable of 5CFB or greater (5CFB, 7CFB, and so on), or Belden 1694A or greater to transmit the image properly. - Page 30 Installation of the Projector Adjusting screen position The projector is set to “Front/Desktop” by default. If you want to install your projector in other setups, be sure to adjust the screen installation to set the correct projection mode. Front/Ceiling Select FRONT/CEILING in the OSD menu. ADVANCED MENU Correct Picture Lotus...
-
Page 31: Adjusting The Projector Lens
Installation of the Projector Rear/Ceiling Select REAR/CEILING in the OSD menu. ADVANCED MENU Correct Picture Lotus Adjusting the projector lens Projector lens adjustment includes focus, zoom, horizontal/vertical picture shift, image corner adjust, and Warping. Refer to " Page 21 : 7. Adjusting the projector's angle, Lens Shift, Zoom, Lens Centering, and Focus "... - Page 32 DUKANE CORP AV SERVICE DEPT 2900 Dukane Drive St Charles, IL 60174 800-676-2487 / 630-762-4032 Fax 630-584-5156 avservice@dukane.com www.dukaneav.com 9100WUSS-User-Manual-00...
Need help?
Do you have a question about the 9100WUSS and is the answer not in the manual?
Questions and answers