
Subscribe to Our Youtube Channel
Related Manuals for Soundstream VHD-9


Summary of Contents for Soundstream VHD-9
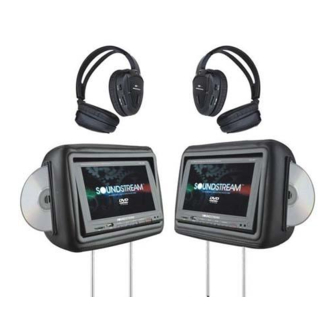
- Page 1 VHD-9BK VHD-9BG VHD-9GR VHD-9GRDK Two Preloaded 8.8" Wide Touch Screen Universal Replacement Headrest Monitors Package OWNER S MANUAL...
-
Page 3: Table Of Contents
Specifications Power Requirements D C 1 2 V Power Consumption Screen Size 8 . 8 T F T- L C D Screen Format 1 6 : 9 W i d e Resolution Pixel 1 4 4 0 x 2 3 4 A/V Input DVD-AV1-AV2 A/V Output... -
Page 4: Troubleshooting
Caution Please read and observe all warnings and instructions in this manual and those marked on the unit. Retain this booklet for future reference. There are two kinds of alarm symbols as follows: The lightning bolt with arrowhead inside in an equilateral triangle is intended to alert the user to the presence of dangerous voltage within the product s enclosure that may be of sufficient magnitude to constitute a risk of electric shock to... -
Page 5: Disc Information
Disc Information DVD features DVD discs provide high-resolution images with high-quality sound. This DVD player can play not only DVD discs of various versions, but also S-VCD, VCD, audio CD and Mp3 discs. Discs that cannot be played DVD-RW, DVD-REM, CD-ROM, CD-EXTRA discs cannot be played on this unit. In addition, a CD or a CD-RW which was recorded on special software cannot be played. -
Page 6: Installation
How To Control The Monitor 1. Power On/Off <Unit> To power on the unit, press POWER button on the monitor; or press POWER button on the remote control. To power the off unit, press MPWR or PWR on the monitor; or press POWER button on the remote control. -
Page 7: Connection Diagram
Connection Diagram Connect the wires as indicated: a. Red: Connect to a switched(+) 12 volt source (ACC). Use a lead that has(+) 12V when the ignition on or in the ACC position so the monitors turns off when the key is in the off position. - Page 8 How To Control The Monitor 3 4 5 6 7 HEADPHONE JACK Headphone output AV2 Inputs STOP PIPE When this button is pressed, Adjustable steel Pipe playback is stopped. SD Inputs USB Inputs REMOTE IR SENSOR SD/USB Functions 1. When USB or SD is inputed, the monitor will be displayed as shown below. But when you input USB that the function can not change into SD moving).
-
Page 9: Dvd Functions
DVD Functions [DVD]/[AUDIO]/[MP3] This button does not function in PBC mode. [VCD] You can turn the PBC (Play Back Control) function on or off by pressing this button. When PBC is loaded, the PBC function is enabled automatically. This function is similar to selection of DVD title. -
Page 10: Remote Control
Remote Control GO TO RETURN Use to search for a title or a chapter on Press this button to return to the root menu. your DVD disc. SETUP Press this button to display the Setup STOP menu. The Setup menu enables you Press this button to stop the playback to enter the settings required for the of the current disc. -
Page 11: Power And Mode Selection
DVD Functions Prev( [DVD]/[VCD] Press this button to advance the player from the current chapter chapter [AUDIO]/[MP3] Press this button to move to the previous track. Next( [DVD]/[VCD] Press this button to advance the player from the current chapter [AUDIO]/[MP3] Press this button to move from the current track to the next track Repeat(A-B) -
Page 12: Selecting An Av Mode
Power and Mode Selection Selecting an AV mode 1. Turn the power ON on the unit and on the external devices. 2. Select the DVD, AV1 or AV2 mode by pressing the AV Select button on the unit or on the remote control. 3. -
Page 13: Picture Control
DVD Functions Subtitle(SUB-T) [DVD] This button is used to select the language for the on-screen display system. (This title menu may vary, depending on the particular DVD.) Title [DVD] Used to display the title menu of the loaded DVD disc. This function is only present on discs which support it. -
Page 14: L ) X 8 . 7 ( W ) X 4 . 7 ( H ) I N C H E S Dvd Setup
DVD Setup Setup Menu-Main Page When the SETUP button is pressed, the setup menu will be displayed as shown below. Select the menu category and make changes according to your preferences. 1. Press the STOP button if the disc is playing. 2. -
Page 15: General Setup
DVD Functions Stop( [DVD]/[AUDIO] In DVD mode, Press STOP to stop playback. To resume playback, press PLAY/PAUSE. If 1 Time Press Play Key To Continue you press STOP and then PLAY/PAUSE twice, 2 Time the player will begin playback at the first scene of the movie. -
Page 16: Class A Digital Device, Pursuant To Part 15 Of The Fcc Rules. These Limits Screen Saver
DVD Setup 4. Screen Saver The screen saver is useful to prevent your display from becoming damaged. The screen saver picture appears when you leave the DVD player in stop mode for about two minutes. Audio Setup Audio Setup Page Audio Setup Page Speaker Setup Speaker Setup... -
Page 17: Password Setup
DVD Setup Password Setup 1. Password Mode Password Setup, which is required for using the Parental Controls settings, is divided into two modules: Turning on the Password function, and setting a Password. The first step is to turn it on in the Password Mode setting. Password Setup Page Password Setup Page Password Mode On... - Page 18 DVD Setup EQ Equalizer Type In this menu you can choose the desired preset equalizer mode. (Choose from Rock, Pop, Live, Dance, Techno, Classic or Soft) Bass Boost The Bass Boost function increases the volume level of the bass frequencies. Super Bass Super Bass Boost further increases the volume level of the bass frequencies.
-
Page 19: Video Setup
DVD Setup Preference 1. TV Type Choose the proper TV format appropriate to the monitor you have connected to the player from the following: NTSC, PAL or Multi type. 1. Press the SETUP button during stop mode. 2. Press the buttons to move to Preference. - Page 20 DVD Setup Contrast Use this option to adjust the contrast level. Use the buttons and press the ENTER button, when you reach the desired contrast level. The contrast control increases or decreases the ratio of bright and dark screen sections. Video Quality Setup Video Quality Setup Color...
Need help?
Do you have a question about the VHD-9 and is the answer not in the manual?
Questions and answers