
Related Manuals for Soundstream VRCP-65


Summary of Contents for Soundstream VRCP-65
- Page 1 Operation Instruction Manual VRCP-65 Operation Instruction Manual VRCP‐65 Page 1 of 37...
-
Page 2: Table Of Contents
Operation Instruction Manual VRCP-65 Content 1. Appearance ‐‐‐‐‐‐‐‐‐‐‐‐‐‐‐‐‐‐‐‐‐‐‐‐‐‐‐‐‐‐‐‐‐‐‐‐‐‐‐‐‐‐‐‐‐‐‐‐‐‐‐‐‐‐‐‐‐‐‐‐‐‐‐3 2. Wiring Connection ‐‐‐‐‐‐‐‐‐‐‐‐‐‐‐‐‐‐‐‐‐‐‐‐‐‐‐‐‐‐‐‐‐‐‐‐‐‐‐‐‐‐‐‐‐‐‐‐‐‐‐‐‐‐4 3. Front panel description ‐‐‐‐‐‐‐‐‐‐‐‐‐‐‐‐‐‐‐‐‐‐‐‐‐‐‐‐‐‐‐‐‐‐‐‐‐‐‐‐‐‐‐‐‐‐‐‐5 4. Main Menu ‐‐‐‐‐‐‐‐‐‐‐‐‐‐‐‐‐‐‐‐‐‐‐‐‐‐‐‐‐‐‐‐‐‐‐‐‐‐‐‐‐‐‐‐‐‐‐‐‐‐‐‐‐‐‐‐‐‐‐‐‐‐‐‐6 5. Settings ‐‐‐‐‐‐‐‐‐‐‐‐‐‐‐‐‐‐‐‐‐‐‐‐‐‐‐‐‐‐‐‐‐‐‐‐‐‐‐‐‐‐‐‐‐‐‐‐‐‐‐‐‐‐‐‐‐‐‐‐‐‐‐‐‐‐‐‐‐7 6. Apple CarPlay ‐‐‐‐‐‐‐‐‐‐‐‐‐‐‐‐‐‐‐‐‐‐‐‐‐‐‐‐‐‐‐‐‐‐‐‐‐‐‐‐‐‐‐‐‐‐‐‐‐‐‐‐‐‐‐‐‐‐‐‐13 7. Radio ‐‐‐‐‐‐‐‐‐‐‐‐‐‐‐‐‐‐‐‐‐‐‐‐‐‐‐‐‐‐‐‐‐‐‐‐‐‐‐‐‐‐‐‐‐‐‐‐‐‐‐‐‐‐‐‐‐‐‐‐‐‐‐‐‐‐‐‐‐‐‐14 ® 8. SiriusXM Operation ‐‐‐‐‐‐‐‐‐‐‐‐‐‐‐‐‐‐‐‐‐‐‐‐‐‐‐‐‐‐‐‐‐‐‐‐‐‐‐‐‐‐‐‐‐‐‐‐‐‐‐‐‐15 9. DISC ‐‐‐‐‐‐‐‐‐‐‐‐‐‐‐‐‐‐‐‐‐‐‐‐‐‐‐‐‐‐‐‐‐‐‐‐‐‐‐‐‐‐‐‐‐‐‐‐‐‐‐‐‐‐‐‐‐‐‐‐‐‐‐‐‐‐‐‐‐‐‐‐‐21 10. USB ‐‐‐‐‐‐‐‐‐‐‐‐‐‐‐‐‐‐‐‐‐‐‐‐‐‐‐‐‐‐‐‐‐‐‐‐‐‐‐‐‐‐‐‐‐‐‐‐‐‐‐‐‐‐‐‐‐‐‐‐‐‐‐‐‐‐‐‐‐‐‐‐‐‐24 11. BT Audio ‐‐‐‐‐‐‐‐‐‐‐‐‐‐‐‐‐‐‐‐‐‐‐‐‐‐‐‐‐‐‐‐‐‐‐‐‐‐‐‐‐‐‐‐‐‐‐‐‐‐‐‐‐‐‐‐‐‐‐‐‐‐‐‐‐‐‐‐26 12. BT Phone ‐‐‐‐‐‐‐‐‐‐‐‐‐‐‐‐‐‐‐‐‐‐‐‐‐‐‐‐‐‐‐‐‐‐‐‐‐‐‐‐‐‐‐‐‐‐‐‐‐‐‐‐‐‐‐‐‐‐‐‐‐‐‐‐‐‐‐28 13. Aux IN ‐‐‐‐‐‐‐‐‐‐‐‐‐‐‐‐‐‐‐‐‐‐‐‐‐‐‐‐‐‐‐‐‐‐‐‐‐‐‐‐‐‐‐‐‐‐‐‐‐‐‐‐‐‐‐‐‐‐‐‐‐‐‐‐‐‐‐‐‐‐‐31 14. Rear Camera ‐‐‐‐‐‐‐‐‐‐‐‐‐‐‐‐‐‐‐‐‐‐‐‐‐‐‐‐‐‐‐‐‐‐‐‐‐‐‐‐‐‐‐‐‐‐‐‐‐‐‐‐‐‐‐‐‐‐‐‐‐‐‐32 15. E‐Link ‐‐‐‐‐‐‐‐‐‐‐‐‐‐‐‐‐‐‐‐‐‐‐‐‐‐‐‐‐‐‐‐‐‐‐‐‐‐‐‐‐‐‐‐‐‐‐‐‐‐‐‐‐‐‐‐‐‐‐‐‐‐‐‐‐‐‐‐‐‐‐‐33 16. Remote Control ‐‐‐‐‐‐‐‐‐‐‐‐‐‐‐‐‐‐‐‐‐‐‐‐‐‐‐‐‐‐‐‐‐‐‐‐‐‐‐‐‐‐‐‐‐‐‐‐‐‐‐‐‐‐‐‐‐‐‐34 17. Specification ‐‐‐‐‐‐‐‐‐‐‐‐‐‐‐‐‐‐‐‐‐‐‐‐‐‐‐‐‐‐‐‐‐‐‐‐‐‐‐‐‐‐‐‐‐‐‐‐‐‐‐‐‐‐‐‐‐‐‐‐‐‐‐36 ... -
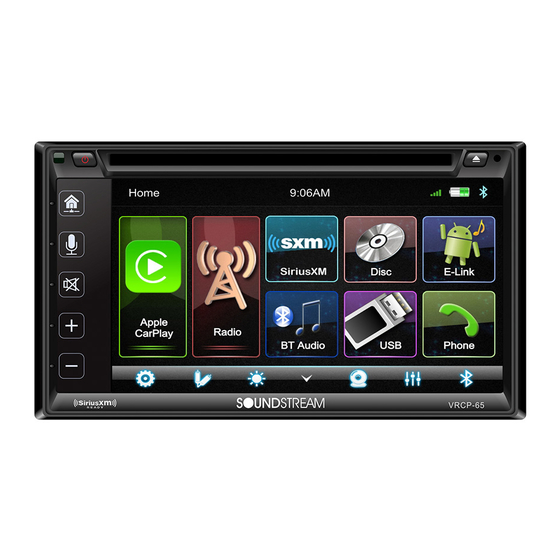
Page 3: Appearance
Operation Instruction Manual VRCP-65 Appearance Main Menu CarPlay Menu Page 3 of 37... -
Page 4: Wiring Connection
Operation Instruction Manual VRCP-65 WIRING CONNECTION Page 4 of 37... -
Page 5: Front Panel Description
Operation Instruction Manual VRCP-65 FRONT PANEL Description ① IR SENSOR IR Remote control signal receiving windows. Max distance is 6‐8 meters, in 45 degree. ② POWER Turn Power on or off. During power OFF, press Power button to turn ON the Head unit. During the unit is ON, long press power button to turn OFF the Head unit ③ Home In any mode, touch the Home button to enter to the Main Menu. ④ SIRI In CarPlay mode, touch the SIRI button to start the Apple SIRI function. ⑤ MUTE To toggle Mute and unmute ⑥ VOL+ Increment the Volume level (0~50). ⑦ VOL‐ Decrement the Volume level (50~0). ⑧ EJECT Insert or eject the disc. ⑨ RESET To reset the Head unit for any reason, use a ball pen or pin to press the RESET button. After reset the head unit, the head unit will be restart, all parameter and setting will be kept as pervious status Page 5 of 37... -
Page 6: Main Menu
Operation Instruction Manual VRCP-65 MAIN MENU VRCP‐65 is a Two Din Car Audio with the following functions: ® SiriusXM Apple CarPlay, Radio, , Bluetooth Audio, Disc (DVD), USB, E‐link (Android 5.0 or above smartphone) and Phone The MODE icon in grey mean the corresponding function is not ready or proper device have not ... -
Page 7: Settings
Operation Instruction Manual VRCP-65 Settings Touch the icon to enter the Setup menu. The Setup menu is included System Settings, Display Settings, Audio & EQ Settings, Disc & DVD Settings, Bluetooth Settings and Rear Camera Settings System Settings The System Settings allow the user to set up the Language, Display Time, Date & Time, Beep Tone, Factory Reset and About Language ... - Page 8 Operation Instruction Manual VRCP-65 Date & Time: ‐ To setting Time display format (12H or 24H), setting the date and time Beep Tone: On/Off ‐ To set the touch button beep tune On or Off Factory Reset ‐ To reset the default factory setting. About ‐ To display the Unit Hardware and Firmware version Page 8 of 37...
- Page 9 Operation Instruction Manual VRCP-65 Display Settings Below is the Display setting menu, user can select Lighting Detect, Daylight Dimming Level, Night Dimming Level, Illumination and Wallpaper. Lighting Detect: On/Off Daylight Dimming Level: 0 – 8 Night Dimming Level: ‐8 – 0 Illumination: Red/Yellow/Blue/Green/White ...
- Page 10 Operation Instruction Manual VRCP-65 Audio & EQ Settings Below shown is the Audio Setting Menu Balance/Fader: ...
- Page 11 Operation Instruction Manual VRCP-65 Disc & DVD Settings Touch the Disc/DVD Settings from the menu to enter the Disc/DVD setting interface. TV Aspect Select between 16:9 and 4:3 aspect ratio DVD Menu Language: DVD Audio Language: DVD Subtitle Language: Bluetooth Settings Touch the Bluetooth Settings from the setting menu will be shown below ...
- Page 12 Operation Instruction Manual VRCP-65 Rear Camera Setting Touch Rear View Camera in the Setting Menu to enter rear camera setting interface as follow: Rear Camera Input: On/Off Rear Camera View: Normal/Reverse Parking Assist Guide: On/Off Parking Assist Guide Adjustment Touch > to enter Parking Assist Guide Adjustment interface to show the below screen Select the adjust position and Touch ˂/˃/˄/˅ to adjust. Touch Reset to resume the default Parking Assist Line Page 12 of 37...
-
Page 13: Apple Carplay
Operation Instruction Manual VRCP-65 6. Apple CarPlay Plug the iPhone (iPhone 5 or latter models, and iOS 7.1 or above) through the lightening cable to the USB port of the Head unit. The iPhone will be shown the “CarPlay”. The Head unit will enter the CarPlay interface, the APP that support the CarPlay feature will be displayed on the Head Unit as shown below. Touch the corresponding APP can operation the operation, touch the button to go back to the CarPlay interface. ... -
Page 14: Radio
Operation Instruction Manual VRCP-65 7. Radio Mode Touch the Radio mode icon to enter Radio mode Touch FM can change between FM1=>FM2=>FM3 Touch AM can change between AM1=>AM2 Touch SiriusXM to enter SiriusXM Mode if a SiriusXM tuner is connected with the unit. *Note - A SiriusXM Connect Vehicle Tuner and Subscription are required and sold separatly. Touch for Prescan search, each scanned station will be play for 3 sec, touch again to stop. Touch it for the Auto Scan searching. Touch it to enter EQ setting Short touch for Tune‐, long touch for Seek‐. Short touch for Tune+, long touch for Seek+. Preset channel, Six preset buttons store and recall stations for each band. Touch and slide the preset channel can switch to next band FM1 / FM2 / FM3 or AM1 / AM2 Slide the frequency to Seek +/‐ to next station Store a Station ... -
Page 15: Siriusxm Operation
Operation Instruction Manual VRCP-65 8. SiriusXM Operation VRCP‐65 is SiriusXM Satellite Radio Ready, to operation this function, connect an optional SiriusXM Connect Vehicle Tuner. To enter SiriusXM Mode, touch the SXM icon on the Main Menu. If the screen is shown “Check Tuner” as below, check the SiriusXM tuner connection. Signal Strength The Top Left corner of the screen is showing the Signal Strength of the SiriusXM satellite SiriusXM Signal is Excellent SiriusXM Signal is Good SiriusXM Signal is Weak No SiriusXM Signal In SiriusXM mode, SiriusXM icon is highlighted. Touch FM1 to go to FM radio ... - Page 16 Operation Instruction Manual VRCP-65 The following functions are also supported Browse function Favorite Alerts, Touch to list the favorite channel to direct select the channel Direct Tune function EQ Setting function SiriusXM Setting Menu ...
- Page 17 Operation Instruction Manual VRCP-65 Slide the bar at right to browse the channel Touch “Channel” button at top right corner to change the display different Metadata as Channel Name, Song Title, Artist/Category Name, Content Info and Category Name Category List Touch the “Category” for the Category list The channel will be shown according to different Category. Touch < or > to select different Category. Touch “Channel” button at top right corner to change the display different Metadata as Channel ...
- Page 18 Operation Instruction Manual VRCP-65 Change Passcode Touch > of the Change Passcode to show the below screen. Input the passcode by using the keypad. Press to clear the pervious digit if input wrong. Touch to confirm input. If the passcode is correct, the below screen will be shown to allow user to Enter NEW Passcode. Input a new 4 digits passcode and select to confirm the new passcode Input the passcode again and press to confirm, then the passcode can be successfully ...
- Page 19 Operation Instruction Manual VRCP-65 Version Press Version in the menu, the below screen will be shown the VRCP‐65 Software version information Reset SiriusXM passcode The default SiriusXM passcode is 0000, If you forget the passcode, follow the steps below to restore the unit to the default. 1. Enter Settings; 2. Set the time format is 24H and the date/time to 2001‐1‐1 01:01; 3. Enter SiriusXM mode and select direct tune; 4. Input the channel number 9992(the display only can show 999) ; 5. Press confirm to reset the SiriusXM passcode to default ...
- Page 20 Operation Instruction Manual VRCP-65 • Verify that your vehicle is outdoors with a clear view of the southern sky. • Verify that the SiriusXM magnetic mount antenna is mounted on a metal surface on the outside the The SiriusXM Connect Vehicle Tuner has vehicle. No Signal No Signal difficulty receiving the SiriusXM satellite • Move the SiriusXM antenna away from any signal. obstructions. • Inspect the antenna cable for damage and kinks. Replace the antenna if the cable is damaged. • If the problem persists, disconnect and reconnect the tuner and then contact your dealer. The channel that you have requested is not a valid SiriusXM channel or the channel that you were listening to is no longer Channel Not Channel Not available. You may also see this message Visit www.siriusxm.com/channellineup for more Available Available briefly when first connecting a new information about the SiriusXM channel lineup. SiriusXM Connect Vehicle tuner. Visit www.siriusxm.com for more information about the SiriusXM channel lineup. • Questions about your subscription in the United States please visit The channel that you have requested is not http://www.siriusxm.com/activatenow or call included in your SiriusXM subscription Channel Not ...
-
Page 21: Disc
Operation Instruction Manual VRCP-65 9. Disc Inserting a Disc Insert a Disc to the slot of the head unit, pull the disc or press the Eject button to make the disc into the deck. Touch the Disc to perform Disc playing function. Ejecting a Disc During disc playing or inside the deck, press the Eject button to stop playing the disc and eject the disc. After the disc is ejected and press the Eject button, the disc will go inside to the unit. Playing CD/MP3 Disc If playing the CD/MP3 Disc, the following will be shown. Press it to skip to the next folder (for MP3) Press it to search song files or folder list. Press it to skip to the previous folder (for MP3). Short press it to skip to the previous track,long press it to fast reverse. Pause/Play button. Short press it to skip to the next track, long press it to fast forward. Repeat: For CD: Press for switch between Repeat All and Repeat One For MP3: Press for select Repeat All, Repeat One or Repeat Directory Press it to turn on/off random play. ... - Page 22 Operation Instruction Manual VRCP-65 DVD/VCD Playback The Video display can be watched only during the Car is Parked Parking wiring: High level (+12v or NC) is driving; low level (ground) is parking Short press it to skip to the previous track, long press it to fast reverse. / Pause/Play button. Short press it to skip to the next track, long press it to fast forward. Touch it to select subtitle language Touch to open/close the navigation button Touch it to show the tools bar ...
- Page 23 Operation Instruction Manual VRCP-65 Playing Multimedia Files in Disc VRCP‐65 is supporting the below disc types and Multimedia file format. 1. Supported DISC Format: CD‐DA /CD‐TEXT/Video CD/DVD/Multi session 2. Supported Audio Format: PCM(.wav ), MP3, WMA, Flac, Dolby Digital, DTS, 3. Supported Picture Format: JPEG, BMP, PNG. ‐ Max file size is 10Mbytes or Max. Resolution 1200×1200. 4. Supported Video Format: MPEG1/MPEG2/MPEG4 Simple Profile (.mp4 (MPEG‐4 Simple Profile + AAC), JPEG, DVD‐Video, DVD‐VR When the disc is included different type of Multimedia, Touch to shown the list. Select Audio or Music files Select Movie or Video files. Select Picture files ...
-
Page 24: Usb
Operation Instruction Manual VRCP-65 10. USB Plug the USB to the connector, the USB icon will have color. Touch the USB icon to enter the USB playback mode. The Head unit default to play the Audio in the USB driver. Press to go to the next folder. Press to search Audio, Video or Picture files. Press to go to the previous folder. Short press it to skip to the previous track, long press it to fast reverse. Pause/Play button. Short press it to skip to the next track, long press it to fast forward. Repeat Play Press it to select Repeat All, Repeat One or Repeat Directory. Press it to turn on/off random play. Press it to select the Audio setting or set the prefer EQ of each band in Custom mode ... - Page 25 Operation Instruction Manual VRCP-65 Picture and Video Playback Touch it to return to the file list Repeat Play, touch to select repeat play once, directory or all Touch to rotate the picture anti‐clockwise for 90 degree (for picture playback) Touch to rotate the picture clockwise for 90 degree (for picture playback) Touch to set the video Brightness, Contrast and Color (for video playback) Page 25 of 37...
-
Page 26: Bt Audio
Operation Instruction Manual VRCP-65 11. Bluetooth Audio Touch the BT Audio icon to enter Bluetooth Audio playing mode. If the Bluetooth is connected, the music will be playing as following shown. If the Bluetooth is not connected, press Reconnect to connect the paired phone or Pairing to pair the new device. Bluetooth Pairing Press Pairing the Pairing Mode screen will be shown as below ... - Page 27 Operation Instruction Manual VRCP-65 Bluetooth Audio Playback Press it to skip to the next folder. Press it to open the music file list or folder (support iPhone). Press it to skip to the previous folder. Short press it to skip to the previous track. Pause/Play button. Short press it to skip to the next track. Repeat, press for select between Repeat All, Repeat One or Repeat Directory Press it to turn on/off random play. Press it to turn on/off the Audio Settings menu to adjust the EQ. Press it to select songs. Return button. Setting the Bluetooth output level Page 27 of 37...
-
Page 28: Bt Phone
Operation Instruction Manual VRCP-65 12. Phone Touch the Phone icon in main menu to go to Phone mode. After the phone connected with the Head Unit via Bluetooth (HFP), user can through the Head unit to make a phone call. Please note it needs to connect the microphone for phone call. Dial Pad, tap Dial pad button to enter call mode Call logs, to show the call record, missed, received and dialed calls Contact, to show the phonebook connected phone BT Setup, to set auto answer and microphone gain Make a Call or Accept the Incoming Call ... - Page 29 Operation Instruction Manual VRCP-65 Receive an incoming Call If the Phone is connect with the unit via Bluetooth, when an incoming call, the below screen will be shown Press to receive the Call or to hang the call Interchange between phone and head unit ON/OFF the Microphone function Display the Dial Pad ...
- Page 30 Operation Instruction Manual VRCP-65 Contacts Touch the icon to access the phone book of the connected phone. To make a call from the phone book, simply touch the contact name. BT Setup Auto Answer On/Off Mic Gain Low/ Middle/High Page 30 of 37...
-
Page 31: Aux
Operation Instruction Manual VRCP-65 13. AUX IN The Audio/Video source with RCA cable can through the Head unit to play the Audio/Video. Plug the RCA to the corresponding A/V socket. Touch the to pop up the function bars and touch to view the playing Audio/Video. The Audio and Video will via the RCA cable to the Head unit If there is no Video signal the below screen will be shown Page 31 of 37... -
Page 32: Rear Camera
Operation Instruction Manual VRCP-65 14. Rear Camera There is a RCA socket for the Rear camera video signal to display on the Head unit. The Reverse wire in High level (+12V) is reverse; low level (ground or NC) is normal User also can touch the to pop up the function bars and touch to view the Rear camera. Rear Camera Settings menu Rear Camera Input: On/Off Rear Camera view: Normal/ Reverse Parking Assist Guide: On/Off Parking Assist Guide Adjust Touch the ˂/˃/˄/˅ buton to adjust the assist line to guide the car position Page 32 of 37... -
Page 33: E-Link
Operation Instruction Manual VRCP-65 15. E‐Link The VRCP‐65 have the E‐Link function to allow the Android 5.0 or above smartphone display on the Head unit screen. Install Auto Link User need to install the Autolink App to the Android phone. When the Android phone first time connected to the VRCP‐65 via USB, the phone will show a website link to download the Autolink ... -
Page 34: Remote Control
Operation Instruction Manual VRCP-65 Remote Control ④ ① Power Answer ② Disc ⑤ Hang up ③ SiriusXM ⑥ Radio ⑩ ⑦ Carplay ⑪ ⑧ VOL+ ⑫ ⑨ ENTER/MENU Phone ⑬ ⑮ VOL- Right ⑭ Left ⑯ SEEK+/ ⑲ EJECT ⑰ SEEK-/ ⑳... - Page 35 Operation Instruction Manual VRCP-65 11. VOL+ Press it to increment volume step, long press to volume rapid up. 12. ENTER/MENU In disc mode, press it to confirm selection or enter setting for DVD menu. 13. VOL‐ Press for decrement the volume step, long press for volume rapid down. 14. LEFT In the radio mode, short press for seek‐, long press for tune‐. In the disc mode, press to select the DVD menu item left. 15. RIGHT In the radio mode, short press for seek+, long press for tune+. In the disc mode, press it to select the DVD menu item right. 16. SEEK+/ In Radio mode, short press for next preset channel, long press for SEEK+ In SiriusXM mode, short press for next preset channel, long press to browse the channel up. In USB/BT/Disc mode, short press for next track, long press for fast forward 17. SEEK‐/ In Radio mode, short press for pervious preset channel, long press for SEEK‐ In SiriusXM mode, short press for pervious preset channel, long press to browse the channel down In USB/BT/Disc mode, short press for previous track, long press for fast reverse 18. DOWN In the radio mode, press it to select a preset station down. In the USB mode, press it to select a folder down. In the disc mode, press it to select the DVD menu item down. 19. EJECT ...
-
Page 36: Specification
Operation Instruction Manual VRCP-65 Specification General Power Supply ………………………….………………………………….……..…………. DC10~16Volts Grounding System …………………………………..……..……….………..…….. Negative Ground Current Drain ………………………………….…………………………...……..….…………. 15A(Max.) Power Output ………………………………………….………………..……. 4×40W/channel(Max.) Speaker Impedance ……………………………………..…..……………. 4~8ohms per channel Frequency Response……………………………………..……….………………………. 20Hz~20KHz Operating Temperature …………………………………..……………….... ‐20~+60℃ TFT Display TFT Screen size…………………………………………..……………………….…………………..6.2inch Resolution………………………………………………………………..…..……………..800×480 pixels FM Radio Frequency Range (USA) ………………………………………………...……..……87.5~107.9MHz Frequency Range (Europe) ………………………….………………...…..…..……87.5~108MHz Usable Sensitivity (S/N=30dB)………..…………………………….…..…….…….…….…≦15dB S/N Ratio……………………………………………………………………..…..…………………≧55dB Stereo Separation………………………………………...…..…………………..………………≧30dB AM/MW Frequency Range (USA) ………………………………………….…………..…….…530~1710KHz Frequency Range (Europe) ………………………..………………..…..………….522~1620KHz Usable Sensitivity(S/N=20dB)……………….……………………………..……….…….…≦40dB S/N Ratio………………………………………………………………………….…..………………≧45dB DVD/CD S/N Ratio……………………………………………………….………………………..……………≧60dB Channel Separation ……………………………….…………………………..……..……>50dB Line‐Out/Subwoofer Output Maximum Output Level (10K ohms load)……………….……………..……..….…≧4Vrms Subwoofer Time Align……………………………………………………………….…………0~18ms Page 36 of 37... - Page 37 Operation Instruction Manual VRCP-65 FCC Warning Any Changes or modifications not expressly approved by the party responsible for compliance could void the user’s authority to operate the equipment. This device complies with part 15 of the FCC Rules. Operation is subject to the following two conditions: (1) This device may not cause harmful interference, and (2) this device must accept any interference received, including interference that may ...
Need help?
Do you have a question about the VRCP-65 and is the answer not in the manual?
Questions and answers