Table of Contents
Advertisement
Available languages
Available languages
Quick Links
Advertisement
Table of Contents

Related Manuals for Proline OV23


Summary of Contents for Proline OV23
- Page 3 WARNINGS This appliance is intended to be used in household and similar applications such - staff kitchen areas in shops, offices and other working environments; - farm houses; - by clients in hotels, motels and other residential type environments; -...
- Page 4 capabilities or lack of experience and knowledge if they have been given supervision or instruction concerning use of the appliance in a safe way and understand the hazards involved. Children shall not play with the appliance. Cleaning and user maintenance shall not be made by children unless they are older than 8 and supervised.
- Page 5 page 12 of the manual. The door or the outer surface may get hot when the appliance is operating. The surfaces are liable to get hot during use. The temperature of accessible surfaces may be high when the appliance is operating.
-
Page 6: Important Safety Instructions
placed against a wall. IMPORTANT SAFETY INSTRUCTIONS Read these instructions carefully before operating the toaster oven. Keep them for further reference. To protect against electric shock, do not immerse the cord, plug, or any parts of the oven in water or other liquids. ... - Page 7 Do not store any materials, other than manufacturer’s recommended accessories, in this oven when not in use. Always wear oven gloves (not supplied) or use the supplied rack/tray handle when inserting or removing items from the hot oven. ...
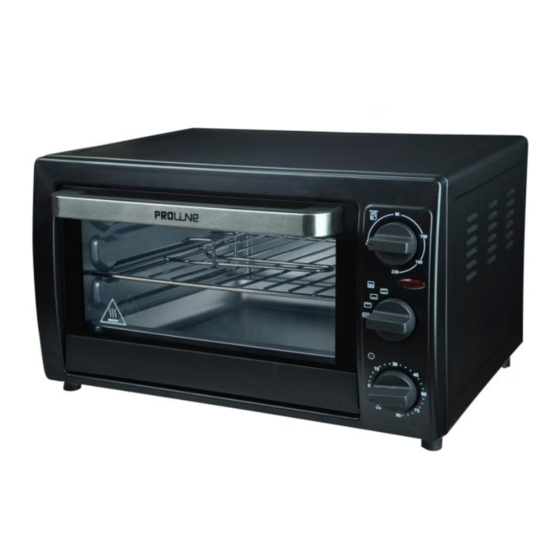
- Page 8 PARTS 1.Door handle 6.Timer knob 2.Glass door 7.Rack 3.Thermostat knob 8.Tray 4.Red indicator light 9.Rack / tray handle 5.Function knob BEFORE FIRST USE Remove all packaging materials and wipe the outside of the appliance with a slightly damp cloth. Wash the rack and tray in warm soapy water. Dry thoroughly before using.
- Page 9 CONTROL SETTINGS TEMPERATURE FUNCTION You can turn the function SETTING SETTING knob to select the OFF, grill, lower heating or convection setting. Lower heating: Only the bottom heating element will heat up. Grill: You can turn the Only the top heating thermostat knob element will heat up.
-
Page 10: Timer Setting
TIMER SETTING The timer can be set up to 90 minutes. In order for the oven to work, you will need to either set up a cooking time or turn the timer knob to “ON” position (see section “Continuous cooking without timer” below). -
Page 11: Operation
OPERATION For the first time use, set the thermostat to 230 °C, set the function knob to the position and turn the timer knob to 15 minutes. Leave the oven operating with no food inside. NOTE: The oven may smoke during cooking. This is normal for a new oven and will last no more than 10 to 15minutes. - Page 12 6. To achieve better cooking performance, it is recommended to preheat the oven for 5 to 8 minutes before cooking. NOTE: It’s recommended that the weight of the food which is put on the rack/tray is not over 3.5 kg. Put food on the rack/tray evenly.
- Page 13 4.Select suitable temperature by turning the thermostat knob. 5.Turn the timer knob to either ON or required cooking time. Lower heating This setting can be used for most food cooked in the conventional function, but will take longer. 1. Slide the tray into the bottom position in the oven. Close the oven door.
-
Page 14: Cleaning And Maintenance
CLEANING AND MAINTENANCE Unplug the appliance from the mains socket and allow it to cool completely before cleaning. Clean the outside of the appliance with a slightly damp cloth. Never use abrasive or chemical cleaners. Wash all removable parts in warm soapy water. Rinse and dry them thoroughly before use. - Page 15 As such we urge you to follow the correct disposal procedure for the appliance and packaging materials. This will help conserve natural resources and ensure that it is recycled in a manner that protects health and the environment. You must dispose of this appliance and its packaging according to local laws and regulations.
- Page 16 ATTENTION Cet appareil est destiné à être utilisé dans des applications domestiques et analogues telles que: les coins cuisines réservés au personnel des magasins, bureaux et autres environnements professionnels; les fermes; l’utilisation par les clients des hôtels, motels et autres environnements à...
- Page 17 Cet appareil peut être utilisé par des enfants à partir de 8 ans et plus et par des personnes ayant des capacités physiques, sensorielles ou mentales réduites ou un manque d’expérience et de connaissances à condition qu’elles aient reçu une supervision ou des instructions concernant l’utilisation de l’appareil en toute sécurité...
- Page 18 minuterie extérieure ou par un système de commande à distance séparé. En ce qui concerne les informations détaillées sur la manière de nettoyer les surfaces en contact avec les aliments, référez-vous dans la section “NETTOYAGE ET ENTRETIEN” en page 26. ...
- Page 19 Ne pas toucher les surfaces chaudes. Utiliser la poignée lorsque vous déplacez l’appareil. Ne pas placer l’appareil près de ou sur une gazinière ou une plaque chauffante, ne le posez pas sur un four ou un mini-four. L’arrière de l’appareil doit être placé contre un mur...
-
Page 20: Mises En Garde Importantes
MISES EN GARDE IMPORTANTES Lisez attentivement le mode d'emploi avant d'utiliser votre four grille-pain pour la première fois. Gardez-le afin de pouvoir vous y référer ultérieurement. Afin d’éviter tout risque d’électrocution, ne mettez jamais le câble, la prise mâle ni aucune autre partie du four dans l’eau ni dans aucun autre liquide. - Page 21 Aucun des matériaux suivants ne doit aller dans le four : papier, carton, plastique et autres produits similaires. Quand le four n'est pas utilisé, ne l'utilisez pas pour y ranger d'autres accessoires que ceux recommandés par le fabricant. ...
-
Page 22: Avant La Première Utilisation
DESCRIPTION 1.Poignée de porte 6..Bouton de la minuterie 2.Porte en verre 7.Grille de cuisson 3.Bouton du thermostat 8.Plaque de cuisson 4.Témoin lumineux rouge 9.Poignée pour la grille et 5.Bouton de fonction plaque AVANT LA PREMIÈRE UTILISATION Enlevez tous les matériaux d'emballage et frottez l'extérieur de l'appareil avec un chiffon légèrement humide. - Page 23 BOUTONS DE CONTRÔ LE BOUTON DU BOUTON DE Le bouton de réglage de THERMOSTAT FONCTION fonction comprend 4 positions: OFF (position éteinte), gril, cuisson par le bas et convection. Cuisson par le bas: Seule la résistance inférieure chauffe. Mettez le bouton Gril: du thermostat Seule la résistance...
- Page 24 BOUTON DE LA MINUTERIE La durée maximale de la minuterie est de 90 minutes. Pour que le four fonctionne, vous devez soit régler une durée de cuisson, soit positionner le bouton de la minuterie sur « ON » (voir la section «...
- Page 25 UTILISATION Pour la première utilisation, mettez le bouton du thermostat sur 230 °C et le bouton de fonction sur , puis réglez la minuterie sur 15 minutes. Laissez tourner le four à vide pendant cette durée. REMARQUE : Le four peut émettre de la fumée pendant la cuisson.
- Page 26 3.N'utilisez en aucun cas des casseroles en verre ou en céramique. 4.Utilisez la température conseillée sur les recettes (ou celle qui vous convient). 5.Fermez bien la porte et réglez le temps de cuisson pour que le four démarre. 6.Pour de meilleurs résultats, il est recommandé de préchauffer le four pendant 5 à...
- Page 27 Grill Ce réglage convient parfaitement pour griller le pain, le poulet, les saucisses, les côtes de porc et le bacon. 1.Insérez la grille dans le four en la faisant glisser dans les rails du haut. 2.Placez la plaque en-dessous pour recueillir les graisses et les jus.
- Page 28 Après la cuisson Une fois la cuisson terminée, mettez le bouton de la minuterie sur "0". Pour sortir les plats du four, utilisez toujours des gants de cuisine (non fournis) ou la poignée fournie. Attention : le four et les aliments sont brûlants! NETTOYAGE ET ENTRETIEN Débranchez l'appareil et attendez qu'il ait complétement refroidi avant de le nettoyer.
-
Page 29: Spécifications
SPÉCIFICATIONS Caractéristiques nominales: 220V-240V~ 50Hz 1300W MISE AU REBUT En tant que distributeurs responsables, nous sommes soucieux de l’environnement. Nous vous prions donc de bien vouloir respecter la procédure de mise au rebut de votre produit et de l’emballage, afin de contribuer à... - Page 30 Hotline Darty France Quels que soient votre panne et le lieu d'achat de votre produit en France, avant de vous déplacer en magasin Darty, appelez le 0 978 970 970 (prix d'un appel local) 7j/7 et 24h/24. Hotline Vandenborre Le service après-vente est joignable au +32 2 334 00 00, du lundi au vendredi de 8h à...
- Page 31 WAARSCHUWINGEN Dit toestel is bestemd voor gebruik in huishoudelijk en soortgelijke omgevingen, zoals : − Personeelkeukens in winkels, kantoren en andere werkomgevingen; − boerderijen; − door klanten in hotels, motels en andere residentiele omgevingen; − bed & breakfasts en gelijkaardige omgevingen.
- Page 32 kinderen vanaf 8 jaar en personen met een beperkt lichamelijk, zintuiglijk of geestelijk vermogen of een gebrek aan ervaring en kennis op voorwaarde dat zij onder toezicht staan of instructies betreffende het veilige gebruik van dit apparaat hebben ontvangen en zich bewust zijn van de gevaren die het gebruik ervan kunnen inhouden.
- Page 33 timer of een aparte afstandsbediening. Wat betreft de instructies voor het reinigen van oppervlakken die in aanraking komen met voedsel, zie hoofdstuk “Reinigen en Onderhoud” op pagina 41 van de handleiding. De deur en het buitenoppervlak kunnen heet worden terwijl het apparaat in werking is.
- Page 34 Gebruik het handvat wanneer U het toestel verplaatst. Plaats het toestel niet op of nabij een warme gas- of elektrische brander, en laat het niet in aanraking koment met een opgewarmde oven of mini-oven. De achterzijde van het apparaat dient tegen een muur te worden geplaatst.
-
Page 35: Belangrijke Veiligheidsvoorzorgen
BELANGRIJKE VEILIGHEIDSVOORZORGEN Lees deze instructies aandachtig wanneer U de toasteroven gebruikt. Bewaar ze voor raadpleging in de toekomst. Om elektrische schokken te voorkomen mag het netsnoer of ander onderdeel van de oven niet in water of andere vloeistof worden ondergedompeld. ... - Page 36 Bewaar uitsluitend de aanbevolen accessoires van de fabikrant in deze oven wanneer die niet wordt gebruikt. Draag altijd ovenwanten (niet meegeleverd) of gebruik het handvat van het meegeleverde rek/lade wanneer U items in de hete oven plaats of verwijdert. ...
-
Page 37: Voor De Eerste Ingebruikname
ONDERDELEN 1..Deurhandvat 6.Timerknop 2.Glazen deur 7.Rek 3.Thermostaatknop 8.Lade 4.Rood indicatorlampje 9.Handvat 5.Functieknop rek/lade VOOR DE EERSTE INGEBRUIKNAME Verwijder alle verpakkingsmaterialen en veeg de buitenkant van het toestel schoon met een licht bevochtigde doek. Was het rek en de lade in een warm sopje. Droog grondig vóór gebruik. - Page 38 INSTELLINGEN TEMPERATUUR FUNCTIES U kan aan de funcieknop INSTELLEN INSTELLEN draaien om de instelling OFF (UIT), grill, lagere verwarming of convectie te selecteren. Lagere verwarming: Alleen het onderste verwarmingselement zal opwarmen. U kan de thermostaatknop Grill: rechtsom draaien Alleen het bovenste naar de gewenste verwarmingselement zal temperatuur tot...
- Page 39 DE TIMER INSTELLEN De timer kan worden ingesteld tot een maximum van 90 minuten. U moet ofwel een bereidingstijd instellen ofwel de timerknop naar de stand “AAN” draaien om de oven te kunnen inschakelen (zie onderstaande paragraaf “Ononderbroken bereiding zonder timer”). Koken met de timer Om de gewenste gebruikstijd in te stellen draait U de timerknop rechtsom.
- Page 40 GEBRUIK Stel de thermostaat op 230 °C wanneer U de oven de eerste keer gebruikt. Stel de functieknop op de stand en draai de timerknop naar 15 minuten. Laat de oven werken zonder ingezet voedsel. OPMERKING: Er kan rook uit de oven komen tijdens het koken. Dit is normaal voor een nieuwe oven en zal niet langer duren dan 10 tot 15 minuten.
- Page 41 4.Stel de temperatuur in volgens het recept of naar wens. 5.Sluit de ovendeur goed en stel de kooktijd in om het koken te beginnen. 6.Om het voedsel zo goed mogelijk te bereiden is het aangeraden om de oven 5 tot 8 minuten voor te verwarmen. OPMERKING: het is raadzaam niet meer dan 3,5kg voedsel op het ovenrek/de ovenschaal neer te zetten.
- Page 42 Grill Deze instelling is ideaal voor het roosteren van brood en het grillen van kip, worst, karbonades en spek. 1.Schuif het rek in de bovenste stand van de oven. 2.Schuif de lade eronder om het vet op te vangen. Sluit de ovendeur.
-
Page 43: Reinigen En Onderhoud
Na het koken Nadat het koken is voltooid draait U de timerknop naar de "0" stand. Draag altijd ovenwanten (niet meegeleverd) of gebruik het handvat van het meegeleverde rek/lade wanneer U items uit de oven verwijdert. Voorzichtig: het gerecht en de oven zijn uiterst warm. - Page 44 VERWIJDERING Als verantwoordelijke handelaar dragen we zorg voor het milieu. We moedigen u aan om de juiste verwijderingsprocedure voor uw apparaat en verpakkingsmateriaal te volgen. Dit draagt bij tot het behoud van de natuurlijke rijkdommen door deze te recyclen zodat zowel de menselijke gezondheid en het milieu worden beschermd.
- Page 45 Hulplijn Nederland Hiervoor kunt u contact opnemen met het BCC Service Center: 0900 0555 (lokaal tarief), geopend van maandag t/m vrijdag van 9.00 tot 17.00 uur. We verontschuldigen ons voor enig ongemak veroorzaakt door kleine inconsistenties in deze gebruikershandleiding, die kunnen ontstaan door productverbetering of –ontwikkeling.
Need help?
Do you have a question about the OV23 and is the answer not in the manual?
Questions and answers