
Related Manuals for Kärcher Sensor 2


Summary of Contents for Kärcher Sensor 2
- Page 1 Sensor 2 (120V) Description Operating instructions (ENG) MODELS: 1.012-070.0 12” Sensor 2 1.012-071.0 14” Sensor 2 86400000-G 12/10/21...
-
Page 2: Machine Data Label
Thank you for purchasing a Kärcher North America product. Warranty registration is quick and easy. Your registration will allow us to serve you better over the lifetime of the product. To register your product go to : http://warranty.karcherna.com For customer assistance: 1-800-444-7654 86400000 - Sensor 2... -
Page 3: Table Of Contents
Changing the Brush Strip ....17 Clearing Blockages ..... . . 18 86400000 - Sensor 2... -
Page 4: How To Use This Manual
KIT INSTRUCTIONS which came with the kit. It contains replacement parts numbers needed for ordering future parts. NOTE: The manual part number is located on the lower right corner of the front cover. 86400000 - Sensor 2... -
Page 5: Safety
19. If used on plush carpet or carpet with thick padding, do not leave machine in one place with machine turned 20. Use of extension cord or light socket with inadequate current-carrying capacity could result in electric shock or fire hazard. READ AND SAVE THESE INSTRUCTIONS 86400000 - Sensor 2... -
Page 6: Hazard Intensity Level
In Flammable or Explosive areas. In areas with possible falling objects WHEN SERVICING MACHINE: Avoid moving parts. Do not wear loose clothing; jackets, shirts, or sleeves when working on the machine. Use manufacturer approved replacement parts. 86400000 - Sensor 2... -
Page 7: Grounding Instructions
NOTE: In Canada, the use of a temporary adapter is not permitted by the Canadian Electrical Code. GROUNDED GROUNDED ADAPTER OUTLET BOX OUTLET TAB FOR METAL SCREW GROUNDING SCREW GROUNDING 86400000 - Sensor 2... -
Page 8: Caution
The use of non-genuine parts will waive the warranty for this product and could pose a serious safety risk. All repairs within the guarantee period should be performed by an authorized Service Representative. Electrical appliance, do not expose to liquid, moisture or heat. 86400000 - Sensor 2... - Page 9 Notes 86400000 - Sensor 2...
-
Page 10: Operations
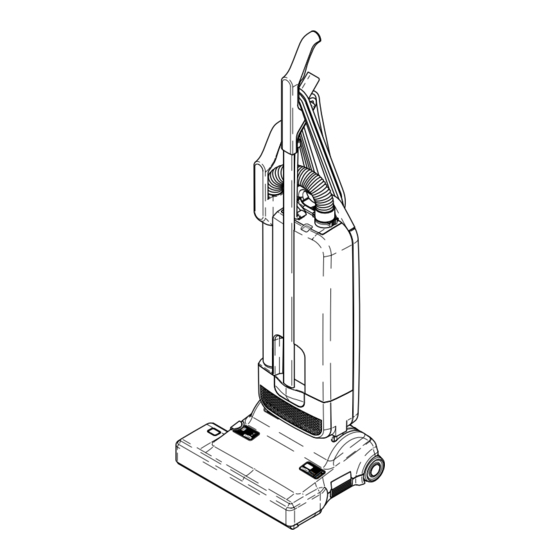
25ft/7.6m 14” Sensor2 39 feet/12m Weight: 12” Sensor2 20.4 pounds/9.3kg 14” Sensor2 20.7 pounds/9.4kg Protection Grounded Sound Pressure Level L 76 dB[A] Uncertainty K 2 dB[A] Hand-arm Vibration Value < 2.5 m/s Uncertainty K 0.2 m/s 86400000 - Sensor 2... - Page 11 14. Rear carrying handle 5. Attachment tube handle 15. Cover release latch 6. Hose 16. Cable hook 7. Attachment tube 17. Crevice nozzle 8. Recessed grip 18. Upholstery nozzle 9. Power head 19. Foot pedal 10. On/Off switch 86400000 - Sensor 2...
-
Page 12: Assembling The Vacuum Cleaner
Fit the mains cable into the groove (22) in the dust bag housing located in the attachment wand recess, then to the clamps on the top of the dust bag housing and on the rear of the handle. 86400000 - Sensor 2... - Page 13 (7) only one way. NOTE: If The Machine Does Not Work, Then The Steps Above Have Not Been Executed Correctly. Please Ensure The Parts Are Properly Pushed Together, Especially The Cable Plug And Swivel Neck. 86400000 - Sensor 2...
-
Page 14: Operating Instructions
Operations Operating Instructions The Sensor 2 vacuum cleaners are designed for high performance, usability and durability. The rotating brush with manual height adjustment cleans your carpets and other floors safely and thoroughly. The hose and attachment tube allow all around cleaning. - Page 15 (17,18) fit either to the end of the hose or the end of the tube. When using accessory tools, keep floor brush off carpet by keeping handle in locked position and lowering handle with one hand to raise brush off floor. Operate accessories with other hand. 86400000 - Sensor 2...
-
Page 16: Maintenance
The Microfilter (37) is located in the dust bag compartment. To change the Microfilter slide it out. Please ensure no particles fall down into the swivel neck. To insert a new Microfilter (37) lift the metal bar (38) to slide the filter in. 86400000 - Sensor 2... -
Page 17: Changing The Brush Strip
Ensure that the new brush strip (42) is fully inserted and press the side plate (44) back into place. NOTE: Ensure that the side plate (44) is fully pushed home so that it locks in place. 86400000 - Sensor 2... -
Page 18: Clearing Blockages
Check for a blockage in the swivel neck of the power head and under the yellow trap-door (45) on the bottom of the power head. Ensure that the passage between these two openings in the power head is clear. 86400000 - Sensor 2... - Page 19 Sensor 2 (120V) Aspiradora Instrucciones de funcionamiento (ESP) MODELOS: 1.012-070.0 12” Sensor 2 1.012-071.0 14” Sensor 2 86400000-G 12/10/21...
-
Page 20: Etiqueta De Datos De La Máquina
Etiqueta de Datos de la Máquina Modelo: Fecha de la compra: Número de serie: Distribuidor: Dirección: Nº de teléfono: Representante de ventas: Registro de Garantía Gracias por comprar un producto de Kärcher North America. El registro de la garantía es rápido y fácil. Su registro permitirá que le sirvamos mejor sobre el curso de la vida del producto. -
Page 21: Índice
Índice Etiqueta de Datos de la Máquina ... . . 2 Índice ........3 Cómo utilizar el manual. -
Page 22: Cómo Utilizar El Manual
INSTRUCCIONES DEL JUEGO que lo acompañan. Éste contiene los números de piezas de recambio necesarios para solicitar piezas en el futuro. NOTA: El número de pieza correspondiente al manual está ubicado en la esquina inferior derecha de la tapa frontal. 86400000 - Sensor 2... -
Page 23: Seguridad
19. Si se la utiliza sobre alfombras gruesas o acolchadas, no deje la máquina encendida en un solo lugar. 20. El uso de un cable de extensión o un tomacorriente con capacidad eléctrica insuficiente puede causar una descarga eléctrica o un incendio. LEA Y GUARDE ESTAS INSTRUCCIONES 86400000 - Sensor 2... -
Page 24: Nivel De Intensidad De Riesgo
En áreas en las que puedan caer objetos. MIENTRAS REPARA LA MÁQUINA: Evite el contacto con las piezas móviles. No lleve puesta ropa amplia (chaquetas, camisas, o mangas) cuando trabaje en la máquina. Use piezas de repuesto aprobadas por el fabricante. 86400000 - Sensor 2... -
Page 25: A Tierra
CONECTADA A GROUNDED GROUNDED ADAPTADOR ADAPTER TIERRA CON CONEXIÓN A OUTLET BOX OUTLET TIERRA TORNILLO METÁLICO LENGÜETA PARA EL TAB FOR METAL SCREW TORNILLO DE GROUNDING SCREW CONEXIÓN A TIERRA CLAVIJA DE GROUNDING CONEXIÓN A TIERRA 86400000 - Sensor 2... -
Page 26: Precauciones
Dentro del período de garantía, todas las reparaciones deberán ser realizadas por un Representante de Servicio autorizado. Dispositivo eléctrico: no exponer a líquidos, humedad o calor. 86400000 - Sensor 2... - Page 27 Notas 86400000 - Sensor 2...
-
Page 28: Operaciones
Peso: 12” Sensor2 20,4 libras/9,3 kg 14” Sensor2 20,7 libras/9,4 kg Protección Conectado a Tierra Nivel de presión acústica L 76 dB[A] Incertidumbre K 2 dB[A] Valor de vibraciones mano-brazo <2,5 m/s Incertidumbre K 0,2 m/s 86400000 - Sensor 2... - Page 29 15. Seguro de liberación de cubierta 6. Manguera 16. Gancho para cable 7. Tubo de sujeción 17. Boquilla con hendidura 8. Asa empotrada 18. Boquilla para tapicería 9. Cabezal de potencia 19. Pedal 10. Interruptor de encendido/apagado 86400000 - Sensor 2...
-
Page 30: Ensamblado De La Aspiradora
86400000 - Sensor 2... - Page 31 (7) de una sola manera. NOTA: Si la máquina no funciona, entonces los pasos anteriores no se han ejecutado correctamente. Asegúrese que las partes estén montadas correctamente, especialmente el enchufe del cable y cuello giratorio. 86400000 - Sensor 2...
-
Page 32: Instrucciones De Operación
1 (ajuste más bajo) a 4 (ajuste más alto). Cuando el cepillo sea nuevo, póngalo en la posición 2. Si es difícil de empujar, cámbielo a la posición 3 o 4. Para obtener una limpieza profunda e intensa, se recomienda la posición 1. 86400000 - Sensor 2... - Page 33 Cuando utilice los accesorios, mantenga el cepillo de piso lejos de la alfombra manteniendo la manija en posición trabada y bajando la manija con la mano para levantar el cepillo del piso. Opere los accesorios con la otra mano. 86400000 - Sensor 2...
-
Page 34: Mantenimiento
Para cambiar el microfiltro, deslícelo hacia fuera. Asegúrese que no caigan partí- culas en el cuello giratorio. Para insertar un nuevo microfiltro (37), levante la barra de metal (38) para deslizar el filtro. 86400000 - Sensor 2... -
Page 35: Reemplazo De La Banda De Cepillo
Asegúrese de insertar bien la nueva banda (42), y vuelva a presionar la placa lateral (44) hasta que quede en su sitio. NOTA: Asegúrese de empujar completamente la placa lateral (44) para que quede trabada en su lugar. 86400000 - Sensor 2... -
Page 36: Desobstrucciones
(45) ubicada en la parte inferior del cabezal de potencia. Asegúrese de que el paso entre estas dos aberturas del cabezal de potencia esté despe- jado. 86400000 - Sensor 2... - Page 37 Sensor 2 (120V) Aspirateur Instructions d'utilisation (FRE) MODÈLES : 1.012-070.0 12” Sensor 2 1.012-071.0 14” Sensor 2 86400000-G 12/10/21...
-
Page 38: Warranty
Étiquette de données de la machine Modèle : Date d’achat : Numéro de série : Détaillant : Adresse : Numéro de téléphone : Représentant commercial: Enregistrement de la garantie Merci d'avoir acheté un produit Kärcher North America. L'enregistrement de la garantie est facile et rapide. - Page 39 Table des matières Étiquette de données de la machine ..2 Table des matières ......3 Comment utiliser ce manuel.
-
Page 40: Comment Utiliser Ce Manuel
INSTRUCTIONS DU KIT qui accompagnaient le kit. En effet, elles contiennent les numéros de pièce de rechange nécessaires à la commande de pièces. REMARQUE : Le numéro de pièce du manuel se trouve dans le coin inférieur de la couverture. 86400000 - Sensor 2... -
Page 41: Sécurité
19. Si la machine est utilisée sur un tapis pelucheux, ou très épais, ne pas la laisser à un endroit lorsqu'elle fonc- tionne. 20. L'utilisation d'une rallonge électrique ou de douilles dont l'intensité est inadaptée peut entraîner une électrocution ou un incendie. LIRE ET CONSERVER CES INSTRUCTIONS 86400000 - Sensor 2... -
Page 42: Niveau D'intensité Du Danger
LORS DE L'ENTRETIEN DE LA MACHINE : Éviter les pièces mobiles. Ne pas porter de vêtements, vestes, chemises ou manches vagues lors de l'entretien de la machine. Utiliser les pièces de rechange approuvées par le fabricant. 86400000 - Sensor 2... -
Page 43: Instructions De Mise À La Terre
GROUNDED GROUNDED ADAPTATEUR ADAPTER RELIÉE À LA TERRE LA TERRE OUTLET BOX OUTLET VIS MÉTALLIQUE LANGUETTE POUR VIS TAB FOR METAL SCREW DE MISE À LA TERRE GROUNDING SCREW FICHE DE MISE À GROUNDING LA TERRE 86400000 - Sensor 2... -
Page 44: Précautions
Toutes les répara- tions effectuées pendant la période de garantie doivent être exécutées par un technicien de maintenance autorisé. Appareil électrique, ne pas exposer à des liquides, à l'humidité ou la chaleur. 86400000 - Sensor 2... - Page 45 Notes 86400000 - Sensor 2...
-
Page 46: Wiring Diagram
20,4 livres/9,3 kg 14” Sensor2 20,7 livres/9,4 kg Protection Reliée à la terre Niveau de pression sonore L 76 dB[A] Coefficient d'élargissement K 2 dB[A] Valeur de vibrations mains-bras < 2,5 m/s Coefficient d'élargissement K < 0,2 m/s 86400000 - Sensor 2... - Page 47 5 Poignée accessoire 15 Verrou de déverrouillage du couvercle 6 Tuyau 16 Crochet de câble 7 Tube accessoire 17 Suceur pour fentes 8 Poignée moulée 18 Embout pour meubles 9 Groupe moteur 19 Pédale 10 Commutateur Marche/Arrêt 86400000 - Sensor 2...
-
Page 48: Montage De L'aspirateur
Placer le cordon d'alimentation dans la rainure (22) du logement de sac à poussière située dans l'évide- ment de fixation de la lance, puis sur les colliers en haut du logement du sac à poussière et à l'arrière de la poignée. 86400000 - Sensor 2... - Page 49 REMARQUE : Si la machine ne fonctionne pas, cela signifie que les étapes ci-dessus n'ont pas été correctement exécutées. Veuillez vous assurer que les pièces sont correctement emboîtées les unes dans les autres ; notamment la fiche du câble et le coude pivotant. 86400000 - Sensor 2...
-
Page 50: Instructions De Fonctionnement
Lorsque la brosse est neuve, la régler à la position 2. Si la machine est dure à pousser, la passer en position 3 ou 4. Pour un nettoyage intensif en profondeur, le réglage 1 est recommandé. 86400000 - Sensor 2... - Page 51 Lors d'utilisation d'outils accessoires, maintenir la brosse au-dessus du tapis en laissant la poignée en position verrouillée et en abaissant la poignée d'une main pour soulever la brosse du sol. Utiliser les accessoires de l'autre main. 86400000 - Sensor 2...
-
Page 52: Maintenance
à poussière. Pour changer le microfiltre, le faire glisser vers l'extérieur. Veiller à s'assurer qu'aucune particule ne tombe à l'intérieur du coude pivotant. Pour insérer un microfiltre neuf (37) lever la barre métallique (38) pour glisser le filtre à l'intérieur. 86400000 - Sensor 2... -
Page 53: Remplacement Du Porte-Brosse
(42) est complètement inséré et appuyer sur la plaque latérale (44) pour la remettre en place. REMARQUE : S'assurer que la plaque latérale (44) est poussée à fond dans son logement afin qu'elle se verrouille en place. 86400000 - Sensor 2... -
Page 54: Élimination Des Blocages
Vérifier l'absence de blocage du coude pivotant du groupe moteur et sous la porte de la trappe jaune (45) en bas du groupe moteur. S'assurer que le passage entre les deux ouvertures dans le groupe moteur est libre. 86400000 - Sensor 2... -
Page 55: Wiring Diagram
Wiring Diagram 86400000 - Sensor 2... - Page 56 86400000-G 06918...
Need help?
Do you have a question about the Sensor 2 and is the answer not in the manual?
Questions and answers