Table of Contents
Advertisement
Quick Links
Advertisement
Table of Contents

Subscribe to Our Youtube Channel
Related Manuals for Robe ROBIN DL4S


Summary of Contents for Robe ROBIN DL4S
- Page 1 Version1.5...
-
Page 2: Table Of Contents
Robin DL4S Profile Table of contents 1. Safety instructions ......................3 2. Operating determination ....................4 3. Fixture exterior view ...................... 5 4. Installation........................6 4.1 Connection to the mains .................... 6 4.2 Replacing rotating gobos ..................7 4.3 Rigging the fixture ...................... 7 4.4 DMX-512 connection .................... -
Page 3: Safety Instructions
CAUTION! Keep this device away from rain and moisture! Unplug mains lead before opening the housing! FOR YOUR OWN SAFETY, PLEASE READ THIS USER MANUAL CAREFULLY BEFORE YOU INITIAL START - UP! 1. Safety instructions Every person involved with installation and maintenance of this device have to: - be qualified - follow the instructions of this manual CAUTION! -
Page 4: Operating Determination
2. Operating determination This device is a moving head for creating decorative effects and was designed for indoor use only. If the device has been exposed to drastic temperature fluctuation (e.g. after transportation), do not switch it on immediately. The arising condensation water might damage your device. Leave the device switched off until it has reached room temperature. -
Page 5: Fixture Exterior View
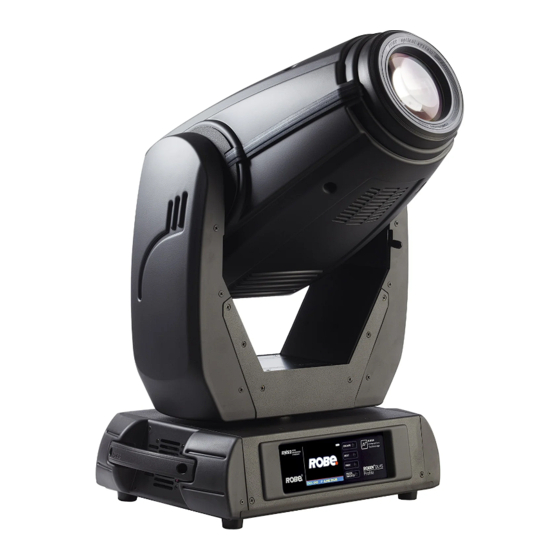
3. Fixture exterior view 1 - Front lens 2 - Tilt lock 3 - Pan lock 4 - Base 5 - Moving head 6 - Arm The head should be locked for transportation- the tilt lock latch (2) and the pan lock latch (3) have to be in the locked positions. -
Page 6: Installation
4.1 Connection to the mains For protection from electric shock, the fixture must be earthed! The Robin DL4S is equipped with auto-switching power supply that automatically adjusts to any 50-60Hz AC power source from 100-240 Volts. -
Page 7: Replacing Rotating Gobos
4.2 Replacing rotating gobos DANGER! Install the gobos with the device switched off only. Unplug from mains before! Rotating gobos 1. Disconnect the fixture from mains and allow it to cool. 2. Remove the bottom plastic cover of the head by loosening the 4 quarter-turn fasteners on the cover. 3. - Page 8 material and the fixture. If you lack these qualifications, do not attempt the installation yourself, but instead use a professional structural rigger. Improper installation can result in bodily injury or damage to property. The fixture has to be installed out of the reach of people. If the fixture shall be lowered from the ceiling or high joists, professional trussing systems have to be used.
-
Page 9: Dmx-512 Connection
When installing fixtures side-by-side, avoid illuminating one fixture with another! DANGER TO LIFE! Before taking into operation for the first time,the installation has to be approved by an expert! 4.4 DMX-512 connection The fixture is equipped with both 3-pin and 5-pin XLR sockets for DMX input and output.The sockets are wired in parallel. -
Page 10: Ethernet Connection
The Universe is a single DMX 512 frame of 512 channels. The Robin DL4S is equipped with 8-pin RJ- 45 socket for Ethernet input.Use a network cable category 5 (with four “twisted” wire pairs) and standard RJ-45 plugs in order to connect the fixture to the network. - Page 11 Ethernet / DMX operation Options “Art2DMX” has to be selected from the “Ethernet Mode” menu on the first fixture (connected to the Ethernet) in the fixture chain,next fixtures have standard DMX setting. Connect the Ethernet-input of the first fixture in the data chain with the network. Connect the DMX output of this fixture with the input of the next fixture until all fixtures are connected to the DMX chain.
-
Page 12: Wireless Dmx Operation
4.6 Wireless DMX operation The wireless version of the Robin DL4S Spot is equipped with the Lumen Radio CRMX module and antenna for receiving DMX signal. CRMX module operates on the 2.4 GHz band. The item " Wireless " from the menu "DMX Input" allows you to activate receiving of wireless DMX (Person- ality-->... -
Page 13: Remotely Controllable Functions
5. Remotely controllable functions Virtual colour wheel This wheel contains 236 colours including whites (2700K, 3200K, 4200K, 5600K and 8000K). Tungsten lamp effect at whites 2700K and 3200K. RGBW or CMY colour mixing system The RGBW colour mixing system is based on red, green, blue and white high power LEDs. Option for switching the fixture to the CMY colour mixing system is also available. - Page 14 Framing shutters identification...
-
Page 15: Control Menu Map
6. Control menu map Default settings=Bold print Level 1 Level 2 Level 3 Level 4 Level 5 Level 6 Addressing Settings DMX Address 001-512 Ethernet Settings Ethernet Mode Disable ArtNet gMAI gMA2 sACN Ethernet To DMX Off, On IP Address/Net Mask Default IP Address Custom IP Address Net Mask... - Page 16 Level 1 Level 2 Level 3 Level 4 Level 5 Level 6 Module F-B Module G Product IDs Mac Address RDM UID RDM Label View Logs Fixture Errors Pan Errors Temp.Sensor Errors Fixture States Power On Power Off Fixture Position Fixture Temperatures LED Temperatures Ambient Temperatures...
- Page 17 Level 1 Level 2 Level 3 Level 4 Level 5 Level 6 Display Orientation Normal Inverted Auto Temperature Unit °C,°F Fan Mode Auto High Dimmer Curve Linear Square law Date & Time Settings U n l i n k W i r e l e s s Adapter * Default Settings Manual Control...
- Page 18 Level 1 Level 2 Level 3 Level 4 Level 5 Level 6 Focus 0-255 Calibrate colours 0-255 Green 0-255 Blue 0-255 White 0-255 Edit Calibrations Module L-L 2700K 0-255 3200K Green 0-255 4200K Blue 0-255 4200K TM White 0-255 5600K 5600K TM 8000K 8000K TM...
-
Page 19: Control Menu
7. Control menu The Robin DL4S Light is equipped with the QVGA Robe touch screen with battery backup which allows to set the fixture´s behaviour according to your needs, obtain information on its operation, test its various parts and lastly program it, if it has to be used in a stand-alone mode. -
Page 20: Tab " Address
Note: The green icon at the top right corner of the screen indicates the level of the display battery charging. If the whole icon is green, the battery is fully charged while the red icon indicates exhausted battery. The battery charges during fixture operation, its charging lasts cca 6 hours. -
Page 21: Tab "Information
Resetable Hours - The item shows the number of the operation hours that the Robin DL4S has been powered on since the counter was last reset. In order to reset this counter to 0, touch the text box next to the item "Resetable Hours:"... - Page 22 was last reset. In order to reset this counter to 0, touch the text box next to the item "Maximum Res." Ambient Temperature - The menu shows temperature of the induced air on the fan in the fixture base . Current - A current temperature of the induced air in the fixture base.
-
Page 23: Tab "Personality
7.3 Tab "Personality" User mode - The Robin DL4S allows you to recall up to 3 user settings. After switching the fixture on for the first time, the User A settings is active. Now all changes made in the “Personality” menu , ”Addressing” menu and the “Music Trigger“... -
Page 24: Tab "Manual Control
Off - The option is disabled Auto - Automatic regulation of fans noise level. Silent - After selecting this item, the option "Fan Noise Level" is accessible where desired level of the fans noise can be set. Colour Calibration Mode - If the function is on, the white output from the fixture (and also mixed colours) is more uniform. -
Page 25: Tab "Stand-Alone
Play Program 2 - The option starts user program No. 2. Play Program 3 - The option starts user program No. 3. Edit Program - Use the menu to create or to edit desired program. The Robin DL4S offers 3 free programs, each up to 100 steps. -
Page 26: Tab "Service
Pan/Tilt Macro 0 - 9 Disabled pan/tilt macro 10 - 31 Reserved 32 - 63 Figure of circle (from small to large) 64 - 95 Figure of horizontal eight (from small to large) 96 - 127 Figure of vertical eight (from small to large) 128 - 159 Figure of rectangle (from small to large) 160 - 191... - Page 27 Red - a red LEDs saturation fine adjustment Green - a green LEDs saturation fine adjusment Blue - a blue LEDs saturation fine adjustment White - a white LEDs saturation fine adjustment Calibration of the white colours via DMX controller 1.
- Page 28 24. Set the channel "Power" at 240 DMX (disable theatre mode). 25. Set the channel " Virtual Colour Wheel" (ch.5) at 5600K. Set the channel "White" (ch.66) from the calibration protocol at 255 DMX and by means of the channels "Red", "Green", "Blue"...
- Page 29 If you use the Robe Universal Interface, connect a USB port of your computer with the Robe Universal Interface by means of the USB cable and DMX input of the fixture with the DMX output of the Robe Universal Interface via a DMX cable.
-
Page 30: Rdm
DMX512, the RDM protocol allows a console or dedicated RDM controller to send commands to and receive messages from specific moving lights. RDM allows explicit commands to be sent to a device and responses to be received from it. The list of commands for Robin DL4S is the following. Parameter ID Discovery command SET command... -
Page 31: Error And Information Messages
9. Error and information messages Occurred errors during fixture operation are signalled by the yellow warning icon at the bottom line of the screen: Touch the warning icon or press the [ESCAPE] button to display error messages. List of error and information messages: Temper.Sensor Error The message informs you that the communication betwen the head temperature sensor and the main pro- cessor failed.. - Page 32 the DATA line connectors. Clean them, pull/push them in/out to renew a good contact. Make sure the fixture has latest software.
-
Page 33: Technical Specifications
10. Technical Specifications Electrical Power supply:......electronic auto-ranging Input voltage range:....supply 100-240V, 50-60Hz Live Fuse:.......T 8 A Neutral Fuse:......T 8 A Max. power consumption* (RGBW=full):....550W ( power factor= 0.97; I=2.4A at 230V) Optic Light source: RGBW LED module RGBW or CMY colour mixing +CTC Min. - Page 34 Strobe Strobe effect with variable speed (0.3 - 20Hz) Dimmer Smooth dimmer from 0 - 100 % Control Graphic touch screen for fixture setting and addressing Gravitation sensor for auto screen positioning Battery backup of the touch screen Readout fixture and LEDs usage, receiving DMX values, temperatures, etc Built-in analyzer for easy fault finding, error messages Built-in demo sequences Black-out while head moving, colour or gobo changing...
-
Page 35: Maintenance And Cleaning
Weight (net) 22.7 kg Dimensions (mm) Accessories 1 x Omega adaptor CL-regular 2 pcs in box (P/N 10980033) 1 x Power cable 1 x Gobo set 16 (P/N.15050025) Optional accessories Upgrade kit CRMX Univerzal 260 (P/N 9903 0100) Safety wire 35 kg (P/N 99011963) Doughty Trigger Clamp (P/N 17030386) 11. -
Page 36: Photometric Diagrams
4) Replace the fuseholder in the housing and fix it. 12. Photometric diagrams April 16, 2020 Copyright © 2016-2020 Robe Lighting - All rights reserved All Specifications subject to change without notice Made in CZECH REPUBLIC by ROBE LIGHTING s.r.o. Palackeho 416/20 CZ 75701 Valasske Mezirici... - Page 38 DMX protocol Robin DL4S Profile - DMX protocol - version 1.4 Mode/channel Type of Function Value control 0 - 255 Pan movement by 540° proportional Pan Fine 0 - 255 Fine control of pan movement proportional Tilt 0 - 255 Tilt movement by 280°...
- Page 39 DMX protocol Mode/channel Type of Function Value control 210-224 Reserved The following RoboSpot related commands are only applicable when the RoboSpot is connected: 225 - 229 RoboSpot enabled step 230 - 234 RoboSpot disabled - except handle faders and pan/tilt step 235 - 239 RoboSpot fully disabled step...
- Page 40 DMX protocol Mode/channel Type of Function Value control White (16 bit) 0 - 255 White colour saturation control - fine (RGBW mode only) proportional If function "White Point 8000K" is ON 0-255 Col. temperature correction from 8000K to 2700K -for whites only proportional (0=8000K, 64=5600K, 128=4200K, 192=3200K,255=2700K) To get colour temperatures stated above, RGBW channels have to...
- Page 41 DMX protocol Mode/channel Type of Function Value control 12-15 Gobo 3 step 16-19 Gobo 4 step 20-23 Gobo 5 step 24-27 Gobo 6 step 28-31 Gobo 7 step Rotation - set rotation on channel 22/18/16 32-35 Gobo 1 step 36-39 Gobo 2 step 40-43...
- Page 42 DMX protocol Mode/channel Type of Function Value control 0 - 19 Open position (hole) step 20 - 127 3-facet rotating prism step 128 - 255 Prism/gobo macros 128 - 135 Macro 1 step 136 - 143 Macro 2 step 144 - 151 Macro 3 step 152 - 159 Macro 4 step...
- Page 43 DMX protocol Mode/channel Type of Function Value control 0 - 255 Continuous adjustment from far to near proportional Focus - fine 0- 255 Fine focusing proportional Autofocus (priority & distance selection) Select desired distance and effect on which you need to focus and use "Focus"...
- Page 44 DMX protocol Mode/channel Type of Function Value control Framing shutter 4- swivelling 0-127 Swivelling from -25 degrees towards 0 degrees proportional 0 degrees (default) step 129-255 Swivelling from 0 degrees to +25 degrees proportional Framing shutters macros No function Macro 1 step Macro 2 8-11...
- Page 45 DMX protocol Mode/channel Type of Function Value control Macro 44 176-179 step Macro 45 180-183 step Macro 46 184-187 step Macro 47 188-191 step Macro 48 192-195 step Macro 49 196-199 step Macro 50 200-203 step Macro 51 204-207 step Macro 52 208-211 step...
- Page 46 Virtual colour wheel - colour mixing chart Scale* Virtual Colour Wheel Green Blue White Theatre mode off 1-3 (White 2700K) 4-6 (White 3200K) 7-9 (White 4200K) 10-12 (White 5600K) 13-15 (White 8000K) Theatre mode on 1-3 (White 2700K) 4-6 (White 3200K) 7-9 (White 4200K) 10-12 (White 5600K) 13-15 (White 8000K)
- Page 47 Scale* Virtual Colour Wheel Green Blue White Page 2...
- Page 48 Scale* Virtual Colour Wheel Green Blue White Page 3...
- Page 49 Scale* Virtual Colour Wheel Green Blue White Page 4...
- Page 50 Scale* Virtual Colour Wheel Green Blue White **** **** **** **** 248-255 (Rainbow effect) * Colour scale as an illustration only Page 5...
Need help?
Do you have a question about the ROBIN DL4S and is the answer not in the manual?
Questions and answers