Table of Contents
Advertisement
Advertisement
Table of Contents

Subscribe to Our Youtube Channel
Related Manuals for Robe 575 AT


Summary of Contents for Robe 575 AT
- Page 1 Version 2.0...
-
Page 2: Table Of Contents
4.6 Changing the front and zoom lenses ................ 9 4.7 Rigging the fixture ....................10 4.8 DMX-512 connection/connection between fixtures ..........12 5. ColorWash 575 AT-DMX Protocol-version 1.0 ............13 6. Controller mode ......................16 6.1 DMX addressing....................... 16 6.2 Remotely controllable functions ................16 7. -
Page 3: Safety Instructions
CAUTION! Keep this device away from rain and moisture! Unplug mains lead before opening the housing! FOR YOUR OWN SAFETY, PLEASE READ THIS USER MANUAL CAREFULLY BEFORE YOU INITIAL START - UP! 1. Safety instructions Every person involved with installation and maintenance of this device have to: - be qualilfied - follow the instructions of this manual CAUTION! -
Page 4: Operating Determinations
2.Operating determinations This device is a moving-head for creating decorative effects and was designed for indoor use only. If the device has been exposed to drastic temperature fluctuation (e.g. after transportation), do not switch it on immediately. The arising condensation water might damage your device. Leave the device switched off until it has reached room temperature. -
Page 5: Description Of The Device
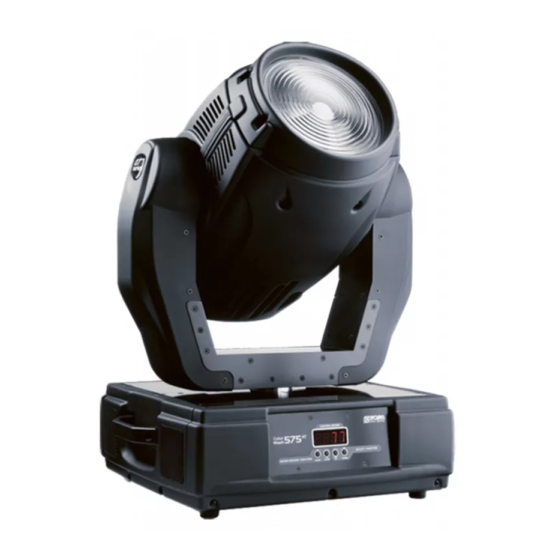
3. Description of the device 1 - Front lens 2 - Moving head 3 - Yoke 4 - Base Rear panel: 5 - Power switch 6 - Power cord 7 - Fuse holder 8 - 3-pin DMX output 9 - 3-pin DMX input 10 - 5-pin DMX output 11 - 5-pin DMX input Front panel:... -
Page 6: Installation
4. Installation 4.1Fitting the lamp DANGER ! Install the lamps with the device switched off only. Unplug from mains before ! To insert the lamp loosen the lamp cover at the rear of head (see the drawings ) by remowing the 3 fastening screws which are marked "X,Y,Z".Carefully pull out the cover with the lamp socket assembly.If changing the lamp, remove the old lamp from the socket. -
Page 7: Lamp Adjustment
4.2 Lamp adjustment 3 adjustment screws "A,B,C" The ColorWash 575 AT lamp holder is aligned at the factory. Due to differences between lamps, fine adjust- ment may improve light performance. Strike the lamp,open the shutter and set the dimmer intensity onto 100% and aim the light on a flat surface (wall).Center a hot-spot(the brightest part of the image) by using the 3 adjustment screws "A,B,C".Turn one... -
Page 8: Connection To The Mains
4.4 Connection to the mains Verify the power supply settings before applying power! If you wish to change the power supply settings,see the chapter below. Connect the fixture to the mains with the power cord. If the plug on the flexible cord is not the right type for your socket outlets,do not use an adaptor,but remove the plug from the cord and discard.Carefully prepare the end of the the supply cord and fit a suitable plug. -
Page 9: Changing The Front And Zoom Lenses
4.6 Changing the front and zoom lenses The ColorWash 575 AT is supplied with one type of the front lense(Fresnel lens) and one type of the zoom lens(standard zoom lens). If you wish to extend the zoom range,you may need optional Fresnel zoom lens or... -
Page 10: Rigging The Fixture
4.7 Rigging the fixture DANGER TO LIFE! Please consider the respective national norms during the installation! The installation must only be carried out by an authorized dealer! The installation of the projector has to be built and constructed in a way that it can hold 10 times the weight for 1 hour without any harming deformation. - Page 11 For overhead use, always install a safety-rope that can hold at least 10 times the weight of the fixture. You must only use safety-ropes with screw-on carabines. Pull the safety-rope through the two apertures on the bottom of the base and over the trussing system etc. Insert the end in the carabine and tighten the fixation screw. Fixation via the omega holders 1.Bolt each clamp (1) to the omega holder (4) with M12 bolt and lock nut through the hole in the holder.
-
Page 12: Dmx-512 Connection/Connection Between Fixtures
4.8 DMX-512 connection/connection between fixtures The fixture is equipped with both 3-pin and 5-pin XLR sockets for DMX input and output.The sockets are wired parallel. Only use a shielded twisted-pair cable designed for RS-485 and 3-pin or 5-pin XLR-plugs and connectors in order to connect the controller with the fixture or one fixture with another. -
Page 13: Colorwash 575 At-Dmx Protocol-Version 1.0
5. ColorWash 575 AT-DMX Protocol-version 1.0 Mode/Channel Type of Value Function control 0 - 255 proportional Pan movement by 530° Pan Fine 0 - 255 proportional Fine control of pan movement Tilt 0 - 255 proportional Tilt movement by 280°... - Page 14 Mode/Channel Type of Value Function control Colour wheel Continual positioning Open/white proportional Deep red proportional Deep blue proportional Green proportional 6000K correction filter proportional UV filter proportional 128-129 White proportional Positioning 130-141 Deep red step 142-153 Deep blue step 154-165 Green step 166-177...
- Page 15 Mode/Channel Type of Value Function control 184-191 Macro 23 step 192-199 Macro 24 step 200 - 207 Macro 25 step 208 - 215 Macro 26 step 216 - 223 Macro 27 step 224 - 231 Macro 28 step 232 - 239 Macro 29 step 240 - 243...
-
Page 16: Controller Mode
The ColorWash 575 AT is to be operated with a Philips MSR 575/2 lamp. A relay inside of the ColorWash 575 AT allows you to switch on and off the lamp via the control panel or via your DMX-controller without affecting the rest of the lighting. -
Page 17: Stand - Alone Mode
7. Stand - alone mode The fixtures on a data link are not connected to the controller but can execute pre-set programs which can be different for every fixture.To set the program to be played,see the "Stand-alone setting" ( menu "St.AL."). "Stand-alone operation"... -
Page 18: Control Menu Map
8.Control menu map Default settings=Bold print A001 dM.Ad. MA.SL. d.AbL MASt. SLA.1 SLA.9 SL.Ct. InFo Po.ti. totl rSEt La.ti. totl rSEt LA.St. totl rSEt tEMP. Cur.t. boAr. HEAd Hi.tE. boAr. HEAd rSEt boAr. HEAd DM.In. Pan (0-255) F.dim (0-255) VErS. IC1.b. - Page 19 En.Sn.(On,Off) dISP. turn (On,Off) d.On (On,Off) d.Int.(20...100) bL.Co.(On,Off) FEEd. (On,Off) MI.SE(1...10...20) FAn.S. (Auto,HIGH) P.t.Mo. (SP.Mo.,ti.Mo.) A.bLc. P.t.M. (On,Off) Col.M. (On,Off) In.Po. Pan (0-255) F.dim (0-255) Stor. dF.SE. LAMP (On,Off) MAn.M. PrE.C. Pan (Pan.1...Pan3) dimr (dim.0..dim.C.) MAn.C. Pan (0-255) F.dim (0-255) tESt Mod 1 Pan (0-255)
- Page 20 rESE. SPEC. LA.Ad. PAn (0-255) tilt (0-255) Zoom (0-255) CodE AdJ. Pan (0-255) F.CAL Colo. (0-255) dimr (0-255) A.rES. uPd.M.(No,YES)
-
Page 21: Control Menu
--- The function shows the number of the operation hours that the ColorWash 575 AT has been powered on since the counter was last reset.In order to reset this counter to 0 you have to hold [UP] and[DOWN ] and press the [ENTER]. - Page 22 ColorWash 575 AT has been powered on since the counter was last reset.In order to reset this counter to 0 you have to hold [UP] and[DOWN ] and press the [ENTER]. LA.St. --- Lamp strikes.Select this submenu to read the total number of the lamp strikes.
-
Page 23: Personality
9.4 Personality Use this menu to to modify ColorWash 575 AT operating behavior. r.PAn --- Pan reverse.Select this function to invert the pan movement. r.tilt --- Tilt reverse.Select this function to invert the tilt movement. DM.Pr. --- DMX preseting.Select this function to set desired effects assigning to the channels.Please refer to the chapter "DMX protocol"... -
Page 24: Lamp On/Off
Fan.S. --- Fan speed operating modes.By using this function you can choose 2 types of the fan speed op- erating modes. Auto --- The fans automatically raise their speed in order to control inside temperature of the head, if the temperature inside increases about certain level (the low fan speed reduces the cooling of the lighting). -
Page 25: Test Sequences
Edit --- Editing program.Select this menu to edit or create the program.The ColorWash 575 AT has one built- in program and the 3 free programs,each up to 99 steps.Each program step has a step time.Step time-the time,during which effects last in the current step. -
Page 26: Reset Function
P.t.SE. a pan/tilt macro selection F.Zom a fine zoom P.t.SP. a pan/tilt speed Stro. a shutter,strobe Func. a special function dimr a dimmer Colo. a colour wheel F.Col. a fine colour wheel CYAN a cyan lamella MAGE. a magenta lemella YELL. -
Page 27: Low Power Mode
To update software in the fixture: 1.Installation of DMX Software Uploader. 1.DMX Software Uploader program is available from the ROBE web site at WWW.robe.cz. 2.Make a new directory ( e.g. Robe_Uploader) on your hard disk and download the software to it. -
Page 28: Error And Information Messages
The message will appear on the display if the lamp doesn't ignite within 28 seconds. The ColorWash 575 AT will store this information and automatically ignite the lamp when the 5 minutes period has expired. Caution: The message is disabled if the lamp light sensor (function "En.Sn.") is switched Off (only if the lamp was turned Off and On within 5 minutes,the message "HEAt"... -
Page 29: Technical Specifications
head is not located in the default position after the reset. MA.Er.(Master error) The message informs you that the fixture was addressed as a master and DMX signal is connected to its input.Disconnect the DMX controller from fixture's input and address the fixture as the master again. t.M.Er.(Temperature measuring error) The message informs you that the communication betwen the head and the main board in the fixture base was cut off (or the head temperature sensor is defective) and the lamp was automatically switched off. - Page 30 -Addressing,special functions setting,effects calibration via control panel with 4-digit LED display -Readout fixture and lamp usage,receiving DMX values,temperature, etc -Built-in analyzer for easy fault finding,error messages -Remotely switching on/off the lamp -Bilt-in demo sequences -Black-out while head moving or color changing -Silent fans cooling, -Self-resetable thermo-fuse -Master/slave operation...
-
Page 31: Maintennce And Cleaning
Weight (net): EU version:30.5 kg US version:34.5 kg Beampath Standard Fresnel lens+standard zoom lens: Accessories - Omega holder (2 pieces)........99010420 Optional Accessories - Module of wide-angle lens D114......99011085 - Module of Front wide-angle lens D200.....99011101 - Flash cable RS232/DMX........13050624 13. Maintenance and cleaning It is absolutely essential that the fixture is kept clean and that dust, dirt and smoke-fluid residues must not build up on or within the fixture. - Page 32 The front objective lens will require weekly cleaning as smoke-fluid tends to building up residues, reducing the light output very quickly. The cooling fans should be cleaned monthly. The interior of the fixture should be cleaned at least annually using a vacuum-cleaner or an air-jet. The dichroic colour filters should be cleaned monthly.
Need help?
Do you have a question about the 575 AT and is the answer not in the manual?
Questions and answers