
Related Manuals for FlowLine EchoPulse LR15 Series


Summary of Contents for FlowLine EchoPulse LR15 Series
- Page 1 ® EchoPulse Radar Liquid Level Transmitter LR10, LR15, LR20, LR25 & LR30 Series Manual 1.888.610.7664 www.calcert.com sales@calcert.com...
-
Page 2: Table Of Contents
Introduction Section One TABLE OF CONTENTS Section One | Introduction: ................... 2 Table of Contents: ....................2 Sensor Models: ....................4 Operating Principle: ..................... 4 Features: ......................4 Benefits: ....................... 4 Limitations: ......................4 Specifications: ...................... 5 Dimensions: ......................8 Safety Precautions: .................... - Page 3 Introduction Section One Section Seven | Advanced Adjustments: ..............45 Advanced Adjustments Overview: ..............45 4-20mA Reverse Output: ................... 46 Fail-Safe Output: ....................47 Minimum Current Output: ................... 48 Create a New False Echo Curve: ..............49 Update an Existing False Echo Curve: .............. 50 Section Eight | Troubleshooting: ................
-
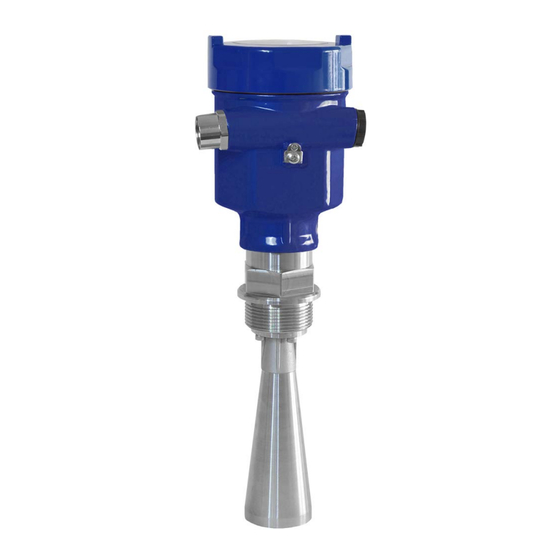
Page 4: Sensor Models
Introduction Section One SENSOR MODELS ® Offered in five different models, EchoPulse is a general-purpose, two-wire, pulse radar level sensor that provides a continuous 4-20 mA current output that’s proportional to the liquid level in a tank or sump. Make sure that the model purchased is appropriate for your application. Series Beam Angle Material... -
Page 5: Specifications
Introduction Section One SPECIFICATIONS Measurement Range: Series LR10 LR15 LR20 LR25 LR30 32.81 ft 98.42 feet 65.61 feet 114.83 feet 98.42 feet Range (Max) (10m) (30m) (20m) (35m) (30m) Dead Band: 12” (30.48cm) / Factory Set Note: Can be lowered to 2” from the bottom of the antenna Measurement Accuracy: (see charts on Page 7) Series... - Page 6 Introduction Section One Process Pressure: Series LR10 LR15 LR20 LR25 LR30 -14.5 to 43.5 psi -14.5 to 150 psi -14.5 to 72.5 psi -14.5 to 580 psi Pressure Atmospheric (-1 to 3 bar) (-1 to 10.3 bar) (-1 to 5 bar) (-1 to 40 bar) Vibration Proof: Mechanical vibration 10m/s, 10m...
- Page 7 Introduction Section One ACCURACY CHARTS MN301700 Rev B3 1.888.610.7664 www.calcert.com sales@calcert.com...
-
Page 8: Dimensions
Introduction Section One DIMENSIONS LR10 Series LR15 Series (Threaded) LR15 Series (Flange) LR15 Series (Threaded) Antenna Dimensions Diameter (X) Length (Y) 2” (48mm) 5.51” (140mm) 3” (78mm) 8.94” (227mm) 4” (98mm) 11.34” (288mm) LR15 Series (Flange) Dimensions Flange (A) Diameter (B) Thickness (C) 3”... - Page 9 Introduction Section One LR20 Series LR25 Series LR20 Series Flange / Antenna Dimensions LR25 Series Flange / Antenna Dimensions Flange Diameter Thickness Length Flange Diameter Thickness Length 3” 7.5” 0.88” 6.50” 4” 9.0” 0.57” 5.71” ANSI (190.5mm) (22.3mm) (165mm) ANSI (228.6mm) (14.5mm) (145mm)
- Page 10 Introduction Section One LR30 Series Bracket (Top View) LR30 Series (Side View B) LR30 Series (Side View A) LR98 Series Display LR98 Series Display LR98 Series Display (Front View) (Bottom View) (Side View) Note: Both conduit ports feature M20x1.5 threads. LR98 ships with Liquid Tight Fitting (LM90-1051) and LR97- S003 Adapter (½”...
-
Page 11: Safety Precautions
Before closing the enclosure, make sure that the enclosure gasket is properly seated, and that any conduit fittings, cable connectors or plugs are installed correctly and sealed. Note: If using the Flowline LM90- 1001 (liquid tight fitting) on the ½” conduit, the cable minimum is 0.170” (4.3mm) and the maximum is 0.450”... -
Page 12: Section Two | Getting Started
1. Prior to purchasing the sensor, you should have submitted a Level Application Questionnaire (flowline.com/LAQ), which based upon the information provided, may have resulted in a suggested part number. Where so, confirm that the suggested part number matches the part number of the purchased sensor. - Page 13 Getting Started Section Two 6. Advanced Adjustments (Section Seven) 1. Reverse 4-20 mA Output a. Reverses the current output from 4mA @ bottom and 20mA @ top of tank to 20mA @ bottom and 4mA @ top of the tank. 2.
-
Page 14: Part Number
tting Star rted Section Two T NUMBER Prior r to purchas ing the sens sor, you shou uld have sub bmitted a Le evel Applicat tion Question nnaire (flow wline.com/LA AQ), which b based upon t the informati ion provided d, may have resulted in a a suggested... - Page 15 Getting Started Section Two LR20 Housing Material - Aluminum Process Connection - ANSI Flange Output - 4-20 mA Approval - General Purpose (cTUVus) Flange Size - 3" Flange (ANSI) - 4" Flange (ANSI) LR25 Housing Material - Aluminum Process Connection - ANSI Flange Output - 4-20 mA...
-
Page 16: Section Three | Install Sensor
Install Sensor Section Three INSTALLATION REQUIREMENTS ® EchoPulse measures the distance between the sensor and the liquid surface below. Typically, all measurements from the sensor originate from the bottom of the antenna. Refer to the Measurement Reference Chart to determine the location where measurement originates on your sensor. To ensure reliable measurement, adhere to the following minimum installation requirements: 1. -
Page 17: Lr15 Antenna Preparation
Install Sensor Section Three LR15 ANTENNA PREPARATION The LR15 Series antenna (only) may be removed from the sensor to allow a flange or reducer bushing accessory to be attached to the 1 ½” NPT mounting threads and/or, the antenna may be inserted from within the inside of the tank through the bottom of an existing fitting (where the base of the antenna is too wide to pass through the fitting from the top). -
Page 18: Mounting Position
Install Sensor Section Three MOUNTING POSITION The minimum distance (independent of beam angle) that the sensor can be mounted next to the straight side wall of the tank is 19.7” (500mm) as measured from the sensor centerline to the side wall. If you are not able to install the sensor more than 19.7”... - Page 19 Install Sensor Section Three Mount the Sensor Perpendicular to the Liquid Level Always mount the sensor perpendicular to the surface of the liquid. This will enable the return echoes to reach the sensor. Mounting the sensor off-axis will result in weaker return echoes or no return echoes, depending on the degree of angle.
-
Page 20: Flange Riser Installation
Install Sensor Section Three Avoid Obstructions in the Beam Path Do not mount the sensor in or above the fill stream, other equipment (ladders, pumps, mixers) or structures within the beam path of the sensor. Such items can create false echo returns and prevent the actual level from being seen by the sensor. -
Page 21: Beam Angle
Install Sensor Section Three Agitator or Mixer If there are agitators or mixers in the tank, the sensor should be mounted as far away from the blades as possible. Once the installation is complete, a False Echo Curve should be preformed while the agitator or mixer is in motion to map out and eliminate false echo returns from the blades. -
Page 22: Stand Pipe Installation
Install Sensor Section Three STAND PIPE INSTALLATION To avoid issues from turbulence, substantial foam or other equipment in the sensors beam path, install the sensor within a stand pipe (still well). A stand pipe installation can be used with liquids with a dielectric constant as low as 1.9. -
Page 23: Bypass Installation
Install Sensor Section Three BYPASS INSTALLATION An alternative to a stand pipe is installing the sensor within a bypass mounted outside of the tank. Bypass installations can avoid issues from turbulence, substantial foam or other equipment in the sensors beam path. Note: The use of a bypass is not recommended with liquids that significantly coat or scale. -
Page 24: Lr30 Sensor Installation
Install Sensor Section Three LR30 SENSOR INSTALLATION ® The LR30 is unique within the EchoPulse sensor family. It is designed for use in water processing, lift stations, storm water and sump process conditions, which require the sensor to be installed in locations that are often below grade where flooding is a possibility. -
Page 25: Lr98 Display Installation
Install Sensor Section Three LR98 DISPLAY INSTALLATION The LR98 is a wall mount IP67 remote push button display module that’s used to configure and display level readings from the LR30 sensor. The LR98 should be mounted in a location where the display can be easily read. -
Page 26: Section Four | Wire Sensor
Wire Sensor Section Four REMOVE THE DISPLAY To access the terminal strip and conduit ports, you first need to remove the display. Gently twist the display counter-clockwise until you feel the display unlock from the housing. Next, lift the display from the housing to view the terminal strip and wire access ports. -
Page 27: Lr30 Sensor To Lr98 Display
Wire Sensor Section Four LR30 SENSOR TO LR98 DISPLAY The LR98 display is used with the LR30 sensor. The attached 8-conductor sensor cable will wire directly into the display terminals. A shielded two-wire cable (user supplied) is required to provide power to and the current output signal from the display. -
Page 28: Wiring To Displays, Controllers & Plcs
Wire Sensor Section Four WIRING TO DISPLAYS, CONTROLLERS & PLC’S ® Below are examples of how to wire EchoPulse to common displays, controllers and PLC’s. DataView™ LI55 Series Commander™ LI90 Series Level Controller Multi-Tank Level Controller DataLoop™ LI23 Series DataLoop™ LI23 Series Level Indicator Level Indicator (Without Backlight) - Page 29 Wire Sensor Section Four WIRING TO DISPLAYS, CONTROLLERS & PLC’S DataPoint™ LC52 Series DataPoint™ LC52 Series Level Controller Level Controller (*JWA Mode - Factory Setting) (*JWB Mode) Generic Loop Generic PLC Powered Display * Refer to the DataPoint™ LC52 Series Level Controller manual for information on JWA mode and JWB mode settings in the controller.
-
Page 30: Section Five | Configuration
Configuration Section Five BASIC CONFIGURATION OVERVIEW Below are the 7 basic steps to configure the sensor for operation. Each step is described in detail on the following pages 1. Measure the Tank 2. Begin by measuring the key tank and fitting dimensions. Correct tank dimensions Accuracy in measurement will result in accurate sensor measurement. -
Page 31: Using The Display
Configuration Section Five USING THE DISPLAY The display module features a dot matrix LCD display with 4 push buttons on a removable puck. Out of the box, the display indicates level in feet and depicts the level within the 4-20mA span on a bar graph at the right side of the display. The four buttons perform the following functions: ... -
Page 32: Changing Display Values
Configuration Section Five CHANGING DISPLAY VALUES The numeric values are set using the Right Arrow and Up Arrow buttons. Press the Right Arrow button to select the next digit and the Up Arrow button to increment the digit value. The digit being changed is highlighted. -
Page 33: Step 1 - Measure The Tank
Configuration Section Five STEP 1 - MEASURE THE TANK Measurement Reference Chart Measuring the tank is one of the most important aspects in LR15 Series configuring the sensor. When measuring the tank, take into LR10 Series (Threaded Version) account the location of the sensor with respect to fittings, risers, dome tops and bottoms, and identify where the measurements are taken from the sensor. -
Page 34: Step 2 - Set The Units Of Measurement
Configuration Section Five STEP 2 - SET THE UNITS OF MEASUREMENT This function sets the units for all measurement values to be entered into the sensor. 1. From the Main Screen, press Enter to advance into the Main Menu. 2. Press Right Arrow repeatedly until the arrow is next to Service. -
Page 35: Step 3 - Set The Empty Configuration (4Ma)
Configuration Section Five STEP 3 - SET THE EMPTY CONFIGURATION (4MA) This function sets the Empty Configuration point for the sensor corresponding 4mA to empty. 1. From the Main Screen, press Enter to advance into the Main Menu. 2. Press Enter to advance into the Configuration Menu. -
Page 36: Step 4 - Set The Full Configuration (20Ma)
Configuration Section Five STEP 4 - SET THE FULL CONFIGURATION (20MA) This function sets the Full Configuration point for the sensor corresponding 20mA to full. 1. From the Main Screen, press Enter to advance into the Main Menu. 2. Press Enter to advance into the Configuration Menu. -
Page 37: Step 5 - Set The Range (Maximum Range)
Configuration Section Five STEP 5 - SET THE RANGE (MAXIMUM RANGE) This function sets the maximum operational range (MaxR) for the sensor. This setting defines the maximum distance that the sensor will detect valid echo returns. 1. From the Main Screen, press Enter to advance into the Main Menu. -
Page 38: Step 6 - Set The Dead Band
Configuration Section Five STEP 6 - SET THE DEAD BAND This function sets the Dead Band for the sensor. This setting defines the minimum distance that the sensor will detect valid echo returns. While the Dead Band setting is typically configured to be equal with or slightly above (higher in the tank) the Full Configuration setting (20 mA), its functions independently of Full Configuration. -
Page 39: Step 7 - Check The Echo Curve
Configuration Section Five STEP 7 - CHECK THE ECHO CURVE This function displays the primary echo return(s) that the sensor is seeing graphically, the location and amplitude of the return(s), and the numeric air gap distance from the sensor’s measurement location to the liquid level below. Note: This step should only be performed after having completed the prior six configuration steps with the sensor installed on the tank. -
Page 40: Section Six | Process Adjustments
Process Adjustments Section Six PROCESS ADJUSTMENTS OVERVIEW These optional functions are intended to improve sensor performance in applications with the below process and/or installation characteristics. Note: These adjustments should only be performed when (after having completed the seven configuration steps described in Section Five with the sensor installed on the tank) the sensor is not performing to your satisfaction. -
Page 41: Fast Filling Or Emptying Of Liquid
Process Adjustments Section Six FAST FILLING OR EMPTYING OF LIQUID If the speed of liquid level rise or fall within the tank is greater than a rate of 1” per second (25.4mm/sec), set Fast Level Change to Yes. Note: Fast filling or emptying can occur when multiple pumps are operating or when a weather event increases the amount of liquid entering the tank. -
Page 42: Liquid Surface Is Turbulent Or Agitated
Process Adjustments Section Six LIQUID SURFACE IS TURBULENT OR AGITATED If the liquid surface is turbulent or agitated, set Turbulent Surface to Yes. Note: Turbulent or agitated surfaces can occur when tanks are filled from the top without a down pipe, or when a mixer or air agitation is used within the tank. -
Page 43: Foam On The Surface Of The Liquid
Process Adjustments Section Six FOAM ON THE SURFACE OF THE LIQUID If the entire liquid surface is covered with foam, set Foam to Yes. This is not necessary if the liquid surface is partially covered with foam. Note: Foam can occur when tanks are filled from the top without a down-fill pipe, or when a mixer or air agitation is used within the tank. -
Page 44: Sensor Installed In A Stand Pipe Or Sight Glass
Process Adjustments Section Six SENSOR INSTALLED IN A STAND PIPE OR BYPASS If the sensor is installed in a metal stand pipe (still well) or metal bypass, set Still Well to yes and enter the inner Pipe Diameter dimension. Note: The Pipe Diameter will be entered in millimeters. For example, a 3” pipe can have an inner diameter of 3.042”. -
Page 45: Section Seven | Advanced Adjustments
Advanced Adjustments Section Seven ADVANCED ADJUSTMENTS OVERVIEW These optional functions are used to change the sensor output characteristics, or Create a False Echo Curve to filter out false echo returns within the tank (improving sensor performance), or Update an existing False Echo Curve filter if the original filter was not created during an empty tank condition. -
Page 46: 4-20Ma Reverse Output
Advanced Adjustments Section Seven 4-20 MA REVERSE OUTPUT This function sets the current output at either 4-20 mA or 20-4 mA. Selecting 4-20 mA sets the output with 4mA @ bottom and 20mA @ top of the tank. This is the standard output used in the majority of applications. Selecting 20-4 mA sets the output with 20mA @ bottom and 4mA @ top of the tank. -
Page 47: Fail-Safe Output
Advanced Adjustments Section Seven FAIL-SAFE OUTPUT This function is used to set the current output to a designated state if the sensor loses measurement confidence. Selecting No Change will hold the current at its last valid current output. Selecting 20.5mA will force the current to jump to 20.5mA. -
Page 48: Minimum Current Output
Advanced Adjustments Section Seven MINIMUM CURRENT OUTPUT This function sets the minimum current output for the sensor at either 4.0mA or 3.9mA. Note: 4.0mA is the default minimum current output and is used in the majority of applications. 1. From the Main Screen, press Enter to advance into the Main Menu. -
Page 49: Create A New False Echo Curve
Advanced Adjustments Section Seven CREATE A NEW FALSE ECHO CURVE Obstructions in the tank (mixer blades, side wall weld joints or material build-up, submersible pumps, piping, other apparatus) or tall tank risers or installation fittings can create false echo returns that impair the sensor’s measurement. -
Page 50: Update An Existing False Echo Curve
Advanced Adjustments Section Seven UPDATE AN EXISTING FALSE ECHO CURVE This function enables an Existing False Echo Curve to be updated under the circumstances that the curve was created when the level was higher than an empty tank condition. Note: This function should only be performed to update an Existing False Echo Curve when the level is BELOW the original False Echo Curve. -
Page 51: Section Eight | Troubleshooting
Troubleshooting Section Eight TROUBLESHOOTING OVERVIEW These functions provide troubleshooting information; enable Echo Curve adjustments and deletion of settings. 1. Measurement Status 1. Displays the signal strength (dB) of the echo returns and the functional status of the sensor including diagnostic error codes. 2. -
Page 52: Measurement Status
Troubleshooting Section Eight MEASUREMENT STATUS This function displays the signal strength (dB) of the echo returns and the operational status of the sensor including diagnostic error codes. 1. From the Main Screen, press Enter to advance into the Main Menu. Press Right Arrow repeatedly until the arrow is next to Diagnostics. -
Page 53: Peak Values
Troubleshooting Section Eight PEAK VALUES This function displays the lowest and highest level height that the sensor has measured in distance (d). 1. From the Main Screen, press Enter to advance into the Main Menu. Press Right Arrow repeatedly until arrow is next to Diagnostics. -
Page 54: Simulation
Troubleshooting Section Eight SIMULATION This function simulates the 4-20mA current output, when the sensor is configured and installed on the tank, but the level cannot be changed easily for testing. Percent (of span), Current Output or Distance can be used as the input method to set the current output. -
Page 55: First Echo Adjustment
Troubleshooting Section Eight FIRST ECHO ADJUSTMENT This function increases or decreases the peak strength of the sensor’s First Echo return, and should only be performed if: 1) The liquid has a very high dielectric constant value and primarily stays in the near full range of the tank, resulting in a very high First Echo peak strength or;... -
Page 56: Echo Curve Zoom
Troubleshooting Section Eight ECHO CURVE ZOOM This function zooms in and magnifies an Echo Curve over a specified range. 1. From the Main Screen, press Enter to advance into the Main Menu. 2. Press Right Arrow repeatedly until the arrow is next to Diagnostics. -
Page 57: False Echo Curve Delete
Troubleshooting Section Eight FALSE ECHO CURVE DELETE This function deletes a saved False Echo Curve. Note: If you are dissatisfied with the sensor’s performance (operating with a False Echo Curve), you may delete it, and consider creating a new False Echo Curve. 1. -
Page 58: Reset
Resets ALL settings and memory to factory default. Note: Only perform the Factory Setting after consulting with a Flowline Representative. Make sure to record all of your settings including the Distance Adjustment (4.9) setting before performing the Factory Reset. Peak Values Measured... -
Page 59: Section Nine
Appendix Section Nine CONFIGURATION MENU The basic configuration functions are found under Configuration. The below tree shows the 10 function settings and how to navigate between them. Note: Press ESCAPE to back-up to the previous level. MN301700 Rev B3 1.888.610.7664 www.calcert.com sales@calcert.com... -
Page 60: Empty Configuration
Appendix Section Nine EMPTY CONFIGURATION This function adjusts the empty linear scaled current output (4mA) and provides two different adjustment methods: The primary method involves setting the value based upon the distance from the bottom of the sensor. This is a measured value using the units of operation for the sensor. For example, if the units of operation are in meters, then the setting must also be in meters. -
Page 61: Medium
Appendix Section Nine MEDIUM This function identifies the type of media that the sensor is measuring including Liquid, Solid or Low Dielectric. Each has various settings to address the different reflective properties associated with each medium. Default is Liquid. The Liquid Medium function has the following settings: ... -
Page 62: Low Dielectric Medium
Appendix Section Nine The Solid Medium function has the following settings (and should not be performed without first consulting with the factory): Fast Level Change - Used when the media’s level rise or fall within the tank is greater than a rate of 1” per second (25.4mm/sec). -
Page 63: Dampen
Appendix Section Nine DAMPEN This function sets the sampling rate for which the sensor updates the current output. The value is entered in seconds. Default is 6 seconds. Decreasing the value will make the output more responsive to level changes. -
Page 64: Display Menu
Appendix Section Nine DISPLAY MENU This menu sets the Display Value and LCD Contrast. The below tree shows the 2 function settings and how to navigate between them. DISPLAY VALUE This function sets the Display Value. Default is (air gap) Distance. Below are the settings: ... -
Page 65: Diagnostics Menu
Appendix Section Nine DIAGNOSTICS MENU This menu provides information about the operational status of the sensor and diagnostic tools. The below tree shows the 5 function settings and how to navigate between them. PEAK VALUES This function displays the lowest and highest level height distances (d) that the sensor has measured during operation. -
Page 66: Echo Curve
Appendix Section Nine Choose Curve This function sets which information is displayed. Default is Echo Curve. Echo Curve - Shows the echo return energy received by the sensor over distance. False Echo Curve - Shows the false echo returns which are mapped out (not considered) by the sensor. -
Page 67: Service Menu
Appendix Section Nine SERVICE MENU This menu is used to make more advanced adjustments to the sensor. Note: Some of these functions should only be performed by a trained technician. MN301700 Rev B3 1.888.610.7664 www.calcert.com sales@calcert.com... -
Page 68: False Echo
Appendix Section Nine FALSE ECHO Obstructions in the tank (mixer blades, side wall weld joints or material build-up, submersible pumps, piping, other apparatus) or tall tank risers or installation fittings can create false echo returns that impair the sensor’s measurement. This function maps all echo returns within the tank, differentiating between good and false echoes, and stores those identified as false into the False Echo Curve, so they will not be considered in the level measurement. -
Page 69: Reset
Factory Settings – Used to reset ALL settings and memory to factory default. Note: Only perform the Factory Setting after consulting with a Flowline Representative. Make sure to record all of your settings including the Distance Adjustment (4.9) setting before performing the Factory Reset. -
Page 70: Information
This function allows the factory set distance of a measured value to be adjusted. Note: This function should only be performed by a trained technician. Never change this setting unless instructed by a Flowline representative. Be sure to record this setting if a Factory reset is performed. Threshold This function allows the factory set echo threshold to be adjusted. -
Page 71: Notes
Appendix Section Nine NOTES Subject Comment Display Shows E14: Sensor is in a Fail-Safe state. The return sound pulses are not reaching the transducer. First, cycle power off and on, waiting 5 seconds between the off and on states. If problem persists, check the installation fitting against the Installation instructions in the manual.
Need help?
Do you have a question about the EchoPulse LR15 Series and is the answer not in the manual?
Questions and answers