
Related Manuals for New Image FITT ROW


Summary of Contents for New Image FITT ROW
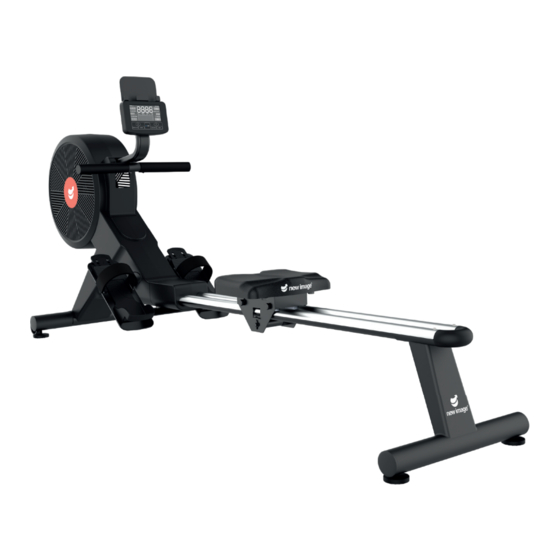
- Page 1 COMPACT MAGNETIC ROWER AS SE MBLY A ND U SE R GUI DE DOWNLOAD THE DOWNLOAD THE NEW IMAGE FITNESS NEW IMAGE FITNESS APP TODAY APP TODAY To help you get started visit: newimagefitness.co.uk...
- Page 2 We know getting started is sometimes the hardest part so we design all our products to be simple, fun to use and effective. We hope you enjoy your new FITT Row and would love to hear your experiences. Check out our social channels and take a look at YouTube for videos, tips and workouts.
- Page 4 Congratulations on purchasing your new FITT Row! QUICK-START GUIDE: Step 1 1. Remove the square neck bolts (9), arc washers (10), spring washers (11) and M8 Nut (12) from the front stabiliser tube (6) using wrench (B). 2. Fix front stabiliser tube (6) to main frame (27) with square neck bolts (9), arc washers (10), spring washer (11), and M8 Nut (12) using multi wrench (B).
- Page 5 Step 2 1. Remove 2x M5 screws (31) from the runner rail (33) using Multi wrench (B). 2. Slide the seat (40) on to the runner rail (33) and move to the centre of the rail. 3. Replace the 2 x M5 screws (31) using the Multi wrench (B). 4.
- Page 6 Step 4 1. Remove arc washers (10), spring washers (11) and M8 screw (24) from main frame (27) using the supplied Allen Key (A). Then remove the M4 screw (25) from the decoration cover (26L & 26R) using the Multi Wrench (B) 2.
-
Page 7: Moving The Machine
Step 6 1. Pull out the extension wire (16A) from display post (67), then connect extension wire (16A) with Display wires (15A), and put back these wires into the Display post (16A) 2. Remove the M5 Screw (13) from display (15), then fix Tablet holder (98) and display (15) on the display post (67) with M5 Screw (13) using the Multi wrench (B) 3. - Page 8 ANGLE OF THE COMPUTER The angle of the computer display should be adjusted for the optimum viewing position before starting exercise. To adjust simply move the angle of the monitor arm until the computer is in your eye-line whilst remaining with your head upright during exercise.
- Page 9 DESCRIPTION OF INSTRUMENT WINDOW Display mode of main window during exercise: 1. Scanning mode: Display in the following order successively every 6 seconds: TIME → TIME/500m → DISTANCE → PULSE → SPM → WATT → CALORIE → STROKES → TOTAL STROKES 2.
-
Page 10: Description Of Button Functions
DESCRIPTION OF INSTRUMENT FUNCTIONS DESCRIPTION OF BUTTON FUNCTIONS DESCRIPTION OF BUTTON FUNCTIONS HEIGHT WEIGHT PULSE CALORIE DISTANCE WATT Metres Beats per minute Kcal trokes per minute Note: it is unable to switch between metric and imperial by display operation. - Page 11 MANUAL (PROGRAMME 1 ) 1. Press the to start the exercise or press the button to enter the setting mode. 2. In the settings mode, press the button to select and set the items in order. To highlight the current setting, the relevant function will flash (TIME, DISTANCE, CALORIE, STROKES and AGE)
- Page 12 • FAT % (Body fat percentage) • BMR (Basal metabolic rate) 4. Before the test, ensure to have the New Image Heart Rate turned on and connected. For further information how to connect, see page 18. 5. The test should be conducted with a resting heart rate.
- Page 13 BODY FAT (BODY FAT PERCENTAGE) GENDER MEDIUM MEDIUM/HIGH HIGH Male < 13% 13% - 25.9% 26% - 30% > 30% Female < 23% 23% - 35.9% 36% - 40% > 40% BMR (Basal Metabolic Rate, i.e., the average amount of calories consumed to maintain the basic living condition every day) Reference value: 1,300 ±...
- Page 14 HRC (PROGRAMME 15-18) REQUIRES NEW IMAGE HEART RATE MONITOR TO OPERATE 1. Press the to select the mode of target heart rate 2. PROGRAM 15 - 17: a) Press the button enter the setting mode. b) In the setting mode, the setting order is as follows: TIME →...
- Page 15 USER PROGRAMME (PROGRAMME 19-22) 1. Use buttons to toggle between U1 ~ U4 (users 1-4). 2. Press the button to start the exercise or press the button to enter settings mode. 3. In the setting mode, the setting order is as follows: TIME → DISTANCE → CALORIE →STROKES →...
-
Page 16: Safety Information
F6 = 6.0 Poor SAFETY INFORMATION • Please read this user guide before first using your Fitt Row training equipment. It is important to keep these instructions for future reference. • Assemble and operate the equipment on a stable and level surface. - Page 17 • Use only the adjustment setting as described in the instructions. Always use the correct adjustment plug / fixing. Note any adjustment devices left projecting could interfere with the user’s movement during use. • Keep hair, fingers and loose clothing away from hinges and other moving parts to avoid serious injury.
-
Page 18: Maintenance And Storage
• We recommend placing a mat beneath the equipment to protect both the equipment We recommend placing a mat beneath the equipment to protect both the equipment and flooring. New Image mat can be purchased at newimagefitness.co.uk • • The safety level of the equipment can only be maintained if it is regularly examined The safety level of the equipment can only be maintained if it is regularly examined for wear and tear. - Page 19 NEW IMAGE FITNESS APP connected fi tness DOWNLOAD THE NEW IMAGE FITNESS APP TODAY Track your fitness & access all your workout videos for our New Image range wherever & whenever you want!
- Page 20 DOWNLOAD THE NEW IMAGE FITNESS APP TODAY! To access all your workout videos wherever & whenever you want! Distributed by: High Street TV, PO Box 7903, CORBY, NN17 9HY Version 1 04/22 CR3830...
Need help?
Do you have a question about the FITT ROW and is the answer not in the manual?
Questions and answers