Table of Contents
Advertisement
Available languages
Available languages
Quick Links
User's Manual
사용 설명서
InBody M20 User Manual for Measurement Guide and Setup
Thank you for purchasing the InBody M20. This user's manual describes all the features of the InBody M20.
Please read before use and keep it in a safe place. By following the manual instructions, you will be able to use the
InBody M20 more safely and effectively.
InBody M20 측정자세 안내 및 설치 사용 설명서
InBody M20을 구입해 주셔서 감사합니다. 본 사용 설명서는 InBody M20의 모든 기능을 상세하고 알기 쉽게 설명하고
있습니다. InBody M20의 안전한 사용을 위하여 사용 전에 꼭 읽어 보신 후 항상 볼 수 있는 장소에 보관하십시오.
본 내용을 숙지하시고 따르시면, 더욱 안전하고 효과적으로 InBody M20을 이용하실 수 있습니다.
M20
M20
USA
Advertisement
Table of Contents

Related Manuals for inbody M20


Summary of Contents for inbody M20
- Page 1 InBody M20 User Manual for Measurement Guide and Setup Thank you for purchasing the InBody M20. This user’s manual describes all the features of the InBody M20. Please read before use and keep it in a safe place. By following the manual instructions, you will be able to use the InBody M20 more safely and effectively.
- Page 2 Intended Purpose The device should be used as an adjunct for clinical decision making and is not intended to diagnose or treat any diseases. Please note the important information below before reading this User’s Manual. Warning Failure to comply with safety warnings and regulations can cause serious injury or death. Caution Failure to comply with safety cautions and regulations can cause injury or property damage.
- Page 3 Reproduction, adaptation, or translation of this manual is prohibited without prior written consent from InBody Co., Ltd. under the copyright laws. This User’s Manual may be printed incorrectly and subject to change without notice. InBody Co., Ltd. shall not be liable for any errors, incidental, or consequential damages that occurred by not complying with the content of the User's Manual.
-
Page 4: Table Of Contents
A. Cautions During Transportation B. Repacking Instructions C. Transportation and Storage Environment IV. Frequently Asked Questions (FAQ) A. Regarding the Equipment B. Regarding the InBody Test V. Others A. Exterior and Functions B. PC Connection C. Battery D. Safety Information E. - Page 5 I. 인바디 설치 A. 제품 구성 B. 옵션 제품 C. 설치 환경 D. 설치 방법 E. 초기 설정 F. 데이터 관리 G. 관리 시 주의 사항 II. 인바디 검사 A. 검사 시 주의 사항 B. 검사 방법 C. 전극 연결 방법 D.
- Page 7 User’s Manual English...
-
Page 8: Inbody Installation
InBody Installation A. Product Components The InBody M20 consists of the following components. Before installation, make sure all of the components listed below are present. * Please inspect each component of the InBody M20 for defects prior to installation. InBody M20 ❶... -
Page 9: Accessories
Atmospheric pressure 70 ~ 106kPa Caution • Use the InBody M20 in a location where it will not be exposed to direct sunlight, as it may cause discoloration or damage to the device. Attention • Utilisez l'InBody M20 dans un endroit où il ne sera pas exposé à la lumière directe du soleil car cela pourrait... -
Page 10: Installation Instructions
Les autres déchets doivent être éliminés conformément aux lois et règlements pertinents. • Pour le remballage futur du InBody M20, vous devez conserver les matériaux d'emballage prévus à cette fin. Les autres déchets doivent être éliminés conformément aux lois et règlements pertinents. - Page 11 * The portable cart is sold separately. 1) Align the InBody M20 unit with the cart bracket groove and turn the knob bolt located on the rear of the cart bracket clockwise, as shown below, by hand to attach the InBody M20 unit to the cart bracket.
- Page 12 <Wheel locked> 4) Connect the power adapter to the power inlet on the right-side port of the InBody M20. Plug the power cord into a grounded plug type 3-prong outlet as shown below. Use the power cord provided with your device.
- Page 13 Plug Type F Power Inlet Ground Pin...
- Page 14 If you pull the cable part, it may break. • The test results may be inaccurate if the InBody M20 is under electrical interference. Do not install the InBody M20 near products that generate electrical interference such as fluorescent lights, large AC motor equipment (treadmill, vibration plate, refrigerator, air-conditioner, compressor, etc.), high-frequency thermal therapy equipments, or heating...
- Page 15 IEC60601-1-1 harmonized national standard or the combination. If in doubt, please contact a qualified InBody technician or your local InBody representative for further information. • N'utilisez pas l'InBody M20 à proximité de sources de chaleur, telles que des appareils de chauffage, car ils peuvent provoquer une déformation, un dysfonctionnement ou un risque d'incendie.
-
Page 16: Initial Setup
E. Initial Setup 1. Press the power button on the front of the InBody M20 to turn it on. Power button * How to turn the power on/off Turning the power on: Press and hold the power button for about three seconds. - Page 17 3. Press the (Menu) button on the Measurement Settings screen. 4. Menu items consist of 5. If you press the button on the menu screen, the Setup screen is displayed.
- Page 18 6. Sound Configure audio indicators for the LCD screen and operation status: : No beep sound output : Beep sound output 7. Brightness The brightness of the LCD screen can be adjusted from 1 (minimum) to 10 (maximum). Press the button to adjust the brightness.
- Page 19 8. Date & Time Set the date format, date, and time. The InBody M20 is shipped in synchronization with local time but may be incorrect depending on the external environment and system conditions. To ensure accuracy, it is recommended to reset the time during initial operation by following the procedure below.
- Page 20 2) The InBody M20 displays height and weight results in [cm, kg] or [ft in, lb], respectively. 10. Password Register or change the administrator password for data management mode. Choose a unique password that is easy to remember. If you lose your password, please contact InBody customer service.
- Page 21 2) New registration When registering for the first time, you will create and confirm a new password. 3) Change password If the password is registered, you can change it by entering the registered password, entering a new password, and confirming the new password.
- Page 22 12. Print (Measuring Impedance) When used in conjunction with LookinBody M20 data management software in the impedance measurement mode, the InBody M20 sets the printing method as connected to the PC (Personal Computer). The printing mode according to setting is as follows: - Total: Prints the entire measurement result sent to LookinBody M20.
-
Page 23: Database
LookinBody M20. Remarque • Les données InBody M20 ne sont pas disponibles pour le programme de gestion des membres PC, LookinBody M20. Les résultats des mesures sont enregistrés dans LookinBody M20. 1. How to go into Measurements... - Page 24 2. View data results In the Measurements screen, you will see all data saved in the machine, sorted out by measurement mode from the recent measurement dates, along with ID data, measurement date/time, and measurement conditions in summary. When you press measurement data, in summary, you will see the measurement result of the selected data. 1) Impedance mode ①...
- Page 25 3. Data search In the Measurements screen, ID search and date search functions are provided for result presentation, copy, or deletion of particular data up to 1,000 data by measurement mode. 1) How to go into search mode In the Measurements screen, press the button to open the search screen.
- Page 26 3) Date search ① In the Search screen, press section ⓐ to change to date search mode. ② In the Start field, enter the first date to search and press the ③ In the End field, enter the last date to end search and press the ④...
- Page 27 4. Data deletion In the Measurements and Data Result Presentation screen, you can delete data. 1) Measurements In the Measurements screen, you can delete multiple data. ① Select the data mode to delete in section ⓐ and press the button. When the button is pressed, data selection becomes available for deletion.
- Page 28 2) View data results In the Measurement Data Result screen, you can delete data selectively. ① In the Data Result screen, press the button. Then, a message will pop up asking for confirmation for deletion. ② In the pop-up message, press the button to delete the data.
- Page 29 In the Measurements screen, you can copy selected data or entire data into the USB device. In the USB device, data is saved in ‘inbody_imp’, ‘inbody_bwm’, and ‘lookinbody’ folders in the CSV file, depending on data mode. You can check the copied data in Excel or the PC membership management program LookinBody M20. 1) Selective Copy In the Measurements screen, select data to copy into the USB device.
- Page 30 ⓐ Note • InBody M20 is not compatible with other USB devices. Therefore, we recommend using the USB provided by Inbody only. If lost, contact Inbody customer center to purchase a replacement. Remarque • InBody M20 n’est pas compatible avec les autres dispositifs USB. Nous vous recommandons d’utiliser uniquement le dispositif USB fourni par Inbody.
-
Page 31: Precautions For Maintenance
• Do not wipe the electrode with a cleaning solution. If liquid enters or comes in contact with the electrode, corrosion may occur and the device may be damaged. To clean the electrode, use an InBody Tissue containing alcohol or physiological saline and gently wipe the component. - Page 32 As with any equipment that uses a connecting cable, durability may deteriorate due to prolonged use. Replace the adhesive clip when the bite strength of the clip is weakened or damaged. To replace the adhesive clip, hold the area marked with "InBody", as shown below, and pull to remove and push in to assemble.
- Page 33 élevées. Caution • The InBody M20 has a built-in lithium-ion battery. The battery must be charged at least every 6 months to prevent performance degradation due to solution leakage or self-discharge. • When there is an equipment failure not described in the manual, contact InBody customer service for product support.
-
Page 34: Inbody Test
• Persons implanted with a medical device that is essential for life support, such as pacemakers or patient monitoring devices, should not use the InBody M20. The device sends a weak electric current into the user's body during the test, which may lead to medical device failure and life-threatening complications. - Page 35 • Si vos poignets et chevilles sont secs ou couverts de cellules mortes, le test peut ne pas fonctionner correctement. Nettoyez votre poignet et vos chevilles avec un tissu InBody (tissu humide) avant de mesurer.
-
Page 36: Measurement Instructions
B. Measurement Instructions Caution • Check the battery status icon to see if the battery is sufficiently charged. If the battery capacity is insufficient, measurement will not occur. Charge the battery by connecting the power adapter provided with your device. When the battery capacity is low, the battery status icon will display as , and the “Battery is too low”... - Page 37 Subject Registration ❶ In Impedance Measurement Mode, you can measure without entering an ID, name, sex, age, height, or weight. If you measure without entering personal information, you will receive a temporary ID, which you can modify on the measurement result screen. If you want to use a fixed ID rather than a temporary ID, enter your ID, name, sex, age, height, and weight in Subject Registration.
- Page 38 Repeat ❸ This function allows you to select manual or continuous measurement. Measurement will be manual when is selected, and continuous when is selected. Interval ❹ This is activated when Repeat is in the continuous measurement mode. The continuous measurement interval can be set as follows: - 50 ms, 100 ms, 200 ms, 500 ms, 1 sec, 2 sec, 5 sec, 10 sec, 30 sec, 1 min, 2 min, 5 min, 10 min, 30 min, 1 hour...
- Page 39 Total Measurement Time ❻ You can set the Number of Measurements with the set interval condition by entering the continuous measurement time. It is activated when Repeat is in the continuous measurement mode. It is possible to set a range within a maximum measurement number of 1,000 times and a continuous measurement time of no more than 24 hours.
- Page 40 Show Electrode Placement ❽ The information about the electrode cable type connected to the main body and the electrode contact method of the cable is displayed as shown below. <When using clamp electrode> <When unsing forceps electrode > START ❾ When measurement is possible, the START button is displayed as .
- Page 41 : Start the measurement : Print the measurement results (available when connected with LookinBody M20) : Switch from the number-type result screen to the graph-type result screen : Switch from the graph-type result screen to the number-type result screen...
- Page 42 The functions of the buttons displayed on the screen are as follows: : Stop the measurement and go to the Results screen : Print the measurement results (available when connected to LookinBody M20) : Switch from the number-type measurement screen to the graph-type measurement screen...
- Page 43 <Number-type Results screen> <Graph-type Results screen> Changing Personal Information ❸ You can change personal information on the measurement result screen. If you tested using an ID, then you can modify all personal information except your ID. If you tested without entering an ID, then you can change all personal information, including your ID.
- Page 44 Memo ❹ This function lets you record notes on the measurement results. You can enter up to 22 characters, consisting of numbers and letters. 3) Measurement Error Screen This screen displays information about errors that occurred during measurement. The functions of the buttons displayed on the screen are as follows: : Re-measure : End of measurement...
- Page 45 - An example of a measurement error due to the disconnection of the electrode cable: 2. Body Water Trend Measurement Mode This function is utilized to monitor and provide results pertaining to the user's body water, intracellular water, extracellular water, and extracellular water ratio. Body Water Trend Measurement mode consists of settings, measurements, results, and measurement error menus.
- Page 46 Interval ❷ Set the measurement interval from 1 minute to 60 minutes in 1-minute increments. Electrode Placement ❸ You can select from 2 measurement areas: Arm-Leg (Right) or Arm-Leg (Left).
- Page 47 Displayed Results ❹ You can select up to 6 result items to be displayed on the Measurement screen. Show Electrode Placement ❺ Information about the electrode cable connected to the main body and how to contact the electrode of the cable is displayed. <When using clamp electrode>...
- Page 48 - An example of an error message displayed when the electrode cable is not connected: 2) Measurement Screen The measurement progress screen supports three screens: body water, extracellular water ratio, and BIVA graph. The functions of the buttons displayed on the screen are as follows: : Go to the Results screen after stopping the measurement : Go to the body water measurement screen : Go to the extracellular water ratio measurement screen...
- Page 49 You can view the explanation of the shortened terms of clinical items displayed on the measurement screen by pressing the button. 3) Results Screen The measurement results are divided into three screens: body water, extracellular water ratio, and BIVA graph. The functions of the buttons displayed on the screen are as follows: : Go to the body water measurement screen : Go to the extracellular water ratio measurement screen : Go to the BIVA measurement screen...
- Page 50 4) Measurement Error Screen This screen displays information about measurement errors. The functions of the buttons displayed on the screen are as follows: : Re-measure : End of measurement - An example of a measurement error due to disconnection of the electrode cable:...
-
Page 51: Electrode Connection Method
• Ensure the foot electrode is attached properly with the clamps on both sides of the lateral malleolus. • If you have a dry wrist or ankle, the test may not be accurate. Use an InBody Tissue to wipe down the area that comes in contact with the electrode, then begin measurement. - Page 52 2. Forceps electrode (Adhesion Type) 1) Wrist Attach the disposable electrode (BWA-ES100) to the center of the back of the hand with the wrist as shown below. Attach the disposable electrode (BWA-ES100) so that the red electrode is placed over the back of your hand, and the black electrode is placed below the wrist.
-
Page 53: Measurement Posture
D. Measurement Posture To use the InBody M20 correctly, it is necessary to understand the correct measuring posture. Maintain consistent measurement posture for high reproducibility and reliable results. 1. Direct your arms slightly beyond 15 degrees to keep your arms and trunk from touching. - Page 54 Note • Be careful not to let the electrode cable and device components come in contact with the iron frame of a bed. • If there is a heating mat (electric blanket) on the floor or bed, be sure to turn it off and unplug the power cable if possible.
-
Page 55: Transportation And Storage
A. Caution During Transportation Caution • Be careful not to drop or shake the InBody M20. Severe impact can cause damage to the device. Attention • Ne laissez pas tomber l’équipement et évitez de le secouer. Un choc important peutcauser des dommages. -
Page 56: Transportation And Storage Environment
C. Transportation and Storage Environment The InBody M20 should be transported or stored under the following conditions. Temperature range -10 ~ 70°C (14 ~ 158°F) Relative humidity 10 ~ 80% RH (No Condensation) Atmospheric pressure 50 ~ 106kPa... -
Page 57: Regarding The Equipment
In this section, you will fi nd frequently asked questions and answers about the InBody M20. If you experience an issue that is not covered below, please contact Customer Service. A. Regarding the Equipment If an issue occurs while using the InBody M20, check out the troubleshooting information below. - Page 58 • The touchscreen used in the InBody M20 is pressure sensitive. work well. Press firmly to optimize touchscreen response. • Press the InBody M20 LCD screen and turn it on. When the coordinate correction screen is displayed, follow the instructions to proceed with the correction.
-
Page 59: Regarding The Inbody Test
B. Regarding the InBody Test In this section, you will find common questions and answers about the InBody Test. If you have additional questions, please contact Customer Service. Question Answer Is it OK to test while wearing • If accessories or metallic objects do not touch the electrodes, accessories or metal objects? they will not have a significant effect on the human body. -
Page 60: Others
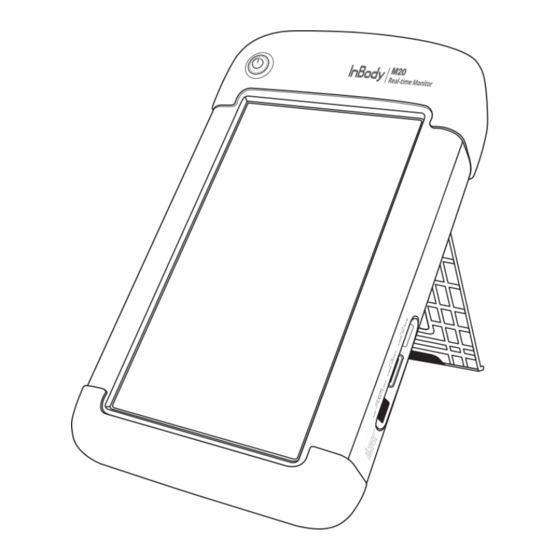
Others A. Exterior and Functions In this section, the names and functions of each component of the InBody M20 are listed. * Please examine each component of the device for damage prior to installation. 1. InBody M20 Body LCD display: Displays each step of the test, guide, and test result. You can enter the information required ❶... -
Page 61: Pc Connection
Caution • If the InBody M20 is subjected to electrical interference, the test results may be inaccurate. Do not install the InBody M20 near fluorescent lights, large AC motor equipment such as treadmills, vibrators, refrigerators, air conditioners, compressors, high-frequency heat treatment devices, and heating devices that cause electrical interference. -
Page 62: Battery
C. Battery 1. Battery charging The InBody M20 has a built-in lithium-ion battery. The battery must be charged at least every six months to prevent performance degradation due to solution leakage or self-discharge. Battery charging is performed by connecting the power adapter to the power input terminal. The battery status is displayed on the screen as follows: : The battery is completely depleted. -
Page 63: Safety Information
D. Safety Information 1. Marks USB Host port USB Slave port Power 2. Safety Symbols Dangerous High Voltage Warning, Caution Note BF Type Equipment Adapter 3. Etc. Symbols Manufacturer Serial number Authorized representative in the Alternating current EUROPEAN COMMUNTY European Conformity Operating Instructions Direct current WEEE mark... - Page 64 Note • Follow local government ordinances and recycling instructions regarding the disposal or recycling of device components, including batteries. Remarque • Suivez les ordonnances du gouvernement local et les instructions de recyclage concernant l'élimination ou le recyclage des composants de l'appareil, y compris les piles. WARNING Electric shock hazard—do not dismantle.
-
Page 65: Product Classification
IPX0 Note • The InBody M20 measures the volume of the total body water, body fat mass, lean mass, and fat mass using bioelectrical impedance analysis. The purpose of body composition analysis is to evaluate body function and improve overall health. Therefore, understanding fundamental body composition concepts such as muscle development, nutrition, and obesity risk through regular body composition check-ups is critical for success. -
Page 66: Specifications
F. Specifications Bioelectrical Bioelectrical 3 impedance measurements by using 3 different frequencies Impedance Analysis (BIA) Impedance (Z) (5 kHz, 50 kHz, 250 kHz) Measurement Items Resistance (R), R, Xc, Phase Angle measurements by using 3 different Reactance (Xc), frequencies (5 kHz, 50 kHz, 250 kHz) Phase Angle(PA) Tetra-polar 8 Point Tactile Clamp Type Electrode, Electrode Method... -
Page 67: Guidance And Manufacturer's Declaration
H. Guidance and Manufacturer’s Declaration The InBody M20 is intended for use in the electromagnetic environment specified below. The customer or the user of the InBody M20 should ensure that it is used in such an environment. Guidance and manufacturer’s declaration – electromagnetic emissions... - Page 68 InBody M20 The InBody M20 is intended for use in an electromagnetic environment in which radiated RF disturbances are controlled. The customer or the user of the InBody M20 can help prevent electromagnetic interference by maintaining a minimum distance between portable and mobile RF communications equipment (transmitters) and the InBody M20 as recommended below, according to the maximum output power of the communications equipment.
- Page 69 RF transmitters, an electromagnetic site survey should be considered. If the measured field strength in the location in which the InBody M20 is used exceeds the applicable RF compliance level above, the InBody M20 should be observed to verify normal operation. If abnormal performance is observed, additional measures may be necessary, such as re-orienting or relocating the InBody M20.
- Page 70 Guidance and manufacturer's declaration - electromagnetic immunity The InBody M20 is intended for use in an electromagnetic environment in which radiated RF disturbances are controlled. Portable RF communications equipment should be used no closer than 30 cm (12 inches) to any part of the InBody M20.
- Page 73 사용 설명서 한국어...
-
Page 74: 인바디 설치
집게 전극(Adhesive Type/부착식) Clip 교체용 1Set ❶ ❸ ❷ ❼ ❻ ❽ ❹ ❾ ❺ ❿ 참고 • InBody M20은 이동용 가방 또는 이동용 카트에 설치하여 사용 가능하며, 이동용 카트는 별도로 구매하실 수 있습니다. •집게 전극 사용 시, 옵션 제품인 일회용 전극(BWA-ES100)을 구매하여 함께 사용하십시오. -
Page 75: 옵션 제품
B. 옵션 제품 (이동용 카트) C. 설치 환경 InBody M20을 설치하기 전 적합한 환경을 확인하십시오. 본 장비는 실내에서 사용하기 적합한 장비입니다. 실내가 아닌 실외에서 설치할 경우 반드시 아래의 기준을 충족해야 합니다. 적정온도 10 ~ 40℃ 상대습도 30 ~ 75% RH 적정기압... -
Page 76: 설치 방법
D. 설치 방법 1. InBody M20 설치 방법 1) 포장 박스를 개봉 후 포장재를 제거하고 사용 설명서와 가방을 꺼내십시오. 포장재 제거 주의 • 포장 박스 개봉 시 칼을 사용할 경우 가방에 긁힘이 발생할 수 있으니 주의하십시오. • 장비를 재포장할 경우에는 제공된 포장 자재를 보관해야 합니다. 기타 폐기물은 관련 법규에 따라 처리 하십시오. - Page 77 4) 본체의 전원 입력단자에 전원 어댑터를 연결하십시오. 전원 입력단자 5) 연결된 전원 어댑터(❶)를 전원 케이블(❷)에 연결하십시오. 전원 케이블의 플러그를 접지 단자가 있는 3단자 콘센트에 연결하십시오. ❷ ❶ 접지 단자 3단자 콘센트 2. 이동용 카트 설치 방법 * 이동용 카트는 옵션 제품이므로 별도로 구매 가능합니다. 1) Cart Bracket 홈에...
- Page 78 2) 전극 케이블을 본체에 연결합니다. 클램프 전극과 집게 전극 전극이 제공됩니다. 사용 목적에 맞게 전극을 선택하여 사용하십시오. 전극 케이블에 적힌 숫자(❶, ❷)와 본체에 표시된 숫자 색상을 맞추어 케이블을 연결하십시오. 3) 카트에는 바퀴가 있어 이동 시 편리하며, 바퀴 잠금 장치를 이용하여 바퀴를 고정할 수 있습니다. <바퀴...
- Page 79 • 장비를 임의로 분해하지 마십시오. 전기적 충격 또는 상해, 장비의 고장 및 부정확한 결과를 야기할 수 있으며 이후에는 제조사의 보증 서비스를 받을 수 없습니다. • 전원이 연결된 InBody M20과 다른 전자 기기를 접촉 시키지 마십시오. 전기적인 충격이 발생할 수 있습니다. 주의...
-
Page 80: 초기 설정
전원 버튼 * 전원 On/Off 방법 전원 On: InBody M20 전원이 꺼져 있는 상태에서 전원 버튼을 3초 정도 길게 눌러주십시오. 전원 Off: InBody M20 전원이 켜져 있는 상태에서 전원 버튼을 짧게 눌러주십시오. * 전원 버튼 LED 색상에 따른 동작 상태... - Page 81 3. 측정 대기 화면에서 버튼을 누르십시오. 4. 메뉴 항목은 ‘ ’ 으로 구성되어 있습니다. ’, ‘ ’, ‘ ’, ‘ 5. 메뉴 화면에서 버튼을 누르면 환경설정 화면이 표시됩니다.
- Page 82 6. Sound 설정 LCD 터치 및 동작 상태에 대한 Beep음 출력을 설정합니다. 설정 상태에 따른 Beep 출력 조건은 다음과 같습니다. : Beep음 출력하지 않음 : Beep음 출력 7. Brightness 설정 LCD 화면 밝기를 최소 1단계에서 최대 10단계까지 조정이 가능하며, 버튼을 눌러 밝기를 조정합니다.
- Page 83 8. Date & Time 설정 날짜 형식, 날짜, 시간을 설정합니다. InBody M20은 현지 시간에 동기화 상태로 출고되지만, 외부환경 및 시스템 상태에 따라서 일부 오차가 있을 수 있습니다. 이러한 오차를 최소화하기 위해서는 아래 절차에 따라 최초 동작 시 시간을 재설정하는 것을 권장합니다.
- Page 84 2) 신장과 체중 및 결과 항목의 단위를 설정하며, cm,kg과, ft in,lb 모드2가지를 지원합니다. 10. Password 설정 Measurements의 관리자 비밀번호 신규 등록, 변경을 합니다. 설정한 비밀번호를 잊어버리지 않도록 주의하십시오. 비밀번호 분실 시 ㈜인바디 고객센터로 연락하십시오. 1) Password 설정 화면 진입 Password를 신규 등록 또는 변경하고자 할 경우 Setup 화면에서 Password 항목을 누릅니다.
- Page 85 2) 신규 등록 최초 등록 시 신규 등록이 동작하며, 신규 Password 입력, 신규 Password 재입력 순으로 진행됩니다. 3) 변경 Password가 등록되어 있는 경우 변경이 동작하며, 등록된 Password 입력, 신규 Password 입력, 신규 Password 재입력 순으로 진행됩니다.
- Page 86 장비의 시리얼 번호와 프로그램 버전을 확인합니다. 12. Print(Measuring Impedance) 임피던스 측정 모드에서 회원 관리 PC 프로그램 LookinBody M20과 연결하여 측정하는 경우, InBody M20에서 PC(Personal Computer)에 연결된 프린터 인쇄 방법을 설정합니다. 설정에 따른 인쇄 방식 다음과 같습니다. - Total: LookinBody M20 으로 전송된 측정 결과 전체를 인쇄합니다.
-
Page 87: 데이터 관리
F. 데이터 관리 InBody M20은 데이터 저장 기능 및 저장된 데이터의 검색, 결과 보기, 삭제, 복사 등의 데이터 관리 기능을 제공합니다. 데이터 저장 기능은 측정 모드의 사용 조건을 고려하여 자동 또는 신상 정보 ID 입력 조건에 따라 동작합니다. 임피던스 측정 모드에서는 신상 정보 및 ID를 입력하지 않아도 자동으로 측정 데이터가 저장되며, 체수분 경향 측정... - Page 88 2. 데이터 결과 보기 Measurements 화면에 진입하면 장비에 저장되어 있는 모든 데이터가 측정 모드 별, 최근 측정 날짜순으로, 신상 정보, 측정 일시, 측정 조건 등을 요약하여 화면에 표시합니다. 해당 부분을 누르면 선택한 데이터의 측정 결과가 표시됩니다. 1) 임피던스 모드 ① Measurements 화면에서 ⓐ 부분을 눌러 측정 데이터 모드를 임피던스 모드로 변경합니다. ②...
- Page 89 3. 데이터 검색 Measurements 화면에서 특정 데이터들의 결과 보기, 복사, 삭제를 위한 검색 기능으로 ID 검색, 날짜 검색 기능을 제공 하며, 측정 모드 별로 최대 1,000개까지 검색이 가능합니다. 1) 검색 모드 진입 Measurements 화면 에서 버튼을 눌러 검색 화면으로 이동합니다. 2) ID 검색...
- Page 90 3) 날짜 검색 ① 검색 화면에서 ⓐ 부분을 눌러 날짜 검색 모드로 변경합니다. ② Start 항목에 검색 시작 날짜를 입력하고 버튼을 누릅니다. ③ End 항목에 검색 종료 날짜를 입력하고 버튼을 눌러 데이터를 검색합니다. ④ 검색 결과는 측정 모드 별, 최근 측정 날짜순으로 신상 정보, 측정 일시, 측정 조건 등을 요약하여 화면에 표시합니다. ⓐ...
- Page 91 4. 데이터 삭제 Measurements 화면 및 데이터 결과 보기 화면에서 데이터를 삭제할 수 있습니다. 1) Measurements Measurements 화면에서 여러 개의 데이터를 삭제할 수 있습니다. ① Measurements 화면에서 ⓐ의 부분의 삭제할 데이터 종류를 선택하고, 버튼을 누릅니다. 버튼을 누르면 삭제할 데이터 선택 기능이 동작합니다. ②...
- Page 92 2) 데이터 결과 보기 선택된 데이터는 데이터 결과 보기의 측정 데이터 결과 화면에서 삭제할 수 있습니다. ① 데이터 결과 화면에서 버튼을 누르면 데이터 삭제 실행 확인 메시지 창이 표시됩니다. ② 메시지 창에서 버튼을 눌러 데이터를 삭제합니다. 주의 • 삭제된 데이터는 복구할 수 없습니다. 중요한 데이터는 "5. 데이터 복사"을 참고하여 데이터를 관리하십시오.
- Page 93 Measurements 화면에서 선택 복사 또는 전체 복사 기능으로 USB 저장 장치에 복사할 수 있습니다. USB 저장 장치에 저장되는 데이터는 데이터 모드에 따라 'inbody_imp', 'inbody_bwm', 'lookinbody' 폴더에 CSV 파일로 저장됩니다. 복사된 파일은 Excel 프로그램으로 보거나 회원 관리 PC 프로그램 LookinBody M20을 사용하여 확인할 수 있습니다. 1) 선택 복사...
- Page 94 버튼을 눌러 데이터를 복사 합니다. ⓐ 참고 • InBody M20 은 모든 USB 저장 장치와 호환되지 않습니다. ㈜인바디에서 제공한 USB 저장 장치 사용을 권장합니다. 제공한 USB 저장 장치 분실 시에는 ㈜인바디 고객센터에 문의하여 구입할 수 있습니다. 주의 • USB 저장 장치로 데이터가 복사되는 동안 USB 저장 장치를 제거하거나 장비의 전원을 끄지 마십시오.
-
Page 95: 관리 시 주의 사항
온수 또는 액정 클리너로 본체의 디스플레이 화면을 닦아주십시오. 화면의 흠집을 방지하려면 연마성 세제를 사용해선 안됩니다. 2. 유지 보수 InBody M20은 정기적인 검, 교정이 필요하지 않도록 설계되었습니다. 주의 • 설명서 상의 유지 보수 외 다른 서비스는 ㈜인바디에서 제공하는 서비스 지원을 절차에 따라 진행되어야 합니다. - Page 96 장시간 사용으로 인한 내구성 저하가 발생할 수 있습니다. 이는 환자 연결 케이블을 사용하는 모든 장비에서 발생할 수 있는 일반적인 현상입니다. 따라서 집게 전극 Clip의 물림 강도가 약해졌거나 파손되었을 경우 집게 전극 Clip을 교체하여 사용하는 것을 권장합니다. 집게 전극 Clip 교체는 InBody가 표기된 부위를 잡고 Clip을 당기거나 밀어 넣어, 제거 혹은 조립을 완료합니다.
-
Page 97: 인바디 검사
인바디 검사 A. 검사 시 주의 사항 경고 • 심장박동 조절기(Pacemaker) 등 이식형 의료기기 또는 환자 감시장치와 같은 생명을 유지하는데 필수적인 의료기기가 장착된 개인은 사용하지 마십시오. 검사 중 미약 전류가 인체로 흐르게 되어 의료기기 고장, 생명의 위험으로 이어질 수 있습니다. •... -
Page 98: 검사 방법
B. 검사 방법 경고 • 본체의 배터리가 충분히 충전되어 있는지 배터리 상태 아이콘을 확인하십시오. 만약 배터리 용량이 부족한 경우 측정이 진행되지 않습니다. ㈜인바디에서 제공한 전원 어댑터를 연결하여 충전해주십시오. 배터리 용량이 부족한 경우 아래와 같이 배터리 상태가 로 표시되며 “ Battery is too low ” 알람이 아래 그림과 같이 표시됩니다. 1. - Page 99 Subject Registration ❶ 임피던스 모드에서는 ID, 성명, 성별, 연령, 신장, 체중을 입력하지 않고 측정이 가능합니다. 신상 정보를 입력하지 않고 측정할 경우 임시 ID가 발급되며, 임시 ID에 대한 수정은 측정 결과 화면에서 가능합니다. 임시 ID를 사용 하지 않고 고정 ID를 사용하고자 할 경우 Subject Registration에서 측정자의 ID, 성명, 성별, 연령, 신장, 체중을 입력하십시오.
- Page 100 Repeat ❸ 수동, 연속 측정을 선택하는 기능으로, 를 선택할 경우 수동으로. 를 선택할 경우 연속 측정으로 설정됩니다. Interval ❹ Repeat가 연속 측정 모드일 때 활성화되며, 연속 측정 간격을 아래와 같이 설정할 수 있습니다. - 50ms, 100ms, 200ms, 500ms, 1sec, 2sec, 5sec, 10sec, 30sec, 1min, 2min, 5min, 10min, 30min, 1hour ❺...
- Page 101 ❻ Total Measurement Time Repeat가 연속 측정 모드일 때 활성화되며, 연속 측정 시간을 입력하여 설정된 Interval 조건으로 Number of Measurements를 설정할 수 있습니다. 최대 측정 회수 1,000회와 최대 연속 측정 가능 시간 24hour 조건을 만족하는 범위 내에서 설정이 가능합니다. Displayed Results ❼...
- Page 102 ❽ Show Electrode Placement 본체에 연결된 전극 케이블 타입의 정보와 해당 케이블의 전극 접촉 방법에 대한 정보를 아래 그림과 같이 표시합니다. <클램프 전극 사용시> <집게 전극 사용시> START ❾ 측정이 가능한 상태일 경우에는 START 버튼이 로 표시됩니다. 전극 케이블 연결 상태 불량, 배터리...
- Page 103 버튼을 눌러 진행합니다. 화면에 표시되는 버튼의 기능은 다음과 같습니다. : 측정 시작 : 측정 결과 인쇄 (LookinBody M20 연결시 사용 가능) : 숫자형 결과 화면에서 그래프형 결과 화면으로 이동 : 그래프형 결과 화면에서 숫자형 결과 화면으로 이동 : 측정 종료...
- Page 104 <그래프형 측정 화면> 화면에 표시되는 버튼의 기능은 다음과 같습니다. : 측정 중지, 결과 화면으로 이동 : 측정 결과 인쇄 (LookinBody M20 연결시 사용 가능) : 숫자형 측정 화면에서 그래프형 측정 화면으로 이동 : 그래프형 측정 화면에서 숫자형 측정 화면으로 이동...
- Page 105 <숫자형 측정 화면> <그래프형 측정 화면> ❸ 신상정보 변경 측정 결과 화면에서 신상 정보 수정이 가능합니다. ID를 입력하고 측정한 경우에는 ID를 제외한 이름, 성별, 연령, 신장, 체중 신상 정보 수정이 가능하며, ID를 입력하지 않고 측정 한 경우에는 ID를 포함한 신상 정보 전체를...
- Page 106 ❹ 메모 측정 결과에 이력을 입력하기 위한 기능으로 숫자, 알파벳 최대 22자를 입력할 수 있습니다. 3) 측정 오류 측정 중 발생된 오류에 대한 정보를 화면에 표시합니다. 화면에 표시된 버튼의 기능은 다음과 같습니다. : 재 측정 : 측정 종료...
- Page 107 - 전극 케이블 빠짐에 의한 측정 오류 발생 예 2. 체수분 경향 측정 모드 체성분 결과 항목 중 체수분, 세포내수분, 세포외수분, 세포외수분비를 연속적으로 모니터링 하기 위한 측정 모드입니다. 화면은 설정, 측정, 결과, 측정 오류 화면으로 구성됩니다. 1) 설정 체수분을 측정하기 위해 신상 정보 등록 및 측정 간격, 측정 부위, 표시 결과 항목을 설정합니다. Subject Registration ❶...
- Page 108 ❷ Interval 측정 간격을 최소 1분에서 최대 60분까지 1분단위로 설정합니다. ❸ Electrode Placement 측정 부위는 Arm-Leg(Right), Arm-Leg(Left), 모드를 지원합니다.
- Page 109 ❹ Displayed Results 측정 화면에 표시할 결과 항목을 최대 6개까지 선택할 수 있습니다. ❺ Show Electrode Placement 본체에 연결된 전극 케이블 정보와 해당 케이블의 전극 접촉 방법에 대해 표시합니다. <클램프 전극 사용시> <집게 전극 사용시> ❻ START 측정이 가능한 경우 START 버튼이 로...
- Page 110 - 전극 케이블이 연결되지 않은 경우 알람 메시지 표시 예 2) 측정 측정 진행 화면은 체수분, 세포외수분비, BIVA 그래프 3가지 화면을 지원합니다. 화면에 표시된 버튼의 기능은 다음과 같습니다. : 측정 중지 후 결과 화면으로 이동 : 체수분 측정 화면으로 이동 : 세포외수분비...
- Page 111 측정 화면에 표시되는 임상 항목들의 단축 용어에 대한 설명을 버튼을 눌러 확인할 수 있습니다. 3) 결과 측정 결과는 측정과 동일하게 체수분, 세포외수분비, BIVA 그래프 3가지 화면으로 구성됩니다. 화면에 표시된 버튼의 기능은 다음과 같습니다. : 체수분 측정 화면으로 이동 : 세포외수분비 측정 화면으로 이동 : BIVA 측정...
- Page 112 4) 측정 오류 측정 중 발생된 오류에 대한 정보를 화면에 표시합니다. 화면에 표시된 버튼의 기능은 다음과 같습니다. : 재 측정 : 측정 종료 - 전극 케이블 빠짐에 의한 측정 오류 발생 예...
-
Page 113: 전극 연결 방법
C. 전극 연결 방법 1. 클램프 전극(Clamp Type/접촉식) 1) 손목 손목 뼈를 클램프 전극의 가운데 지점에 위치하도록 하며, 손목에 최대한 넓은 면적이 전극이 닿도록 합니다. <손목에 전극 끼운 모습> 2) 발목 발목 복사뼈 위치가 클램프 전극의 가운데 지점에 위치하도록 하며, 발목에 최대한 넓은 면적이 전극에 닿도록 합니다. - Page 114 2. 집게 전극(Adhesive Type/부착식) 1) 손목 아래 그림처럼 손목 뼈를 가운데로 하여 손등 가운데 지점 정도에 일회용 전극(BWA-ES100)을 붙입니다. 빨간색 전극이 손등 위로, 검은색 전극이 손목 아래로 오게 위치하도록 하여 일회용 전극(BWA-ES100)에 연결합니다. 2) 발목 발목 복사뼈를 가운데로 하여 발등 가운데 지점 정도에 일회용 전극(BWA-ES100)을 붙입니다. 빨간색 전극이 발등...
-
Page 115: 측정 자세
D. 측정 자세 InBody M20을 정확히 사용하기 위해서는 바른 측정 자세에 대한 이해가 필요합니다. 높은 재현도와 신뢰성 있는 결과를 얻기 위해서는 정확한 측정 자세를 유지하게 하십시오. 1. 팔과 몸통이 닿지 않도록, 팔을 15˚ 정도로 약간 벌려줍니다. 2. 허벅지끼리 닿지 않도록, 다리를 어깨너비 정도로 약간 벌려줍니다. -
Page 116: 운송 및 보관
운송 및 보관 III. A. 운송 시 주의 사항 주의 • 설치 전의 장비는 당사에 의해 제작된 포장 박스 속에 들어있습니다. 안전하게 운반할 수 있도록 이동용 장비를 이용하거나, 안전한 자세로 운반하여 주십시오. B. 재포장 방법 장비를 재포장하기 전에는 반드시 전원 버튼을 끄고 전원 어댑터 연결선을 제거하였는지 확인하십시오. 제품을... -
Page 117: 운송 및 보관 환경
• 이동용 카트는 조립 상태에서 분해가 어렵습니다. 조립된 상태로 운송 및 보관하십시오. C. 운송 및 보관 환경 InBody M20과 그 부속품을 보관하거나 운송할 시, 아래와 같은 환경조건을 유지해야 합니다. 본 조건은 동작을 고려하지 않은 보관 및 운송 환경임에 주의하십시오. 적정온도... -
Page 118: 자주 묻는 질문 및 답변
자주 묻는 질문 및 답변 InBody M20에 대해 자주 묻는 질문 및 답변이 정리되어 있습니다. 해당 내용을 확인한 후에도 문의사항이 있을 경우에는 ㈜인바디 고객센터로 연락하십시오. A. 장비 관련 InBody M20 장비 사용 도중 문제가 발생할 경우 아래 질문 및 답변을 확인하십시오. - Page 119 반드시 ㈜인바디에서 제공한 전원 어댑터(DC 12V)를 연결하십시오. 전원 어댑터 전원 케이블 터치가 잘 되지 않습니다. InBody M20에서 사용되는 터치스크린은 감압식입니다. 손가락 끝으로 • 일정한 힘을 가해 눌러주십시오. InBody M20 LCD 화면을 누르고 전원을 켜십시오. 좌표 보정 화면이 • 표시되면 지시에 따라 보정을 진행하십시오.
-
Page 120: 검사 관련
삽입한 경우 검사해도 영향을 미칠 수 있습니다. 괜찮을까요? 검사시 흐르는 전류는 InBody는 미세한 전류를 사용하므로 인체에 아무런 해가 되지 않습니다. • 인체에 무해한가요? 이미 국내 및 유럽 의료기 허가를 받음으로써 InBody의 안전성은 입증되었습니다. 전세계의 많은 의료 기관에서 InBody를 사용 중 입니다. -
Page 121: 외관 및 기능
* 반드시 ㈜인바디가 제공하는 전원 어댑터를 사용하십시오. ❹ USB HOST 연결단자: USB 저장 장치를 연결할 때 사용합니다. ❺ USB SLAVE 연결단자: InBody M20과 회원 관리 PC 프로그램 LookinBody M20을 유선으로 연결할 때 사용합니다. 전극 케이블 연결 단자 : 전극 케이블을 본체에 연결할 때 사용합니다. ❻... -
Page 122: Pc 연결
• 전원 입력 단자에 반드시 ㈜인바디에서 제공한 전원 어댑터를 연결하십시오. B. PC 연결 InBody M20은 회원관리 PC 프로그램 LookinBody M20과 유, 무선을 통해 연결할 수 있습니다. 유, 무선 연결을 위해 별도의 설정 작업이 필요하지 않으며, 연결 상태는 InBody M20에 다음과 같이 표시됩니다. -
Page 123: 배터리
C. 배터리 1. 배터리 충전 전원 입력 단자에 전원 어댑터를 연결하여 충전합니다. 6개월 이상 사용하지 않을 경우 누액 누출이나 자가 방전으로 인한 성능 저하를 방지하기 위해 최소 6개월마다 충전해야 합니다. 배터리 상태는 다음과 같이 표시됩니다. : 배터리가 모두 소진되었습니다. 배터리를 충전하십시오. : 배터리가... -
Page 124: 안전을 위한 주의사항
D. 안전을 위한 주의사항 1. 표시사항 USB HOST 연결 단자 USB SLAVE 연결 단자 전원 2. 안전기호 위험이 높은 전압 경고/주의 참고 BF형 기기 전원 입력 단자 3. 기타기호 Manufacturer Serial number Authorized representative in the Alternating current EUROPEAN COMMUNTY European Conformity Operating Instructions Direct current... -
Page 125: 제품 사양
• InBody M20은 생체 전기 임피던스 분석을 통해 체수분량, 체지방량을 측정합니다. 정기적인 검사를 통해 근육 발달, 영양, 비만 가능성 등 기본적인 신체 기능과 상태를 파악하여 건강을 개선할 수 있습니다. •InBody M20은 급성 또는 만성 질환이 있는 사람들에게 사용할 수 있으며 영양 상태, 비만 및 수분 공급 상태를 평가하는 데 사용할 수 있습니다. - Page 128 ⓒ 2022 InBody Co., Ltd. All rights reserved. IM-P5-E-220706...
Need help?
Do you have a question about the M20 and is the answer not in the manual?
Questions and answers