Table of Contents
Advertisement
Quick Links
Advertisement
Table of Contents

Related Manuals for Motorola Avigilon AVA QUAD CAMERA


Summary of Contents for Motorola Avigilon AVA QUAD CAMERA
- Page 1 AVA QUAD CAMERA MOUNTING GUIDE Avigilon Alta Cloud Security...
-
Page 2: Important Warnings And Safety Instructions
Water may be trapped inside, causing For the grounding wire use a green/yellow wire (min. 18AWG), damage or condensation issues. a knurled washer and min. 3.5mm screw. MOUNTING GUIDE | AVIGILON AVA QUAD CAMERA 2 / 17... -
Page 3: Outer View
Release button IR LEDs Dome cover Top mounting plate PACKAGE CONTAINS Quad camera IR light cover Alignment sticker Screws and anchors T10 security L-key MOUNTING GUIDE | AVIGILON AVA QUAD CAMERA 3 / 17... -
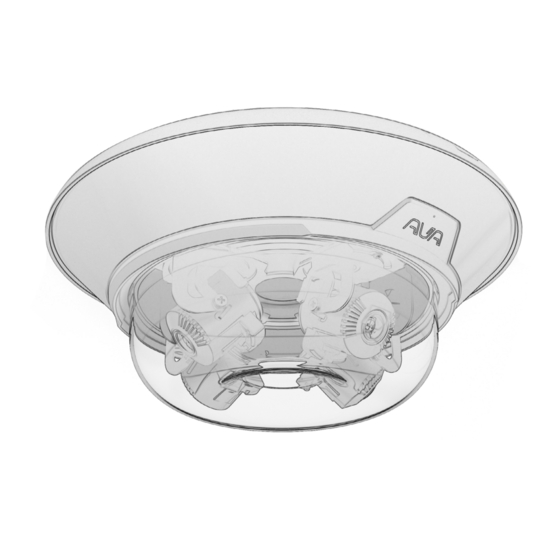
Page 4: Inner View
OVERVIEW Inner view Lens (sensor) module, 3-axis adjustable Status LEDs RJ45 Ethernet port Reset button (only POE+ supported) Cable gland Safety tether wire MOUNTING GUIDE | AVIGILON AVA QUAD CAMERA 4 / 17... - Page 5 PREPARING TO MOUNT THE CAMERA For all install options T10 security MOUNTING GUIDE | AVIGILON AVA QUAD CAMERA 5 / 17...
- Page 6 PREPARING TO MOUNT THE CAMERA MOUNTING GUIDE | AVIGILON AVA QUAD CAMERA 6 / 17...
- Page 7 OPTION A - USING THE CEILING MOUNT Alignment sticker 180mm Drill hole Cable hole Cable hole Drill hole Drill hole MOUNTING GUIDE | AVIGILON AVA QUAD CAMERA 7 / 17...
- Page 8 Cut a hole in the center of the tile with a diameter of 15cm. Main keel Secondary keel ø15cm If needed, add hanging rods to strengthen the ceiling structure. Weight of camera: 2.7 Kg Weight of Recessed kit: 1.1 Kg MOUNTING GUIDE | AVIGILON AVA QUAD CAMERA 8 / 17...
- Page 9 Use nuts, washers and lock washers as shown, tighten the nut towards the adapter plate and make sure the two nuts close to the bracket rod are loose. Bracket rod Adapter plate Bracket stand MOUNTING GUIDE | AVIGILON AVA QUAD CAMERA 9 / 17...
- Page 10 Assemble the camera top mounting plate to the adapter plate, adjust the position so the camera will be flush to the ceiling and the release button can be pressed. Required: ACQ-REC-KIT Recessed kit MOUNTING GUIDE | AVIGILON AVA QUAD CAMERA 10 / 17...
- Page 11 Install the mounting plate with the orientation you prefer. screw. Required: ACQ-PEN-HEA Pendant head ACQ-PEN-PIP Pendant pipe 40c ACQ-MNT-ADA Mounting adapter MOUNTING GUIDE | AVIGILON AVA QUAD CAMERA 11 / 17...
- Page 12 Route the cable along the routing guide poles to form drip loop. and 1 hole for routing cable. cable and use foam tapes or seal foam to ensure the back-end connection is waterproof. ø9.5mm or 3/8” Required: ACQ-WAL-MNT Wall mount bracket MOUNTING GUIDE | AVIGILON AVA QUAD CAMERA 12 / 17...
- Page 13 OPTION D - USING THE WALL MOUNT Fasten bracket using nuts, washers and lock washers. Secure the top mounting plate. MOUNTING GUIDE | AVIGILON AVA QUAD CAMERA 13 / 17...
- Page 14 Align the top mounting plate with correct type of screws. the center of the wall mount bracket. Required: ACQ-WAL-MNT Wall mount bracket ACQ-POL-MNT Pole bracket or ACQ-CRN-MNT Corner bracket MOUNTING GUIDE | AVIGILON AVA QUAD CAMERA 14 / 17...
-
Page 15: Completing The Camera Installation
COMPLETING THE CAMERA INSTALLATION MOUNTING GUIDE | AVIGILON AVA QUAD CAMERA 15 / 17... - Page 16 COMPLETING THE CAMERA INSTALLATION Adjust the image orientation in Alta Aware. 19cm Mind the electrostatic damage by avoiding contact with exposed circuitry. MOUNTING GUIDE | AVIGILON AVA QUAD CAMERA 16 / 17...
- Page 17 Motorola Solutions, Inc. 500 West Monroe Street, Chicago, IL 60661 U.S.A. motorolasolutions.com © 2023, Avigilon Corporation. All rights reserved. MOTOROLA, MOTO, MOTOROLA SOLUTIONS and the Stylized M Logo are trademarks or registered trademarks of Motorola Trademark Holdings, LLC and are used under license. All other trademarks are the property of their respective owners. 07-2023...
Need help?
Do you have a question about the Avigilon AVA QUAD CAMERA and is the answer not in the manual?
Questions and answers