
Related Manuals for nvent RAYCHEM HWAT-ECO-16


Summary of Contents for nvent RAYCHEM HWAT-ECO-16
- Page 1 HWAT-ECO-16 INSTALLATION AND OPERATION MANUAL FOR HOT WATER TEMPERATURE MAINTENANCE SYSTEM ELECTRONIC CONTROLLER nVent.com Download Full EN Manual Raychem-IM-H59181-HWATECO16controller-EN-1805...
- Page 2 Arcing may not be stopped by conventional circuit breakers. • Approvals and performance are based on the use of nVent parts only. Do not substitute parts or use vinyl electrical tape. • Bus wires will short if they contact each other. Keep bus wires separated.
-
Page 3: Table Of Contents
1.5 HWAT Heating Cables Installation 2.1 Installing the Controller 2.2 Wiring the Controller Programming the Controller 3.1 Programming Overview 3.2 Initializing the Controller 3.3 Advanced Programming Error/Alarms and Troubleshooting Pre-Defined Programs Heat-Up Cycle Graphs Cool-Down Graph nVent.com | iii Raychem-IM-H59181-HWATECO16controller-EN-1805... - Page 4 Item Description HWAT-ECO-16 controller Temperature sensor with 13 ft (4 m) cable Mounting screws Mounting washers Aluminum tape Manual Figure 1: Kit contents iv | nVent.com Raychem-IM-H59181-HWATECO16controller-EN-1805...
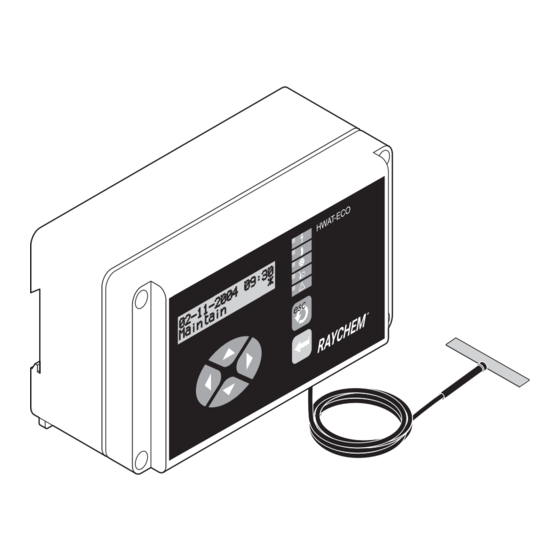
- Page 5 Pipe Temperature alarm (requires installed sensor) (green LED) Alarm (red LED) Escape, backspace; NO; or display maintain temperature setpoint Arrow keys: to change menu selection or position the cursor Confirm selection, new value or YES Figure 2: HWAT-ECO-16 controller nVent.com | v Raychem-IM-H59181-HWATECO16controller-EN-1805...
- Page 6 | nVent.com Raychem-IM-H59181-HWATECO16controller-EN-1805...
-
Page 7: General Information
General Information Use of the Manual This manual covers the installation and operation of the nVent RAYCHEM HWAT-ECO-16 controller and must be used with the following additional documents: • HWAT System Product and Selection Design Guide (H57538) • HWAT System Installation and Operation Manual... - Page 8 • Pipe temperature monitoring, low temperature alarm and high temperature cut-out. • Master/slave function that allows one HWAT-ECO-16 to control up to eight additional HWAT-ECO-16 controllers. • 9 pre-defined programs that can be customized by the user. 2 | nVent.com Raychem-IM-H59181-HWATECO16controller-EN-1805...
-
Page 9: Technical Data
(not provided with ground-fault protection HWAT-ECO-16 controller) Power terminal block 16–10 AWG (1.5–4 mm Use copper conductors only Internal temperature 150˚F (65˚C) alarm BMS control voltage 0–10 Vdc BMS cable maximum 328 ft (100 m) length nVent.com | 3 Raychem-IM-H59181-HWATECO16controller-EN-1805... - Page 10 To increase or decrease your actual pipe maintain temperature or adjust for plastic pipe. Pipe temperature sensor Thermistor with 13 ft (4 m) lead provided. A PT100 RTD may be optionally used. Max length is 328 ft (100 m) 4 | nVent.com Raychem-IM-H59181-HWATECO16controller-EN-1805...
- Page 11 • 2-wire: 20 AWG (0.5 mm • 4-wire: 24 AWG (0.2 mm Default programs 9 pre-defined programs that can be customized by user Program settings 48 1/2-hour time blocks of the following program settings: Off, Economy, Maintain and Heat-Up cycle nVent.com | 5 Raychem-IM-H59181-HWATECO16controller-EN-1805...
- Page 12 Type 12 Energy Management Equipment (for use with HWAT-R2 and HWAT-Y2 heating cables only.) 80BJ Weight 2 lbs (1 kg) Size 6.5 in x 3.4 in x 2.8 in (165 mm x 85 mm x 71 mm) 6 | nVent.com Raychem-IM-H59181-HWATECO16controller-EN-1805...
-
Page 13: Care And Maintenance
Do not pour water directly on the device. Do not use a water hose or high pressure cleaner. Important: In case of questions or product failure, please contact your nVent representative, or call nVent t 800 5 5 6258. 1.5 HWAT Heating Cables... - Page 14 WARNING: To minimize the danger of fire from sustained electrical arcing if the heating cable is damaged or improperly installed, and to comply with the requirements of approvals agencies, nVent and n tion e ect ic co es oun f u t e ui ent protection must be used on each heating cable branch circuit.
-
Page 15: Installation
The HWAT-ECO-16 has a removable front cover. Both the cover and the box have electronic parts and are connected to each other by a 14-pin connector. First unscrew the four screws in the cover. Carefully pull the cover straight out, not sideways! nVent.com | 9 Raychem-IM-H59181-HWATECO16controller-EN-1805... - Page 16 Mount the controller using either of the options below: 1. You can mount the controller to the wall using the two supplied screws and sealing rings in the two holes located inside the bottom part of the controller. 10 | nVent.com Raychem-IM-H59181-HWATECO16controller-EN-1805...
- Page 17 Installation 5.9" (148 mm) 1.7" (43 mm) TEMP Figure 4: Hole locations for mounting with screws nVent.com | 11 Raychem-IM-H59181-HWATECO16controller-EN-1805...
- Page 18 Installation 2. Optionally you can mount the controller using DIN 35 Rail mounting. Mounting Removing Press tab to remove box Optional Din Rail Mount (Rail not provided) Figure 5: Mounting with DIN 35 Rail 12 | nVent.com Raychem-IM-H59181-HWATECO16controller-EN-1805...
-
Page 19: Wiring The Controller
BMS and network. Alarm terminal block Sensor, BMS, Power and network terminal block terminal block Ground TEMP Ø Ø Ø Ø HWAT Line HWAT-ECO-16 General Arrangement Figure 6: General arrangement for terminal blocks nVent.com | 13 Raychem-IM-H59181-HWATECO16controller-EN-1805... - Page 20 Ground TEMP 1/2" Conduits Max. 20 A Ø ground fault Ø circuit breaker 208-240 Vac HWAT RayClic-PC heating cable Wiring diagram for HWAT-ECO-16 Figure 7: Connecting a single controller (w/o sensor, BMS, network and alarm connections) 14 | nVent.com Raychem-IM-H59181-HWATECO16controller-EN-1805...
- Page 21 Installation of the pipe temperature sensor is optional. If installed, the HWAT-ECO-16 provides low temperature alarm and high temperature cut-out. The temperature sensor should be connected to a single or master controller only. Connect both wires nVent.com | 15 Raychem-IM-H59181-HWATECO16controller-EN-1805...
- Page 22 To install a PT100 sensor first connect a jumper between the terminals indicated in Figure 9, then connect the two wires from the RTD. If you are using a three wire sensor, remove the compensation lead and only connect the two measurement wires. 16 | nVent.com Raychem-IM-H59181-HWATECO16controller-EN-1805...
- Page 23 328 ft (100 m) by splicing a length of 300 volt, 18 AWG (0.75 mm ) cable. Temperature sensor Insulation Heating 180° cable Hot water out HWAT-Y2 HWAT-R2 Tempered water out Hot water in mixing Water valve heater Cold water in Figure 10: Positioning temperature sensor (optional) nVent.com | 17 Raychem-IM-H59181-HWATECO16controller-EN-1805...
- Page 24 Put the wire into the hole and release the orange tab. The wires used for the alarm contact should be rated for 300 V. See “Chapter 4, Error/ 18 | nVent.com Raychem-IM-H59181-HWATECO16controller-EN-1805...
- Page 25 328 ft (100 m). Be careful not to mix A and B connections. To connect a wire, use a screwdriver to push down the orange tab on the side of the terminal. Put the wire into the hole and release the orange tab. nVent.com | 19 Raychem-IM-H59181-HWATECO16controller-EN-1805...
- Page 26 Installation MASTER SLAVE 1 TEMP TEMP Figure 12: Networking controllers together The diagram below shows the connection of multiple controllers (with optional RS-485 connections). 20 | nVent.com Raychem-IM-H59181-HWATECO16controller-EN-1805...
- Page 27 RS485 wire. Since the cable gland grommet has only o es ou ust co ine t e i e n t e bM wire in a 4-wire cable. nVent.com | 21 Raychem-IM-H59181-HWATECO16controller-EN-1805...
- Page 28 Using 300-V rated cable, connect the BMS signal wire to terminal (PL5). Connect the ground wire to the “–” and the 0-10 V output to the “+” terminal. Alarm, Sensor, and BMS terminals TEMP 0-10v ground Figure 15: Connecting the BMS 22 | nVent.com Raychem-IM-H59181-HWATECO16controller-EN-1805...
- Page 29 Installation Figure 16 shows the connection of a single controller (with optional sensor, BMS and alarm connections). Master Alarm 208/240V Sensor HWAT RayClic-PC heating cable Figure 16: Single controller connection (with sensor, BMS, and alarm connections) nVent.com | 23 Raychem-IM-H59181-HWATECO16controller-EN-1805...
- Page 30 Push the cover onto the box. Note that the connector pins will offer some resistance. Put the screws in place and tighten to 10 inch-lbs (1.13 N-m). Figure 17: Closing the controller 24 | nVent.com Raychem-IM-H59181-HWATECO16controller-EN-1805...
- Page 31 Pipe temperature alarm (requires installed sensor) (green LED) Alarm (red LED) Escape, backspace; NO; or display maintain temperature setpoint Arrow keys: to change menu selection or position the cursor Confirm selection, new value or YES Figure 18: Controller display nVent.com | 25 Raychem-IM-H59181-HWATECO16controller-EN-1805...
-
Page 32: Programming The Controller
Quickstart program which is suitable for normal operations. In addition, advanced programming can be used to modify initial settings, set additional features such as BMS and Network Master, reinitialize the entire controller, or customize the pre-defined programs. 26 | nVent.com Raychem-IM-H59181-HWATECO16controller-EN-1805... -
Page 33: Initializing The Controller
“Press Enter for this voltage type.” Units English “Press Enter for this unit type.” Metric “Press Enter for this unit type.” Ambient temp. “Enter ambient temp.” “Enter maintain temp. setpoint” Maintain temp. “Enter economy temp. setpoint” Economy temp nVent.com | 27 Raychem-IM-H59181-HWATECO16controller-EN-1805... - Page 34 Enter. Then, select and enter the month, day, hour, and minutes. The time and date is contained in volatile memory, and is maintained during power outages by an internal rechargeable battery. Power the HWAT-ECO-16 for at least 6 hours to charge the battery. 28 | nVent.com Raychem-IM-H59181-HWATECO16controller-EN-1805...
- Page 35 HWAT-ECO-16 controller for each ambient condition. Maintain temperature The maintain temperature setpoint is the water temperature that you set for normal use. Use the up/down arrow keys to select the temperature. nVent.com | 29 Raychem-IM-H59181-HWATECO16controller-EN-1805...
- Page 36 The economy temperature setpoint is the water temperature for periods during which hot water is not usually used (at night) or when a lot of hot water is used (peak period). Use the up/down arrows to select 30 | nVent.com Raychem-IM-H59181-HWATECO16controller-EN-1805...
- Page 37 Press Enter to start the controller. If you press the ESC button, you can retrace all menu items to check the settings. After starting the controller the display shows date, time, temperature setting and a “*” to nVent.com | 31 Raychem-IM-H59181-HWATECO16controller-EN-1805...
- Page 38 Figure 19: Bar graph Displaying Pipe Temperature When the optional pipe temperature sensor is connected, the controller will display date and time as above and alternate between temperature mode and pipe temperature. 32 | nVent.com Raychem-IM-H59181-HWATECO16controller-EN-1805...
-
Page 39: Advanced Programming
Table 4 and the remainder of this section outline the advanced programming options that include modifying initial settings, setting additional features such as BMS and Network Master, reinitializing the entire controller, or customizing the pre-defined programs. nVent.com | 33 Raychem-IM-H59181-HWATECO16controller-EN-1805... - Page 40 5-30 Minutes 4. Set Deadband 4-18°F (2-10°C) 11 HTC (High Tem. Cut Out) 1. Set Status Enabled or Disabled 2. Set Temperature Maximum 205°F 3. Set Alarm Filter Time 10-30 Minutes 4. Set Deadband 4-18°F (2-10°C) 34 | nVent.com Raychem-IM-H59181-HWATECO16controller-EN-1805...
- Page 41 5 Info Show firmware version number + Cable type + Sensor temp. Time and Date Use the up/down arrows to select the year and press Enter. Then select and set the month, day, hour and minutes. nVent.com | 35 Raychem-IM-H59181-HWATECO16controller-EN-1805...
- Page 42 The minimum temperature is 105˚F (40˚C) and the maximum temperature is the selected maintain temperature. Press Enter. 3. Ambient temperature The ambient temperature is the air temperature surrounding the pipes where the heating cable is 36 | nVent.com Raychem-IM-H59181-HWATECO16controller-EN-1805...
- Page 43 Enter. If you select ‘On’, you must enter a password using the left/right and up/down arrow buttons to select a 4-digit password. Press Enter. You will need to remember your 4-digit password whenever you wish to unlock the controller for nVent.com | 37 Raychem-IM-H59181-HWATECO16controller-EN-1805...
- Page 44 5. For voltages > 6.4 Vdc: 100% power is applied to the heating cable. See "Building Management System (BMS) (optional)" on page 22 for installation information. If Water heater is ON, it overrules the BMS temperature setting if necessary. 38 | nVent.com Raychem-IM-H59181-HWATECO16controller-EN-1805...
- Page 45 (A, B and C). Slave controllers connected to a different phase will switch at the same time (1, 2 and 3). nVent.com | 39 Raychem-IM-H59181-HWATECO16controller-EN-1805...
- Page 46 No: Generates low current alarm when measured current is less that 300 mA. 10. LTA (Low Pipe Temperature Alarm) When the optional pipe temperature sensor option is installed, the HWAT-ECO-16 controller monitors the temperature of the hot water distribution pipes 40 | nVent.com Raychem-IM-H59181-HWATECO16controller-EN-1805...
- Page 47 > 5°F (3°C) default 0°F(6°C) Timer The Timer feature lets you re-program any of the pre-defined programs to suit your personnel requirements. Reprogramming is done graphically in ½ hour time blocks. A block can be set to Heat-Up nVent.com | 41 Raychem-IM-H59181-HWATECO16controller-EN-1805...
- Page 48 Use the up/down arrows to select the temperature: = Heat-up cycle = Maintain temperature = Economy temperature = Off Figure 20: Timer block options Select time block Use the left/right arrows to select the time block. Timer programming example from 00:00 to 08:00: 42 | nVent.com Raychem-IM-H59181-HWATECO16controller-EN-1805...
- Page 49 Heat-Up cycle can be programmed for the number of hours that are required and the desired temperature will be reached. To determine the amount of time nVent.com | 43 Raychem-IM-H59181-HWATECO16controller-EN-1805...
- Page 50 Info The display shows the firmware version number, selected cable type and the current sensor temperature. Press Enter twice to update the sensor temperature on the display. 44 | nVent.com Raychem-IM-H59181-HWATECO16controller-EN-1805...
-
Page 51: Error/Alarms And Troubleshooting
• Low temp alarm or High temperature cut-out selected and sensor is not installed. Error 3: Network failure Reinitialize MASTER (see "Setup" on page 36) Two or more HWAT-ECO-16’s are set as Master nVent.com | 45 Raychem-IM-H59181-HWATECO16controller-EN-1805... - Page 52 Error code Definitions Cause/reasons Remedy Error 4: Internal Error Controller needs to be replaced. Contact nVent representative Error 5: No/Low current alarm Ensure that the heating circuit is connected to power output of the HWAT-ECO-16. If controlling a contactor, ensure that the Short Heater Alarm is enabled.
- Page 53 • Ensure that the sensor is tight (Only when temperature to pipe and insulated. alarm “yes” selected) • Verify power is connected to Pipe temperature too heating cable. • Confirm Low Temperature Alarm (LTA) setting Confirm HWAT-ECO-16 settings Confirm insulation schedule nVent.com | 47 Raychem-IM-H59181-HWATECO16controller-EN-1805...
- Page 54 - Reinitialize) is different than • Change value of standard thickness. ambient temperature • Adjust power correction factor if possible (see "Timer" on page 41) • Change insulation to match required schedule in HWAT installation manual. 48 | nVent.com Raychem-IM-H59181-HWATECO16controller-EN-1805...
- Page 55 No display Loss of power Restore power Can’t access Controller is Enter your 4-digit programming password-protected password. If you mode forgot your password, enter the backup password: 6922 to unlock the controller nVent.com | 49 Raychem-IM-H59181-HWATECO16controller-EN-1805...
-
Page 56: Pre-Defined Programs
= Heat-up cycle = Maintain temperature = Economy temperature = Off Constant Heat-up Maintain Economy Monday-Sunday Apartments Heat-up Maintain Monday-Friday Economy Heat-up Maintain Saturday-Sunday Economy Family home Heat-up Maintain Monday-Sunday Economy Prison Heat-up Maintain Monday-Sunday Economy 50 | nVent.com Raychem-IM-H59181-HWATECO16controller-EN-1805... - Page 57 = Maintain temperature = Economy temperature = Off Hospital Heat-up Maintain Monday-Sunday Economy Nursing home Heat-up Maintain Monday-Sunday Economy Hotel Heat-up Maintain Monday-Sunday Economy Sports center Heat-up Maintain Monday-Sunday Economy Convalescent home Heat-up Maintain Monday-Sunday Economy nVent.com | 51 Raychem-IM-H59181-HWATECO16controller-EN-1805...
-
Page 58: Heat-Up Cycle Graphs
(52) (49) 208V (46) 1/2-inch pipe 1-inch pipe (43) 2-inch pipe 70°F (21°C) ambient (41) Time (hours) (52) (49) 240V (46) 1/2-inch pipe 1-inch pipe (43) 2-inch pipe 70°F (21°C) ambient (41) Time (hours) Heat-Up HWAT-Y2 52 | nVent.com Raychem-IM-H59181-HWATECO16controller-EN-1805... - Page 59 (54) 208V 1/2-inch pipe (49) 1-inch pipe 2-inch pipe (43) 70°F (21°C) ambient (41) Time (hours) (66) (60) (54) 240V 1/2-inch pipe (49) 1-inch pipe 2-inch pipe (43) 70°F (21°C) ambient (41) Time (hours) Heat-Up HWAT-R2 nVent.com | 53 Raychem-IM-H59181-HWATECO16controller-EN-1805...
-
Page 60: Cool-Down Graph
Cool-Down Graph These cool down curves represent when the heating cable is turned off. (66) 70°F (21°C) ambient 1/2-inch pipe (63) 1-inch pipe 2-inch pipe (60) (57) (54) (52) (49) (46) (43) (40) Time (hours) Cool-Down 54 | nVent.com Raychem-IM-H59181-HWATECO16controller-EN-1805... - Page 62 Tel +32.16.213.511 Fax +1.800.527.5703 Fax +32.16.213.604 thermal.info@nvent.com thermal.info@nvent.com Asia Pacific Latin America Tel +86.21.2412.1688 Tel +1.713.868.4800 Fax +86.21.5426.3167 Fax +1.713.868.2333 cn.thermal.info@nvent.com thermal.info@nvent.com nVent.com All other trademarks are the property of their respective owners. nVent reserves the right to change Raychem-IM-H59181-HWATECO16controller-EN-1805...
Need help?
Do you have a question about the RAYCHEM HWAT-ECO-16 and is the answer not in the manual?
Questions and answers