
Related Manuals for cytiva SE 250 Mighty Small II


Summary of Contents for cytiva SE 250 Mighty Small II
- Page 1 SE 250/260 Mighty Small II Operating Instructions Original instructions cytiva.com...
-
Page 2: Table Of Contents
Table of Contents Table of Contents Introduction ......................3 About this manual ............................4 Important user information ........................5 Safety information ..................... 7 Safety precautions ............................8 Labels ................................. 15 Emergency procedures ..........................16 System description .................... 17 Installation ......................19 Operation ...................... -
Page 3: Introduction
1 Introduction Introduction About this chapter This chapter contains important user information, descriptions of safety notices, regu- latory information, and intended use of the SE 250/260 Mighty Small II. In this chapter Section See page About this manual Important user information SE 250/260 Mighty Small II Operating Instructions 29281629 AB... -
Page 4: About This Manual
1 Introduction 1.1 About this manual About this manual Purpose of this manual The Operating instructions provide you with the information needed to install, operate and maintain the product in a safe way. Scope of this manual The Operating Instructions covers the SE 250/260 Mighty Small II. The illustration below shows the SE 250/260 Mighty Small II. -
Page 5: Important User Information
1 Introduction 1.2 Important user information Important user information Read this before operating the product All users must read the entire Operating instruction before installing, oper- ating or maintaining the product. Always keep the Operating instruction at hand when operating the product. Do not operate the product in any other way than described in the user documenta- tion. - Page 6 1 Introduction 1.2 Important user information Notes and tips Note: A note is used to indicate information that is important for trouble-free and optimal use of the product. Tip: A tip contains useful information that can improve or optimize your proce- dures.
-
Page 7: Safety Information
2 Safety information Safety information About this chapter This chapter describes safety precautions, labels and symbols that are attached to the equipment. In addition, the chapter describes emergency and recovery procedures, and provides recycling information. Important WARNING Before installing, operating or maintaining the product, all users must read and understand the entire contents of this chapter to become aware of the hazards involved. -
Page 8: Safety Precautions
2 Safety information 2.1 Safety precautions Safety precautions Introduction The SE 250/260 Mighty Small II is powered by an external power supply. Before instal- ling, operating or maintaining the system, you must be aware of the hazards described in this manual. Follow the instructions provided to avoid injury to the operator or other personnel, to the product, or to other equipment in the area. - Page 9 Do not damage the power supply cord by bending, twisting, heating or allowing them to become pinned under the equipment. Using damaged power cords could result in fire or electric shock. If the power supply cords are damaged, contact your local Cytiva representative for replacements. WARNING The safety lid must be in place before connecting the power leads to a power supply.
- Page 10 2 Safety information 2.1 Safety precautions CAUTION Circulate only water or 50/50 water/ethylene glycol through the heat exchanger. Never use anti-freeze or any organic solvent in the heat exchanger. CAUTION Never introduce anti-freeze or any organic solvent into any part of the instrument.
- Page 11 Handle the unit with care to avoid personal injury. Power supply WARNING Power cord. Only use power cords with approved plugs delivered or approved by Cytiva. WARNING The safety lid must be in place before connecting the power leads to a power supply.
- Page 12 2 Safety information 2.1 Safety precautions WARNING Make sure that there is access to the instrument power supply cord at all times. Operation WARNING The high voltage power supply must always be disconnected when the safety lid of the electrophoresis unit is taken off. The high voltage power supply must never be switched on unless the safety lid is on the electrophoresis unit.
- Page 13 WARNING Only spare parts and accessories that are approved or supplied by Cytiva may be used for maintaining or servicing the product. WARNING Disconnect power. Always disconnect power from the instru- ment before performing any maintenance task.
- Page 14 2 Safety information 2.1 Safety precautions WARNING Decommissioning. Decontaminate the equipment before decommissioning to make sure that hazardous residues are removed. NOTICE Cleaning. Keep the exterior of the instrument dry and clean. Wipe regularly with a soft damp tissue and, if necessary, a mild cleaning agent.
-
Page 15: Labels
2 Safety information 2.2 Labels Labels Introduction This section describes the system label and other safety or regulatory labels that are attached to the product. Description of symbols on the system label The table below describes the various symbols that may be found on the system label. Label Meaning Warning! Read the user documentation before using the system. -
Page 16: Emergency Procedures
2 Safety information 2.3 Emergency procedures Emergency procedures Introduction This section describes how to shut down of the SE 250/260 Mighty Small II in an emer- gency situation, and the procedure for restarting the SE 250/260 Mighty Small II. The section also describes the result in the event of power failure. Precautions WARNING Make sure that there is access to the instrument power supply cord... -
Page 17: System Description
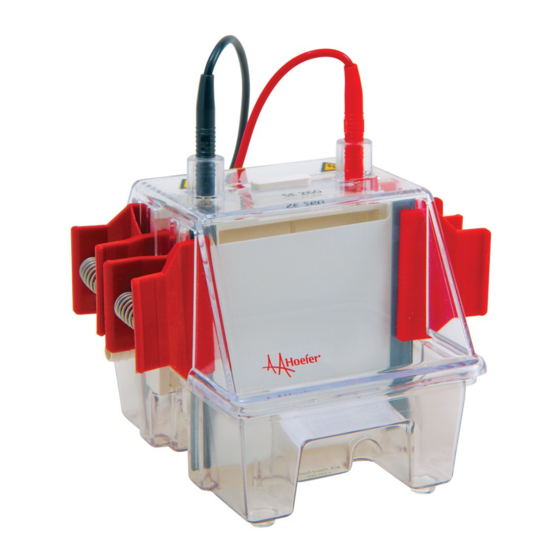
3 System description System description About this chapter This chapter gives an overview of the SE 250/260 Mighty Small II. Illustration of the instrument The illustration below shows the SE 250/260 Mighty Small II instrument. Part Function Color-coded leads (2) Safety lid SE 250/260 Mighty Small II Operating Instructions 29281629 AB... - Page 18 3 System description Part Function Upper buffer chamber core Foam gasket Coolant port (2) Spring clamps (4) Positioning tabs SE 250/260 Mighty Small II Lower buffer chamber The following parts are included, but not shown in the illustration: • Glass plates •...
-
Page 19: Installation
Inspect all visible parts for damage or missing pieces. If any damage is observed, record this on the receiving documents and inform your Cytiva representative. Make sure to keep all packing material for damage claims or to use should it become necessary to return the unit. -
Page 20: Operation
5 Operation Operation About this chapter This chapter gives instructions on how to operate the product in a safe way. Safety precautions WARNING The high voltage power supply must always be disconnected when the safety lid of the electrophoresis unit is taken off. The high voltage power supply must never be switched on unless the safety lid is on the electrophoresis unit. - Page 21 5 Operation CAUTION Devices must only be operated with a certified power supply capable of limiting the voltage and current to specified ratings. NOTICE After initial monitoring, do not leave the unit unattended for more than 45 min before checking the progress of the bands and the buffer level.
-
Page 22: Preparations
5 Operation 5.1 Preparations Preparations Prepare the gel sandwich Both precast and self-cast gels can be run in the SE 250/260 Mighty Small II units. This unit accepts gels in 10 × 8 cm plates, which can be cast in SE215, SE245, or SE275 gel casters. - Page 23 5 Operation 5.1 Preparations Step Action Attach one end of each length of tubing to a cooling core port. Attach the free ends of each length of tubing to the circulator bath ports; one to the inlet and the other to the outlet. Secure the connections with the hose clamps.
- Page 24 5 Operation 5.1 Preparations Step Action Part Description Handle Release tabs (2) Coolant port (2) SE 250/260 Mighty Small II Operating Instructions 29281629 AB...
-
Page 25: Assembly
5 Operation 5.2 Assembly Assembly Place the gel sandwich in the SE 250/260 Mighty Small II WARNING Acrylamide is a neurotoxin. Always wear gloves and observe all laboratory safety procedures. Step Action Rinse away the gel overlay with distilled water and drain any excess water. If installing a self-cast or precast 10 ×... - Page 26 5 Operation 5.2 Assembly Step Action If installing a self-cast or precast 10 × 8 cm gel sandwich, align the bottom of the plate with the bottom of the core (see figure below). The bottom of the notched plate must cover the silicone rubber gasket. The 10 × 8 cm gel sand- wich fits flush with the bottom of the upper buffer chamber core.
- Page 27 5 Operation 5.2 Assembly Clamp the sandwich in place Note: Cooling is optional. If desired, attach tubing to ports on both sides of the core before attaching gel sandwiches. Circulate coolant. See Optional cooling, on page Step Action Lightly press the sandwich against the gasket and secure it to the core with one spring clamp on each side.
- Page 28 5 Operation 5.2 Assembly Step Action De-aerate the stacking gel monomer solution. Add catalyst and initiator to the stacking gel monomer solution and then pour. Use a pipette to deliver the solution into one corner of the plate, taking care not to trap any bubbles.
- Page 29 5 Operation 5.2 Assembly Step Action To aid in loading samples, wet the well-locating decal and apply it to the front of the glass plate so that the appropriate edge outlines the sample wells. Note: The side wells for standards of a preparative comb correspond to the outer- most wells formed by the 10-well comb.
- Page 30 5 Operation 5.2 Assembly Step Action Note: If using precast gels, check that the lower gel/buffer contact surface is exposed (the colored plastic tape must be removed). Place the safety lid on the unit. Plug the color-coded leads into the jacks of an approved power supply. The red lead plugs into the red output jack, and the black lead plugs into the black output jack.
-
Page 31: Electrophoresis Run
5 Operation 5.3 Electrophoresis run Electrophoresis run Running the gel Gels may be run at either constant current or constant voltage. A constant current setting is traditionally used with a discontinuous buffer system so that the rate of elec- trophoretic migration remains unchanged throughout the run. Under these condi- tions, voltage increases as the run proceeds. - Page 32 5 Operation 5.3 Electrophoresis run Step Action Remove the core assembly with gels attached by squeezing the release tabs and lift out the core assembly. Pour out the buffer by inverting the core assembly, then remove both clamps, and lift away gel sandwich(es) from the upper buffer chamber core. Gently loosen and then slide away both spacers.
-
Page 33: Maintenance
WARNING Only spare parts and accessories that are approved or supplied by Cytiva may be used for maintaining or servicing the product. WARNING Disconnect power. Always disconnect power from the instru- ment before performing any maintenance task. - Page 34 6 Maintenance Cleaning before planned maintenance/service To ensure the protection and safety of service personnel, all equipment and work areas must be clean and free of any hazardous contaminants before a Service Engineer starts maintenance work. Please complete the checklist in the On Site Service Health and Safety Declaration Form or the Health and Safety Declaration Form for Product Return or Servicing, depending on whether the instrument is going to be serviced on site or returned for service, respectively.
-
Page 35: Troubleshooting
If the suggested actions in this guide do not solve the problem, or if the problem is not covered by this guide, contact your Cytiva representative for advice. Safety precautions CAUTION Circulate only water or 50/50 water/ethylene glycol through the heat exchanger. - Page 36 7 Troubleshooting Error description Corrective action Unusually slow (or To increase or decrease the migration rate, adjust the fast) run voltage or current by 25% to 50%. Adjust the solutions: • Check recipes, gel concentrations, solutions, and dilu- tions. (For instance, do not use Tris-HCl instead of Tris.) •...
- Page 37 7 Troubleshooting Error description Corrective action Poor band resolu- Use only the highest quality reagents. tion Conduct the separation at a lower current or voltage setting. Dialyze or desalt the sample. Reduce the sample volume or concentration. Only use freshly deionized urea. Improve dissociation of subunits by heating sample in SDS sample buffer 1–2 minutes at 100°C.
-
Page 38: Reference Information
8 Reference information Reference information About this chapter This chapter lists the technical specifications of the SE 250/260 Mighty Small II. The chapter also includes ordering information, and the Health and Safety Declaration form for service. In this chapter Section See page Specifications Recycling information... -
Page 39: Specifications
8 Reference information 8.1 Specifications Specifications Parameter Specification Gel plate size 10 × 8 cm Approximate gel size 8 × 7 cm Maximum power 12 W Maximum voltage 500 V Maximum current 500 mA Maximum gel tempera- 45°C ture Environmental operating Indoor use: 4°C to 40°C conditions Humidity up to 80%... -
Page 40: Recycling Information
8 Reference information 8.2 Recycling information Recycling information Introduction This section contains information about the decommissioning of the product. Decontamination The product must be decontaminated before decommissioning. All local regulations must be followed with regard to scrapping of the equipment. Disposal of the product When taking the product out of service, the different materials must be separated and recycled according to national and local environmental regulations. -
Page 41: Regulatory Information
8 Reference information 8.3 Regulatory information Regulatory information Introduction This section lists the regulations and standards that apply to the SE 250/260 Mighty Small II. In this section Section See page 8.3.1 Contact information 8.3.2 European Union and European Economic Area 8.3.3 Eurasian Economic Union Евразийский... -
Page 42: Contact Information
Manufacturing information The table below summarizes the required manufacturing information. Requirement Information Name and address of manufacturer Cytiva Sweden AB Björkgatan 30 SE 751 84 Uppsala Sweden Telephone number of manufacturer + 46 771 400 600 SE 250/260 Mighty Small II Operating Instructions 29281629 AB... -
Page 43: European Union And European Economic Area
8 Reference information 8.3 Regulatory information 8.3.2 European Union and European Economic Area 8.3.2 European Union and European Economic Area Introduction This section describes regulatory information for the European Union and European Economic Area that applies to the equipment. Conformity with EU Directives See the EU Declaration of Conformity for the directives and regulations that apply for the CE marking. -
Page 44: Eurasian Economic Union
Customs Union and (or) the Eurasian Economic Union. Requirement Information Name, address and telephone See Manufacturing information number of manufacturer Importer and/or company for Cytiva RUS LLC obtaining information about 109004, Moscow importer internal city area Tagansky municipal district Stanislavsky str., 21, building 3, premises I,... - Page 45 улица Станиславского, дом 21, строение 3, помещение I, комната 57 Российская Федерация Телефон: +7 499 609 15 50 Адрес электронной почты: rucis@cytiva.com Description of symbol on the system label Описание обозначения на этикетке системы This Eurasian compliance mark indicates that the product is...
-
Page 46: Declaration Of Hazardous Substances (Dohs)
8 Reference information 8.3 Regulatory information 8.3.4 Declaration of Hazardous Substances (DoHS) 8.3.4 Declaration of Hazardous Substances (DoHS) This section describes the information that applies to the product in China. 根据 SJ/T11364-2014《电子电气产品有害物质限制使用标识要求》特提供如下 有关污染控制方面的信息。 The following product pollution control information is provided according to SJ/ T11364-2014 Marking for Restriction of Hazardous Substances caused by electrical and electronic products. - Page 47 8 Reference information 8.3 Regulatory information 8.3.4 Declaration of Hazardous Substances (DoHS) 有害物质的名称及含量 Name and Concentration of Hazardous Substances 产品中有害物质的名称及含量 Table of Hazardous Substances’ Name and Concentration 部件名称 有害物质 Component Hazardous substance name 铅 汞 镉 六价铬 多溴联苯 多溴二苯醚 (Pb) (Hg) (Cd) (Cr(VI))
-
Page 48: Ordering Information
8 Reference information 8.4 Ordering information Ordering information For product codes and information about how to order, please see cytiva.com SE 250/260 Mighty Small II Operating Instructions 29281629 AB... -
Page 49: Health And Safety Declaration Form
Service Ticket #: To make the mutual protection and safety of Cytiva service personnel and our customers, all equipment and work areas must be clean and free of any hazardous contaminants before a Service Engineer starts a repair. To avoid delays in the servicing of your equipment, complete this checklist and present it to the Service Engineer upon arrival. - Page 50 To make sure the mutual protection and safety of Cytiva personnel, our customers, transportation personnel and our environment, all equipment must be clean and free of any hazardous contaminants before shipping to Cytiva. To avoid delays in the processing of your equipment, complete this checklist and include it with your return.
-
Page 51: Index
Index Index CE, 43 On site service, 49 conformity, 43 Operation, 20 marking, 43 Ordering information, 48 Cleaning, 33 Prerequisites, 5 Decommisioning, 40 Product return or servicing, 50 Purpose of this manual, 4 Emergency, 16 procedures, 16 Recycling information, 40 Emergency procedures, 16 decontamination, 40 emergency shutdown, 16... - Page 52 Index Unpacking, 19 Unpacking procedure, 19 SE 250/260 Mighty Small II Operating Instructions 29281629 AB...
- Page 53 Page intentionally left blank...
- Page 54 © 2020–2021 Cytiva All goods and services are sold subject to the terms and conditions of sale of the supplying company operating within the Cytiva business. A copy of those terms and conditions is available on request. Contact your local Cytiva representative for the most current information.
Need help?
Do you have a question about the SE 250 Mighty Small II and is the answer not in the manual?
Questions and answers