Table of Contents
Advertisement
Quick Links
Advertisement
Table of Contents

Subscribe to Our Youtube Channel
Related Manuals for Tool Shed TSMS09


Summary of Contents for Tool Shed TSMS09
- Page 1 MITRE SAW COMPOUND SLIDING 300mm TSMS09 www.thetoolshed.co.nz...
-
Page 2: Product Details
PRODUCT ToolShed Mitre Saw Compound Sliding 300mm 1700W MODEL NO. TSMS09 ISTRIBUTED BY NOTE: This manual is only for your reference. Due to the continuous improvement of the ToolShed products, changes may be made at any time without obligation or notice. -
Page 3: Table Of Contents
OPERATION MANUAL C O N T E N T S: Product Details ............................2 Specifications ............................4 Identification ............................5 Safety Information ..........................6 Figures ..............................11 Before Starting ............................. 16 Attachment & Operation ........................17 Transport .............................. 21 Maintenance ............................22 Parts List ............................... -
Page 4: Specifications
OPERATION MANUAL SPECIFICATIONS Motor 230V / 50Hz Power 1700W Idle Speed 3800min-1 Carbide Saw Blade Ø 305 x Ø 25.4 Number of Teeth Mitre Range -45° / 0° / +45° Bevel Cut Range 0° - 45° to the left Cutting Capacity 0°... -
Page 5: Identification
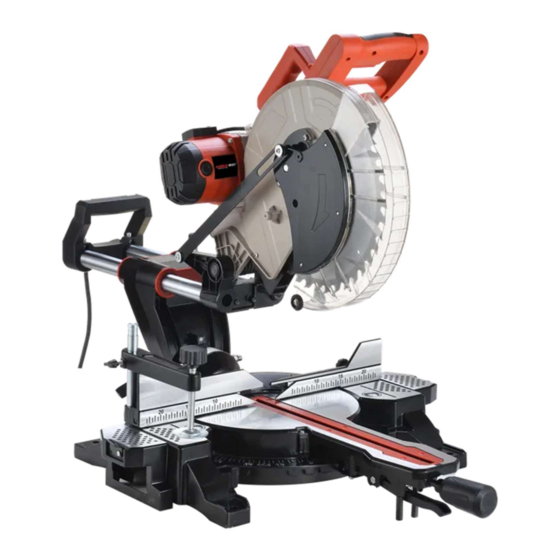
OPERATION MANUAL IDENTIFICATION Motor Sliding Rails Back Fence Handle Blade Guard Extension Tables Adjustment Handle www.thetoolshed.co.nz... -
Page 6: Safety Information
OPERATION MANUAL IMPORTANT INFORMATION GENERAL SAFETY GUIDELINES WARNING READ ALL SAFETY WARNINGS AND ALL INSTRUCTIONS. Failure to follow instructions and warnings could lead to serious injury, electric shock, or fire. Save ALL warnings and instructions for future reference. WORK AREA SAFETY Ensure that your work area is kept well-lit and clean. - Page 7 OPERATION MANUAL ELECTRICAL SAFETY Do NOT use the power tool or machinery in raining conditions or wet areas where the power tool or machinery could get wet. Water in the power tool or machinery can lead to electric shock. Only use the power tool or machinery when the plug correctly matches the power outlet. Modifying plugs greatly increases the risk of electric shock.
- Page 8 OPERATION MANUAL ADDITIONAL SAFETY FOR MITRE SAWS Mitre saws are intended to cut wood or wood-like products and they cannot be used with abrasive cut-off wheels for cutting ferrous material such as bars, rods, studs, etc. Abrasive dust causes moving parts such as the lower guard to jam. Sparks from abrasive cutting will burn the lower guard, the kerf insert, and other plastic parts.
- Page 9 OPERATION MANUAL Do not use another person as a substitute for a table extension or as additional support. Unstable support for the workpiece can cause the blade to bind or the workpiece to shift during the cutting operation pulling you and the helper into the spinning blade. The cut-off piece must not be jammed or pressed by any means against the spinning blade.
- Page 10 OPERATION MANUAL Protect yourself and your environment from accidents using suitable precautionary measures. Do not look directly into the laser beam with unprotected eyes. Never look into the path of the beam. Never point the laser beam towards reflecting surfaces and persons or animals. Even a laser beam with a low output can cause damage to the eyes.
-
Page 11: Figures
OPERATION MANUAL www.thetoolshed.co.nz... - Page 12 OPERATION MANUAL www.thetoolshed.co.nz...
- Page 13 OPERATION MANUAL www.thetoolshed.co.nz...
- Page 14 OPERATION MANUAL www.thetoolshed.co.nz...
- Page 15 OPERATION MANUAL LAYOUT – Fig. 1-17 Handle ON/OFF switch Lock switch Saw shaft lock Machine head Moveable blade guard Saw blade Clamping device Workpiece support Locking screw for workpiece support Table insert Indexed position lever Locking lever Pointer Scale Turntable Fixed saw table Stop rail Scale...
-
Page 16: Before Starting
OPERATION MANUAL BEFORE STARTING THE EQUIPMENT Open the packaging and remove the saw carefully. Remove the packaging material as well as the packaging and transport bracing (if available). Check the tool and accessory parts for transport damage. If possible, store the packaging until the warranty period has expired. The equipment must be set up where it can stand securely, i.e. -
Page 17: Attachment & Operation
OPERATION MANUAL ATTACHMENT & OPERATION Attaching the Saw (Fig. 1-6) To adjust the rotary table (16), push the locking lever (13) downwards and pull the lower indexed position lever (12) upwards with your index finger. Rotate the rotary table (16) and pointer (14) to the desired angle on the scale (15) and lock in place by folding up the locking lever (13). - Page 18 OPERATION MANUAL Cross Cut 90° and Turntable 0° (Fig. 1, 2, 6, 7) In the case of cutting widths up to approximately 100mm, it is possible to fix the traction function of the saw with the set screw (23) in the rear position. In this position, the machine can be operated in cross cutting mode.
- Page 19 OPERATION MANUAL Cross Cut 90° and Turntable 0° - 45° (Fig. 1, 6, 7) The crosscut saw can be used to make crosscuts of 0° -45° to the left and 0 -45° to the right in relation to the stop rail. Attention: For bevel cuts, (inclined saw head), the moveable stop rail (28) must be fixed in the outer position.
- Page 20 OPERATION MANUAL Mitre Cut 0° - 45° and Turntable 0°-45° (Fig. 1, 2, 6, 9) The crosscut saw can be used to make mitre cuts to the left and right of 0° - 45° in relation to the work face and, at the same time, 0° - 45° to the left or 0° - 45° to the right in relation to the stop rail (double mitre cut).
-
Page 21: Transport
OPERATION MANUAL Changing the Saw Blade (Fig. 11-14) REMOVE THE POWER PLUG Important: Wear safety gloves when changing the saw blade. RISK OF INJURY. Swing up the machine head (5). Loosen the screw (f) of the flange cover so that it is free to move. Swing up the saw blade guard (6) to the point where the recess in the saw blade guard (6) is above the flange bolt (32). -
Page 22: Maintenance
OPERATION MANUAL MAINTENANCE WARNING: Prior to any adjustment, maintenance, or service work, disconnect the mains power plug. General Maintenance Measures Wipe chips and dust off the machine from time to time using a cloth. In order to extend the service life of the tool, oil the rotary parts once monthly. -
Page 23: Parts List
OPERATION MANUAL PARTS LIST www.thetoolshed.co.nz... - Page 24 OPERATION MANUAL www.thetoolshed.co.nz...
- Page 25 OPERATION MANUAL www.thetoolshed.co.nz...
Need help?
Do you have a question about the TSMS09 and is the answer not in the manual?
Questions and answers