Table of Contents
Advertisement
Quick Links
Advertisement
Table of Contents

Related Manuals for Kärcher G 2600 PC


Summary of Contents for Kärcher G 2600 PC
- Page 1 G 2600 PC English Español Français 9.800-499.0 01/10A...
-
Page 2: Table Of Contents
HIGH PRESSURE WASHER OPERATOR MANUAL Owner/User Responsibility Model Overview The owner and/or user must have an under- Important Safety Instructions standing of the manufacturer’s operating instruc- Assembly Instructions tions and warnings before using this pressure Operating Instructions washer. Warning information should be emphasized and Using the Accessories understood. -
Page 3: Model Overview
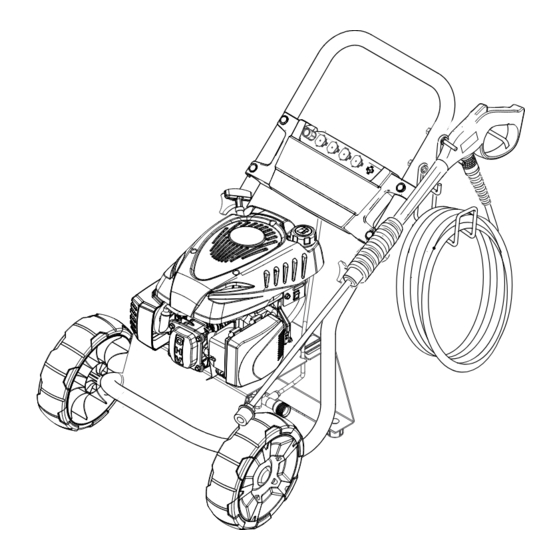
MODEL OVERVIEW 1 Handle 9 Quick connect high pressure outlet 2 Trigger gun 10 Detergent suction tube with filter 3 Trigger gun safety lock 11 Quick connect nozzles 4 High pressure hose 12 Water intel filter 5 Gas tank For engine details see engine manual. 6 Spray wand 7 Dipstick 8 Water inlet with garden hose connector... -
Page 4: Important Safety Instructions
IMPORTANT SAFETY INSTRUCTIONS ■ Read the operating instructions of the engine WARNING manufacturer before start-up and follow the Gun Kicks Back – Hold with both hands. ■ safety instructions carefully. The Trigger Gun Safety Lock prevents the WARNING trigger from accidentally being engaged. When using this product basic precautions should This safety feature DOES NOT lock trigger always be followed, including the... - Page 5 WATER SUPPLY (Cold Water Only) ■ CAUTION Flow rate of water supply must not fall When connecting the water inlet to the water below 2.5 GPM (gallons per minute). ■ supply mains, local regulations of your water Flow rate can be determined by running the company must be observed.
-
Page 6: Assembly Instructions
ASSEMBLY INSTRUCTIONS Assembling STEP 5: STEP 1: Attach the wand to the spray gun. Attach the handle to the frame of the pressure washer. Align holes, insert bolts, and tighten with knobs. STEP 6: Pull the spring-loaded collar of the wand back to STEP 2: insert your choice of quick connect nozzle. - Page 7 STEP 8: Pull back the springloaded collar at the spray gun and insert the high pressure hose. Release the collar and push the high pressure hose until the collar clicks WARNING High pressure in quick connect area. Risk of injury caused by improperly locked high pressure hose.
-
Page 8: Operating Instructions
OPERATING INSTRUCTIONS CAUTION WARNING Engine shipped without oil. Before starting engine, fill High pressure in quick connect area. with oil. Do not over-fill. Do not run the engine with a Risk of injury caused by improperly locked high or low oil level as this can cause engine damage. high pressure hose. -
Page 9: Using The Accessories
USING THE ACCESSORIES Quick connect nozzles The color-coded quick connect nozzles provide a wide array of spray widths from 0° to 65° and are easily accessible when placed in the convenient nozzle holder. 0° spray angle = Red nozzle For particularly stubborn accumulation of grime. Not recommended for soft materials like sid- ings, decks, painted surfaces, cars. -
Page 10: Working With Detergents
WORKING WITH DETERGENTS Detergents can only be applied with the black Kärcher® biodegradable detergents are specially detergent nozzle. formulated to protect the environment and your pressure washer. The special formula won’t clog STEP 1: the suction tube filter and will protect the internal Install the black detergent nozzle for detergent parts of the pressure washer for a longer life. -
Page 11: Taking A Break ..Five Minutes Or More
TAKING A BREAK ..five minutes or more STEP 1: STEP 2: Move the engine stop switch to the OFF position. Release trigger and engage gun safety lock. For engine details see engine manual. SHUTTING DOWN & CLEAN-UP STEP 1: Remove detergent suction tube from container and insert into 1 gallon of fresh water. -
Page 12: Winterizing And Long-Term Storage
WINTERIZING AND LONG-TERM STORAGE 1: Disconnect all water connections. CAUTION Failure to follow the above directions will result in 2: Turn on the machine for a few seconds, until the water which had remained in the pump damage to the pump assembly and accessories and will void the warranty. - Page 13 Cement Patios, Brick and Stone Patio & Lawn Furniture (with or without detergent). Pre-rinse cleaning (with or without detergent). Pre-rinse furniture and surrounding area with fresh water. If using surface with fresh water. If using detergent or Degreaser, apply to surface at low pressure. detergent, apply to surface at low pressure.
-
Page 14: Troubleshooting
TROUBLESHOOTING CAUTION Remove the spark plug cable to prevent ac- cidental ignition of the engine before making any repair. Symptom POSSIBLE CAUSE SOLUTION Engine will not start No gasoline Fill gas tank Choke is not in the correct position. Slide choke lever out to closed position. Water pressure built up in the ma- Squeeze the trigger to release the pressure. - Page 15 Symptom POSSIBLE CAUSE SOLUTION Pump is noisy. Pump is sucking air. Check that hoses and fittings are air tight. Turn off machine and purge pump by squeezing trigger gun until a steady flow of water emerges through the nozzle. Water leaks from Loose fittings.
Need help?
Do you have a question about the G 2600 PC and is the answer not in the manual?
Questions and answers