Table of Contents
Advertisement
Quick Links
Advertisement
Table of Contents

Related Manuals for Kärcher G 2900 X


Summary of Contents for Kärcher G 2900 X
- Page 1 G 2900 X English..2 Español...17 Français...33 8.757-714.0 10/18...
-
Page 2: Model Overview
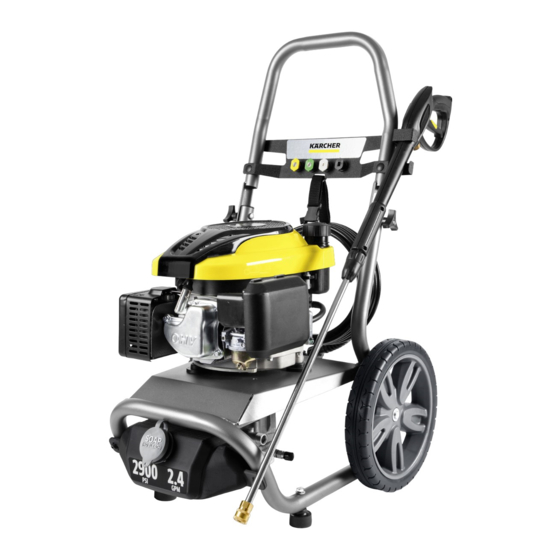
MODEL OVERVIEW Handle Water inlet for garden hose Trigger gun High pressure outlet Trigger gun safety lock Spark plug High pressure hose Water inlet filter Spray wand Detergent tank Quick connect nozzles Engine stop switch Knob Detergent tube connection Gas Tank *For engine details see engine manual. -
Page 3: Specifications
Specifications The owner and/or user must have an understand- ing of the manufacturer’s operating instructions and warnings before using this pressure washer. G 2900 X Warning information should be emphasized and Operating Pressure Max. 2900 PSI understood. If the operator is not fluent in English, Water Volume Max. -
Page 4: Important Safety Instructions
IMPORTANT SAFETY INSTRUCTIONS Do not use acids, solvents, or any alkaline Read the operating instructions of the or flammable material in this product. These engine manufacturer before start-up and products can cause physical injuries to the follow the safety instructions carefully. operator and irreversible damage to the WARNING machine. - Page 5 IMPORTANT SAFETY INSTRUCTIONS WARNING PROP 65 This product and accessories can expose you to chemicals know to the State of California to cause cancer and birth defects or other re- productive harm. For more information about this regulation: www.P65Warnings.ca.gov Wash hands after handling. SAVE THESE INSTRUCTIONS WATER SUPPLY (Cold Water Only) CAUTION...
-
Page 6: Hardware Included
ASSEMBLY INSTRUCTIONS Hardware (included) Description Purpose Illustration Detergent siphon Tank assembly hose Tank Tank assembly Hexagonal ¼" bolt Tank assembly Tank knob Tank assembly Wheel Wheel assembly Spacer ½" Wheel assembly Axle Wheel assembly Cotter pin Wheel assembly Carriage bolts Handle assembly Knob Handle assembly... - Page 7 Assembling Assembling Illustration 1: Illustration 4: Pass the detergent siphon hose (A) under Mount nozzle holder (K) to handle as shown the machine, aligning the detergent fill hole in illustration, align holes, insert ¼” carriage on the detergent tank (B) towards the front of bolts (L) and secure with knob with nut (M).
- Page 8 OPERATING INSTRUCTIONS STEP 1: Be sure the machine is level when checking the oil level. (Refer to the engines operating Pull the spring-loaded collar of the wand back manual for seasonal grades). to insert your choice of quick connect nozzle. We recommend that the oil be changed after the first 5 hours of use, then once every 50 hours.
-
Page 9: Using The Accessories
USING THE ACCESSORIES 40° spray angle = White nozzle Quick connect nozzles For moderate dirt accumulation over a large The color-coded quick connect nozzles provide a surface. wide array of spray widths from 0° to 65° and are easily accessible when placed in the convenient nozzle holder. -
Page 10: Shut Down And Clean-Up
WORKING WITH DETERGENTS Detergents CAUTION CAUTION This unit has been designed for use with cleaning Never use: detergents recommended by the manufacturer. – Bleach, chlorine products or other corrosive The use of other cleaning detergent may affect the chemicals operation of the machine and void the warranty. –... -
Page 11: Winterizing And Long-Term Storage
WINTERIZING AND LONG-TERM STORAGE It is highly recommended to use Kärcher's STEP 6: Pump Guard (part number 9.558-998.0) be- Screw bottle into water inlet on pressure fore winter storage and during the cleaning washer pump and squeeze. season to protect the pump from freezing and premature wear. -
Page 12: House Siding
CLEANING TIPS Deck Cleaning Cement Patios, Brick and Stone (with or without detergent). Pre-rinse deck and (with or without detergent). Pre-rinse clean- surrounding area with fresh water. If using Karcher ing surface with fresh water. If using Karcher Multipurpose Cleaner, apply to surface at low Multipurpose Cleaner, apply to surface at low pressure. -
Page 13: Optional Accessories
CLEANING TIPS Recommendations Optional Accessories Optional accessories are available to further Before cleaning any surface, test spray pa- enhance your cleaning capabilities. These acces- ttern and distance in an inconspicuous area. sories are accurate as of the printing date of this If painted surfaces are peeling or chipping, manual. - Page 14 TROUBLESHOOTING Symptom Cause Solution NO DETERGENT Detergent suction tube not Check connection properly connected to the machine Detergent is too thick Dilute detergent, for best results use Kärcher detergent Filter on detergent suction Run warm water through filter to remove debris tube is clogged Damaged or clogged deter-...
-
Page 15: Warranty Information
WARRANTY INFORMATION High Pressure Washers Limited warranty This Kärcher product is warranted by Kärcher to be free of defects in workmanship and materials under normal use. Specific warranty applies to: • Kärcher KPS and KXS series engines are warranted for three (3) years parts and labor and serviced by a Kärcher service center •... - Page 16 WARRANTY INFORMATION • Damage caused by acts of nature such as floods, fires, earthquakes, lightning strikes, etc. • Devices or accessories not distributed or approved by Kärcher. Any use of such said devices or accessories will void implied warranty. • Repairs made by the end user or any service center not authorized by Kärcher. Any such tampering with Kärcher equipment or accessories will void the implied warranty.
Need help?
Do you have a question about the G 2900 X and is the answer not in the manual?
Questions and answers