
Related Manuals for MEDAP VENTA SP 26


Summary of Contents for MEDAP VENTA SP 26
- Page 1 OPERATING INSTRUCTIONS MEDAP SEPTIC FLUID ASPIRATOR VENTA SP 26 GA 5752 4412 GB 17...
- Page 2 Subject to technical modification! Illustrations and technical specifications may vary slightly from those in these Operating Instructions as a result of ongoing product development. V17 2022-05 GA 5752 4412 GB 17...
-
Page 3: Table Of Contents
1.3.3 Batteries and rechargeable batteries ................... 9 1.3.4 Used electrical devices ........................ 9 Overview ..............................10 1.4.1 VENTA SP 26 N ......................... 10 1.4.2 VENTA SP 26 A .......................... 11 1.4.3 Trolley ............................12 1.4.4 Aspirator holder, universal ......................13 Basic requirements ........................... - Page 4 Table of contents Safety notes ............................19 General safety notes ..........................19 Product safety notes ..........................21 Initial operation ............................23 General ..............................23 Equipment mount interface ........................23 3.2.1 Attaching the septic fluid jar to the equipment mount ..............23 Mounting the hydrophobic bacterial and viral filter ...................
- Page 5 Spare parts ............................... 48 Handling of batteries ..........................48 6.10 Sending in the device ..........................48 Technical specifications ........................49 VENTA SP 26 N ............................49 VENTA SP 26 A ............................50 Approved accessories ........................... 52 General accessories ..........................52 Application sets ............................
-
Page 6: Introduction
Introduction Foreword Introduction Foreword Your facility has selected the leading-edge medical technology made by ATMOS. We sincerely appreciate the trust you have placed in us. How to use these operating instructions These operating instructions are provided to familiarise you with the features of this ATMOS product. -
Page 7: Definitions
Introduction How to use these operating instructions 1.2.3 Definitions 1.2.3.1 Design of safety notes Pictogram Descriptor Text The text for the safety note DANGER! describes the type of risk and Indicates a direct and immediate risk to how to avert it. persons, which may be fatal or result in most serious injury. - Page 8 Introduction How to use these operating instructions Identification Symbols Date of manufacture Country of manufacture: Germany Reference number Unique Device Identifier of a medical device Medical device Serial number Specification of the degree of protection against the ingress of solids and moisture Type B applied part Professional disposal...
-
Page 9: Disposal
Introduction Disposal UDI-Code (01) UDI-DI: Identification of the manufacturer and the device (11) Date of manufacture (13) Packing date (21) Serial number Tab. 4: UDI-Code Disposal WARNING! Infection hazard! The product or some of its components may be contaminated after use. Clean and disinfect the product before disposal. -
Page 10: Overview
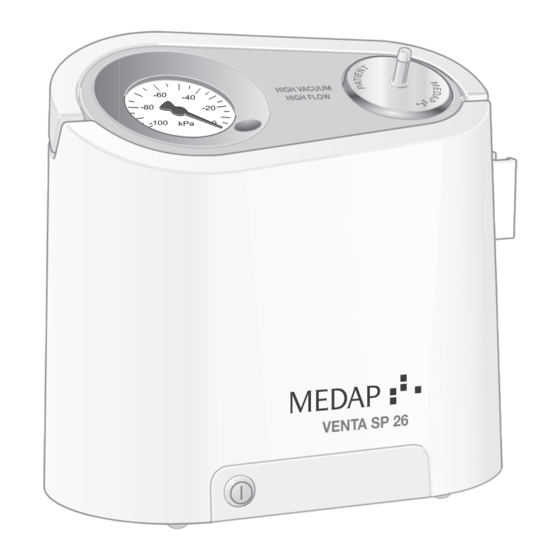
Overview 1.4.1 VENTA SP 26 N -100 Fig. 1: Overview of the VENTA SP 26 N septic fluid aspirator 1 Setting ring vacuum 7 Mains cable 2 Vacuum gauge 8 Hydrophobic bacterial and viral filter 3 Interface for hydrophobic bacterial and viral... -
Page 11: Venta Sp 26 A
Overview 1.4.2 VENTA SP 26 A -100 Fig. 2: Overview of the VENTA SP 26 A septic fluid aspirator 1 On / Off switch 8 Septic fluid jar with equipment carrier and septic fluid jar cap 2 Battery capacity display... -
Page 12: Trolley
Introduction Overview 1.4.3 Trolley Fig. 3: Trolley overview (REF 5752 5345) 1 Locking pin 4 Cable rewind 2 Handle screw 5 Support for catheter tubular 6 Double castors with locking brake 3 Height adjustment tube holder GA 5752 4412 GB 17... -
Page 13: Aspirator Holder, Universal
Introduction Basic requirements 1.4.4 Aspirator holder, universal Fig. 4: Overview of the aspirator holder, universal (REF 5752 5311) 1 Mounting variant A 4 Fastening grip 2 Handle screw 5 Mounting variant B 3 Screws for fastening grip Basic requirements 1.5.1 Use in accordance with the intended purpose Product As per appendix IX of the Medical Products Directive 93/42/EU this product belongs to class IIa. -
Page 14: Applicable Standards
93/42/EEC Directive. 1.5.3 Intended purpose Product name: VENTA SP 26 N VENTA SP 26 A Main functions: Aspiration of secretion, blood, serous fluids, vomit and rinsing fluids along with any contained particles as well as temporary collection... -
Page 15: Interface Description
Introduction Interface description Other contra-indications: • Outside the medical field • In the homecare area • Use directly by the patient or his/her relatives • For aspiration of flammable or explosive liquids Warnings: None The product is: active Sterility / specific microbial Non-sterile device state: Single-use device /... -
Page 16: Septic Fluid Jar Including Septic Fluid Jar Cap
Introduction Interface description Technical specifications: • Shore hardness of 60 • Inner diameter of 6-8 mm • Length: maximum 1.1 m • Vacuum resistant down to -95 kPa (may not collapse). • Prerequisites: • The vacuum connection tube must comply with the hospital's standards for hygiene. •... -
Page 17: Connection Of Equipment Mount
ø 35 mm. Aspirator variants These operating instructions apply to the versions listed below. VENTA SP 26 N septic fluid aspirator / basic equipment (REF 5752 5133) • Mains cable (2 m) • Connection tube 8 x 14 mm (1 m) •... - Page 18 Introduction Aspirator variants VENTA SP 26 N septic fluid aspirator / complete unit (REF 5752 5129) • Mains cable (2 m) • Connection tube 8 x 14 mm (1 m) • Hydrophobic bacterial and viral filter • 1 l septic fluid jar with equipment mount plastic (PSU) •...
-
Page 19: Safety Notes
Safety notes General safety notes Safety notes General safety notes DANGER! Danger to life! Danger due to unauthorised modifications. The product may not be modified. DANGER! Explosion hazard! The equipment is not AP protected. Be sure not to operate the unit inside the AP area. Store product outside the AP-area. - Page 20 Safety notes General safety notes WARNING! Risk of injury to mucous membranes! Endobronchial aspiration in paediatrics and neonatology requires particularly careful limitation of the vacuum. WARNING! Risk of injury! ATMOS products may be used only when fully functional. Check to ensure that the ATMOS product is fully functional and in good working order prior to use.
-
Page 21: Product Safety Notes
Safety notes Product safety notes WARNING! Danger of suffocation and strangulation for children and animals due to accessories! Children and animals could suffocate or be injured by small parts. Persons and animals can be strangled by tubes or mains cables, especially if they are excessively long. - Page 22 Safety notes Product safety notes WARNING! Risk of injury! ATMOS products may be used only when fully functional. Check to ensure that the ATMOS product is fully functional and in good working order prior to use. ATMOS recommends always having another aspirator ready to hand.
-
Page 23: Initial Operation
Initial operation General Initial operation General WARNING! Infection hazard! Contaminated components may endanger the health of the staff and the patients. Ensure the product is prepared as per hygiene standards before using it for the first time. The scope of delivery includes these operating instructions, as well as the individual components in accordance with the ordered product versions [... -
Page 24: Mounting The Hydrophobic Bacterial And Viral Filter
Initial operation Mounting the hydrophobic bacterial and viral filter Mounting the hydrophobic bacterial and viral filter WARNING! Risk of infection due to oversuction! To avoid the ingress of fluids in the aspirator, the hydrophobic bacterial and viral filter must be inserted the correct way. When mounting, ensure that the hydrophobic bacterial and viral filter is always inserted with the lettering pointing upwards. -
Page 25: Connecting Cables
Initial operation Connecting cables Connecting cables 3.5.1 Mains variant NOTE The plug must always be accessible to ensure that the aspirator can be unplugged from the power source at any time. Connecting the mains cable Ensure that the available mains voltage corresponds to the specifications on the type plate. -
Page 26: Mounting Accessories
Initial operation Mounting accessories Mounting accessories 3.6.1 Mounting the aspirator to the trolley Trolleys are available to facilitate moving the aspirator and installing additional accessories. WARNING! Risk of injury! The aspirator and its aspiration sets may only be mounted on the trolley (REF 5752 5345). -
Page 27: Attaching The Catheter Holder (Ref 5750 8002)
Initial operation Mounting accessories Mounting the aspirator Position the aspirator (3) securely on the trolley. The aspirator is positioned over the locating pin (4). Use the handle screw (5) to fix the aspirator on the trolley. Ensure firm seat of the aspirator. Fig. -
Page 28: Catheter Tubular (Ref 5752 5150) Incl. Catheter Tubular Cover (Ref 5752 5151)
Initial operation Mounting accessories 3.6.1.2 Catheter tubular (REF 5752 5150) incl. catheter tubular cover (REF 5752 5151) Insert the catheter tubular into the oblong hole (1) of the trolley. The support (2) of the trolley supports the catheter tubular. Fig. -
Page 29: Mounting The Aspirator To The Aspirator Holder
Initial operation Mounting accessories Attach the septic fluid jar with the equipment mount into the equipment mount holder (1). Position the height of the tube holder (2) so that the septic fluid jar with equipment mount is fitted on the cross-connection of the trolley. - Page 30 Initial operation Mounting accessories Attaching the aspirator holder to the equipment rail Position the aspirator holder (1) on the equipment rail, at an angle from above, and affix it to the equipment rail with the fastening grip (2). Ensure that the aspirator holder is firmly seated.
-
Page 31: Septic Fluid Jar Caps
Initial operation Mounting accessories Mounting the aspirator Place the aspirator (3) on the aspirator holder. Use the handle screw (4) to fix the aspirator to the aspirator holder. Ensure firm seat of the aspirator. Fig. 17: Mounting the aspirator 3.6.3 Septic fluid jar caps NOTE... -
Page 32: Operation
Operation Functional test Operation Functional test Prior to using the system, the operator should check that the product is fully functional and in good condition. NOTE Connecting several septic fluid jars in series can cause delayed suction effect and reduced suction power. Prior to each use, carry out the following functionality checks: •... -
Page 33: Battery Variant
Operation Switching on the aspirator 4.2.2 Battery variant Mains operation Switch on the aspirator (1). All LEDs (2) of the capacity display light up once simultaneously and then one after another. The battery operation display / charging display (3) flashes. -
Page 34: Operating Status Display Of Battery Variant With Battery Operation
Operation Suction 4.2.2.2 Operating status display of battery variant with battery operation The LEDs on the panel indicate the following operational and charging states: Battery capacity display Battery op- Operat- Opera- Voltage eration dis- ing sta- tional play tus dis- status play Recharge-... -
Page 35: Mains Operation
Operation Suction NOTE Monitor the filling level in the septic fluid jar before and after aspiration and, if larger volumes are being extracted, during aspiration. When the maximum filling level is reached, switch off the aspirator and empty the septic fluid jar. NOTE In the event that the hydrophobic bacterial and viral filter has been tripped, switch off the aspirator. -
Page 36: Setting The Vacuum Level
Operation Setting the vacuum level NOTE In order to get full use of the battery's capacity, do not recharge the battery until the red LED at the battery capacity display lights. The built-in battery is a rechargeable lithium-ion battery. The battery is a consumable item. Its service life is approximately 300 charging and discharging cycles. -
Page 37: Completing The Aspiration Process
Operation Completing the aspiration process Connecting the application set Connect the suction tube (1) with the fingertip (2). Connect the extraction catheter (3) with the fingertip. Extraction Use a finger to shut off the shunt air opening (4). Interrupt the extraction process ... -
Page 38: Disassembly
Operation Disassembly NOTE Monitor the filling level in the septic fluid jar before and after aspiration and, if larger volumes are being extracted, during aspiration. When the maximum filling level is reached, switch off the aspirator and empty the septic fluid jar. Disassembly Disassembly ... -
Page 39: Cleaning And Disinfection
Cleaning and disinfection General Cleaning and disinfection General The product must be wipe or spray disinfected after every use. DANGER! Danger to life! Electric shock! Remove the mains plug from the socket before cleaning / disinfection. DANGER! Danger to life! Electric shock! Liquid should never be allowed to enter live parts. -
Page 40: Cleaning
Cleaning and disinfection Cleaning CAUTION! Improper cleaning and disinfection can cause property damage! Use only as much detergent and disinfectant as required. CAUTION! Improper cleaning and disinfection can cause property damage! Perform visual and functional inspections after each cleaning and disinfection process. -
Page 41: Disinfection
Cleaning and disinfection Disinfection Disinfection 5.3.1 General NOTE In the event of product surfaces that are very dirty, carry out an additional cleaning procedure before disinfecting. CAUTION! Material damage due to excessive exposure times! Exceeding the specified exposure time of the disinfectant may damage the surfaces. -
Page 42: Disinfection Procedure
Different disinfection procedures may be used for the various components, depending on the properties of the materials. Components In solu- Wiping tion VENTA SP 26 basic equipment Trolley Catheter holder Septic fluid jar with equipment mount Septic fluid jar cap... -
Page 43: Maintenance
Maintenance General Maintenance General Maintenance, repairs and period tests may only be carried out by persons who have the appropriate technical knowledge and are familiar with the product. To carry out these measures the person must have the necessary test devices and original spare parts. ATMOS recommends: Work should be carried out by an authorised ATMOS service partner. -
Page 44: Period Tests
Maintenance Period tests Period tests At least every 12 months a repeat test of the electrical safety should be performed according to IEC 62353. ATMOS recommends an inspection according to the manufacturer‘s specifications. Malfunctions and troubleshooting Potential malfunctions and the rectification of such are described in the following tables. 6.4.1 General No. -
Page 45: Battery Variant
Maintenance Malfunctions and troubleshooting No. Malfunction Cause Remedy Aspirator functions but Mechanical overflow Check liquid level in the septic fluid does not aspirate protection on the septic jar; empty the septic fluid jar and fluid jar cap is closed clean overflow protection device if (vacuum gauge indicates required. -
Page 46: Replace Mains Fuse
Maintenance Malfunctions and troubleshooting Malfunction Cause Remedy Aspirator does not Leaks in vacuum section Check all septic fluid jar achieve the maximum inside the aspirator components for visible damage. vacuum of - 80 kPa within Check tubes and septic fluid jar cap 20 seconds for proper seating Hydrophobic bacterial and... -
Page 47: Repairs
Maintenance Repairs Repairs NOTE Exclusion of liability! Any and all liability by the manufacturer lapses in case of tampering by unauthor- ised persons. The following may require repairs from the manufacturer or an authorized service partner: • Liquid has penetrated the device. •... -
Page 48: Spare Parts
Maintenance Spare parts Spare parts 5752 5436 Septic fluid jar cap insert (5 pieces) 5752 2096 Float and float cage (10 pieces of each) 5750 3615 Mains cable 2 m 5752 5438 Silicone cones (5 pieces) 5752 5437 Silicone seal ring 5752 5451 Fuses 2 x T 0.63 A/H 250 V (10 units) (mains variant) 5752 5536... -
Page 49: Technical Specifications
Technical specifications VENTA SP 26 N Technical specifications VENTA SP 26 N Input voltage 230 V~; 50 Hz Current consumption max. 400 mA Power consumption max. 92 VA Fuses 2 x T 0.63 A/H; 250 V; 5 x 20 mm Suction power at the device inlet 26 ±... -
Page 50: Venta Sp 26 A
Technical specifications VENTA SP 26 A Dimensions (H x W x D) 275 x 275 x 160 mm Weight 3.7 kg (without canister) Periodic tests Repeat test of the electrical safety every 12 months. Recommended: Inspection according to the manufacturer‘s specifications. - Page 51 Technical specifications VENTA SP 26 A Available canister systems Reusable secretion canister: 1 l PSU 4 l PSU 4 l PC Interfaces for the use of disposable systems: Sound pressure level 50 dB (A) Mode of operation Continuous operation Ω...
-
Page 52: Approved Accessories
Suction tube, silicone, Ø 6 mm, 1 m (minimum order 5 m) 000.0347.0 Fingertip, sterile (minimum order10 pieces) 5752 5345 Trolley for VENTA SP 26 5752 5346 Equipment rail for Trolley VENTA SP 26 5752 5311 VENTA SP Aspirator holder, universal 5750 8002 Catheter holder for trolley 5752 5150... - Page 53 Approved accessories Application sets 5752 5439 AS septic fluid aspiration / portable / PSU / 1 litre 5752 5803 AS septic fluid aspiration / portable / 1 l / ATMOS 5752 4946 AS septic fluid aspiration / portable / 1 l / Serres ®...
-
Page 54: Refer To Emc
Refer to EMC Application sets Refer to EMC WARNING! Medical electrical equipment is subject to special precautions regarding EMC and must be installed in accordance with the EMC information described below. Guidelines and manufacturer's declaration - Ambient conditions The product is designed for operation in the following environments: •... - Page 55 Notes...
- Page 56 Manufacturer: ATMOS MedizinTechnik GmbH & Co. KG Ludwig-Kegel-Str. 16 79853 Lenzkirch DEUTSCHLAND Telefon: +49 7653 689-0 www.atmosmed.com...
Need help?
Do you have a question about the VENTA SP 26 and is the answer not in the manual?
Questions and answers