
Related Manuals for MEDAP BORA UP 2080


Summary of Contents for MEDAP BORA UP 2080
- Page 1 OPERATING INSTRUCTIONS UNIVERSAL ASPIRATOR MEDAP-BORA UP 2080 MEDAP-BORA UP 2080 OP GA 5752 2300 GB 27...
- Page 2 Subject to technical modification! Illustrations and technical specifications may vary slightly from those in these Operating Instructions as a result of ongoing product development. V27 2022-05...
-
Page 3: Table Of Contents
Packing ............................9 1.3.2 ATMOS products .......................... 9 1.3.3 Used electrical devices ........................ 9 Overview ..............................10 1.4.1 BORA UP 2080 OP ........................10 1.4.2 BORA UP 2080 .......................... 11 1.4.3 Trolley ............................12 Basic requirements ........................... 12 1.5.1 Use in accordance with the intended purpose ................12 1.5.2... - Page 4 Tube connection of overflow protection device with septic fluid jar cap (REF 5752 5432) ..32 3.6.6 Tube connection for vacuum shift (REF 5752 2049) ..............32 Foot switch (only for BORA UP 2080 OP) ....................33 Mains cable .............................. 34 Operation ..............................35 Functional test ............................
- Page 5 Sending in the device ..........................52 Technical specifications ........................53 Device ..............................53 Approved accessories ........................... 55 Accessories .............................. 55 BORA UP 2080 complete unit ........................56 Application sets ............................56 Consumables ............................56 Notes on EMC ............................57 GA 5752 2300 GB 27...
-
Page 6: Introduction
Introduction Foreword Introduction Foreword Your facility has selected the leading-edge medical technology made by ATMOS. We sincerely appreciate the trust you have placed in us. How to use these operating instructions These operating instructions are provided to familiarise you with the features of this ATMOS product. -
Page 7: Definitions
Introduction How to use these operating instructions 1.2.3 Definitions 1.2.3.1 Design of safety notes Pictogram Descriptor Text The text for the safety note DANGER! describes the type of risk and Indicates a direct and immediate risk to how to avert it. persons which may be fatal or result in most serious injury. - Page 8 Introduction How to use these operating instructions Identification Symbols Reference number Unique Device Identifier of a medical device Medical device Serial number Specification of the degree of protection against the ingress of solids and moisture Symbol for foot switch --> Stand-by operation. The device can be put into standby mode using the foot switch Professional disposal Fuse...
-
Page 9: Disposal
Introduction Disposal UDI code UDI-DI: Identification of the manufacturer and the device (01) Date of manufacture (11) Packing date (13) Serial number (21) Tab. 4: UDI code Disposal WARNING! Infection hazard! The product or some of its components may be contaminated after use. Clean and disinfect the product before disposal. -
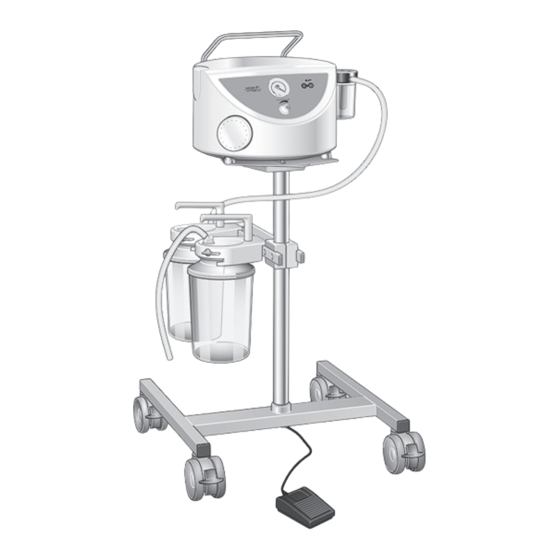
Page 10: Overview
1 1 2 2 1 1 4 4 1 1 4 4 1 1 5 5 1 1 5 5 Fig.1: Overview of BORA UP 2080 OP 1 Aspirator 9 Mains cable 2 Handle 10 Control light foot switch 3 Equipment mount interface... -
Page 11: Bora Up 2080
BORA UP 2080 1 1 1 1 1 1 0 0 1 1 2 2 1 1 3 3 Fig.2: Overview of the BORA UP 2080 1 Aspirator 8 Mains cable 2 Handle 9 ON switch 3 Equipment mount interface... -
Page 12: Trolley
Introduction Basic requirements 1.4.3 Trolley Fig.3: Overview of trolley (REF 5752 5320) 1 Handle screw 3 Double castors with locking brake 2 Equipment rail Basic requirements 1.5.1 Use in accordance with the intended purpose Product As per Annex IX to the Medical Devices Directive 93/42/EEC, this product belongs to class IIa. In accordance with this directive, the product may only be used by persons who have been instructed how to use this product by an authorised person. -
Page 13: Applicable Standards
Directive 93/42/EEC. 1.5.3 Intended purpose Product name: BORA UP 2080 BORA UP 2080 OP Main functions: Aspiration of secretion, blood, serous fluids, vomit and rinsing fluids along with any contained particles as well as temporary collection of these fluids. Intended use: Drainage and temporary collection of body fluids. -
Page 14: Bora Variants
• Tube adapter • Filter papers (10 pieces) • Two caps for covering the mechanical connections BORA UP 2080 OP basic equipment 230 V AC (REF 5752 2301) • Mains cable 4 m • Tube adapter • Filter papers (10 pieces) •... -
Page 15: Interface Description
Introduction Basic requirements BORA UP 2080 OP basic equipment 115 V AC (REF 5752 2303) • Mains cable 4 m • Tube adapter • Filter papers (10 pieces) • Two caps for covering the mechanical connections • Pneumatic foot switch 1.5.4... -
Page 16: Septic Fluid Jar Including Septic Fluid Jar Cap
Introduction Basic requirements 1.5.4.3 Septic fluid jar including septic fluid jar cap The septic fluid jar is used to collect the septic fluids extracted. Technical specifications: • Vacuum resistant down to −95 kPa (must not collapse) Prerequisites: • Must be equipped with an overflow protection device or must be connected to an external overflow protection system. -
Page 17: Connection Of Equipment Mount
Introduction Basic requirements 1.5.4.6 Connection of equipment mount The equipment mount interface is used to mount a rinsing fluid jar or septic fluid jar, or a holder for rinsing fluid jars or septic fluid jar, or an overflow protection with equipment mount. Prerequisites: •... -
Page 18: Safety Notes
Safety notes General safety notes Safety notes General safety notes DANGER! Danger to life! For open heart operations and those to the central nervous system, there may be equipotential bonding between the user and the patient. The product may not be used with components for aspiration that are metal and conductive. - Page 19 Safety notes General safety notes DANGER! Infection hazard! The bacterial filter paper provides additional protection against contamination of the ambient air. Do not operate the aspirator without a bacterial filter paper. WARNING! Risk of injury! ATMOS products may be used only when fully functional. Check to ensure that the ATMOS product is fully functional and in good working order prior to use.
-
Page 20: Product Safety Notes
Safety notes Product safety notes WARNING! Risk of suffocation and strangulation for children and animals through accessory parts! Children and animals could suffocate or be injured by small parts. Hoses or power cables may strangle people or animals, especially if the hoses or cables are particularly long. - Page 21 Safety notes Product safety notes CAUTION! Property damage due to foaming! Foam may be created when extracting secretion. Foam is detrimental to the functioning of the mechanical overflow protection. This gives rise to the risk of secretions entering and damaging the aspirator. Always use a hydrophobic bacterial and viral filter and a commercially available foam inhibitor.
-
Page 22: Initial Operation
Initial operation General Initial operation General WARNING! Infection hazard! Contaminated components may endanger the health of staff and patients. Ensure the product is prepared as per hygiene standards before using it for the first time. NOTE Various septic fluid jar caps may be used. Refer to the respective manufacturer's instructions for information on the mounting procedure. -
Page 23: Aspirator On Trolley
Initial operation Variations in use 3.2.2 Aspirator on trolley A trolley is available to make it easier to transport the aspirator and to mount additional accessories. Locking the castor brakes Lock the brakes (2) of the castors on the trolley (1). -
Page 24: Inserting The Catheter Holder (Ref 5750 8002)
Initial operation Variations in use 3.2.2.1 Inserting the catheter holder (REF 5750 8002) NOTE The catheter holder can only be mounted if the aspirator is not mounted on the trolley. To secure the catheter holder, remove the aspirator from the trolley. ... -
Page 25: Overflow Protection Device
Initial operation Overflow protection device Overflow protection device NOTE If the float is not correctly seated in the overflow protection device, or no float is used, liquid may exit in the event of oversuction. NOTE It is not necessary to use a hydrophobic bacterial and viral filter if a hydrophobic bacterial and viral filter is integrated in the septic fluid jar of a disposable extraction system. -
Page 26: Mounting The Hydrophobic Bacterial And Viral Filter
Initial operation Overflow protection device 3.3.1.1 Mounting the hydrophobic bacterial and viral filter NOTE When mounting the aspirator to an equipment rail, attach a tube with an 8 mm inner diameter (e.g. REF 5750 5483) using the tube adapter (REF 5752 2295) between the hydrophobic bacterial and viral filter (1) and the opening (2) on the back of the aspirator in order to prevent the hydrophobic filter from colliding with the wall / equipment rail. -
Page 27: Mounting Septic Fluid Jar Caps With Integrated Overflow Protection
Initial operation Rail clamp mounting point 3.3.3 Mounting septic fluid jar caps with integrated overflow protection NOTE When mounting the aspirator to an equipment rail, attach a tube with an 8 mm internal diameter (e.g. REF 5750 5483) using the tube adapter (REF 5752 2295) between the hydrophobic bacterial and viral filter (1) and the opening (2) on the back of the aspirator in order to prevent the hydrophobic filter from colliding with the wall/equipment rail. -
Page 28: Mounting The Vacuum Shift To The Rail Clamp
Initial operation Equipment mount interface 3.4.1 Mounting the vacuum shift to the rail clamp The vacuum shift is used to switch between two septic fluid jars. Mounting the switch valve Attaching the rail clamp [ Page 27]. Attach equipment mount (1) of switch valve to rail clamp (2). -
Page 29: Mounting The Septic Fluid Jar
Initial operation Mounting the tubes 3.5.1 Mounting the septic fluid jar Mounting of the tubes is described using the septic fluid jar (REF 5752 5431) as an example. Removing the cap Pull off cap (1) upwards. Connection of equipment mount is ready for use. -
Page 30: Tube Connection Hydrophobic Bacterial And Viral Filter (Ref 5752 4514) With Atmos Disposable Aspiration System
Initial operation Mounting the tubes 3.6.1 Tube connection hydrophobic bacterial and viral filter (REF 5752 4514) with ATMOS disposable aspiration system Attach the connection tube (1) to the hydrophobic bacterial and viral filter (REF 5752 4514) (2). Attach the other end of the connection tube (1) onto the L-connector of the ATMOS external canister (3). -
Page 31: Tube Connections Of Surgical Overflow Protection
Initial operation Mounting the tubes 3.6.3 Tube connections of surgical overflow protection Attach the tube adapter (1) to the connection tube (2). Insert the tube adapter into the opening (3) on the back of the aspirator. Attach the other end of the connection tube to the surgical overflow protection (4). -
Page 32: Tube Connection Of Overflow Protection Device With Septic Fluid Jar Cap (Ref 5752 5432)
Initial operation Mounting the tubes 3.6.5 Tube connection of overflow protection device with septic fluid jar cap (REF 5752 5432) Mounting is described using the universal overflow protection as an example. Attach the tube adapter (1) to the connection tube (2). ... -
Page 33: Foot Switch (Only For Bora Up 2080 Op)
Initial operation Foot switch (only for BORA UP 2080 OP) Attach the connection tube (1) to the right tube connector (4) of the vacuum shift. Attach the other end of the connection tube onto the middle of the left septic fluid jar cap (5). -
Page 34: Mains Cable
Initial operation Mains cable Mains cable Connecting the mains cable Check to ensure that the mains voltage is identical to the specifications given on the type plate (1). Plug the mains cable (2) into the equipment socket (3) and connect to the mains socket. Fig.24: Connecting the mains cable GA 5752 2300 GB 27... -
Page 35: Operation
Operation Functional test Operation Functional test NOTE Connecting several septic fluid jars in series can cause delayed suction effect and reduced suction power. Prior to each use, carry out the following functionality checks: • All components are properly attached. • The mains cable is undamaged. •... -
Page 36: Switching On The Aspirator
Operation Suction NOTE In the event that the overflow protection device has been tripped, switch off the aspirator. Empty and clean or replace all parts. NOTE Replace the hydrophobic bacterial and viral filter immediately if it is discoloured, contaminated or oversucked. Furthermore, the filter must be exchanged if the vacuum displayed is above −0.3 bar / 30 kPa when the vacuum controller is in the ‘max’... -
Page 37: Setting The Vacuum Level
Read the value on the vacuum gauge (2). Fig.26: Setting the vacuum level 4.2.3 Foot switch (only for BORA UP 2080 OP) Operate the foot switch. Aspirator is set to stand-by mode. Yellow light emitting diode (1) is illuminated. -
Page 38: Setting The Vacuum Shift
Operation Utensil 4.2.4 Setting the vacuum shift The vacuum shift can be set in four different ways • Arrow (1) on the rotary switch (2) of the vacuum shift points to the right side: The aspirated secretion will be conducted into the septic fluid jar on the right. -
Page 39: Replacing The Bacterial Filter Paper
Operation Replacing the bacterial filter paper Replacing the bacterial filter paper WARNING! Infection hazard! Any and all the parts of the product could be contaminated. Wear gloves and be absolutely sure to follow the hygiene rules during all cleaning and reconditioning work. NOTE Using the aspirator requires daily replacement of the bacterial filter paper. -
Page 40: Taking The Unit Out Of Operation
Taking the unit out of operation Completing the aspiration process Taking the unit out of operation Completing the aspiration process Remove the tube from the patient. Switch off the aspirator. Empty the septic fluid jar. Clean the components. Emptying the septic fluid jar DANGER! Infection hazard! -
Page 41: Disassembly
Taking the unit out of operation Disassembly Disassembly 5.3.1 Detaching tubes The disassembly of the tubes is described using the septic fluid jar cap (REF 5750 5362) as an example. Remove the suction tube (2) from the chromed tube connector on the patient side. - Page 42 Taking the unit out of operation Disassembly Surgical overflow protection Remove the lid (1) from filter housing by lifting upwards. Remove the bacterial filter (2). Unscrew the lid of the overflow protection device (3). Detach float cage (4) and remove the float (5).
-
Page 43: Cleaning And Disinfection
Cleaning and disinfection General Cleaning and disinfection General All the components in the aspirator which come into contact with septic fluid must be cleaned and disinfected after each use. DANGER! Danger to life! Electric shock! Remove the mains plug from the socket before cleaning / disinfection. DANGER! Danger to life! Electric shock! -
Page 44: Cleaning
Cleaning and disinfection Cleaning CAUTION! Improper cleaning and disinfection can cause property damage! Use only as much detergent and disinfectant as required. CAUTION! Improper cleaning and disinfection can cause property damage! Perform visual and functional inspections after each cleaning and disinfection process. -
Page 45: Cleaning Procedure
Cleaning and disinfection Disinfection CAUTION! Improper cleaning can cause property damage! Do not spray cleaning agent directly into the joints or gaps and never use a high- pressure cleaning unit! 6.2.2 Cleaning procedure Use the correct dose of multi-purpose detergent with water for the degree of surface contamination and in accordance with the instructions of the detergent manufacturer. -
Page 46: Suitable Disinfectants
Cleaning and disinfection Disinfection 6.3.2 Suitable disinfectants Only surface disinfectants based on the following combinations of active ingredients may be used for disinfection: • Aldehydes • Quaternary ammonium compounds • Guanidine derivatives Ingredient group Active ingredients Aldehydes 2-ethyl-1-hexanal, formaldehyde, glutardialdehyde, glyoxal, o-phthaldialdehyde, succinaldehyde Quaternary ammonium Alkyl-didecyl-polyoxethyl ammonium propionate, alkyl-dimethyl-... - Page 47 Cleaning and disinfection Disinfection Components In solution Wipe, spray disinfection Aspirator basic equipment Trolley Catheter holder Mains cable Foot switch Cap to cover the Only spray disinfection equipment mount interface Bacterial filter cap Float / float cage Suction tube / connection tube Tube adapter Housing of overflow...
-
Page 48: Maintenance
Maintenance General Maintenance General Maintenance, repairs and period tests may only be carried out by persons who have the appropriate technical knowledge and are familiar with the product. To carry out these measures, the person must have the necessary test devices and original spare parts. ATMOS recommends: Work should be carried out by an authorised ATMOS service partner. - Page 49 Maintenance Malfunctions and troubleshooting Malfunction Cause Remedy Equipment cannot be The electronics are defective. Have the equipment switched on and off. repaired by a service technician authorised by ATMOS. Aspirator operates but LED on the operating status Have the equipment operating status display is display is defective.
-
Page 50: Replace Mains Fuse
Maintenance Malfunctions and troubleshooting Malfunction Cause Remedy Aspirator has been exposed No mechanical overflow Aspirator may no longer be to oversuction. protection device and no used. Have the equipment hydrophobic bacterial filter repaired by a service installed. technician authorised by ATMOS. -
Page 51: Repairs
Maintenance Repairs Remove the fuse carriers (1). Remove the fuses (2) from the fuse carriers. Insert new fuses. Insert fuse holders and screw closed. Fig.35: Replacing fuses Repairs The following issues may require repairs by the manufacturer or an authorised service partner: •... -
Page 52: Type Plate Position
Maintenance Type plate position Type plate position Position of the type plate (1) on the product. Fig.36: Type plate Service hotline: +49 7653 689-0 Spare parts 5752 4982 Foot switch 5752 3082 Repair set, bacterial filter cap 5750 5384 Regulating knob 5750 3609 Mains cable 4.0 m 5752 3203... -
Page 53: Technical Specifications
Technical specifications Device Technical specifications Device Input voltage 230 V~ ± 10%; 50/60 Hz Special voltage: 115 V~ ± 10 %; 60 Hz Current consumption max. 0.4 A (at 230 V~, 50/60 Hz) max. 0.7 A (at 115 V~, 60 Hz) Power consumption 100 VA Fuses... - Page 54 Technical specifcations Device Environmental conditions: Operation • Temperature range +15...+40 °C • Air humidity without condensation 30...75 % • Air pressure 700...1060 hPa Maximum operating altitude 2,000 m Contamination level Overvoltage category Dimensions (H x W x D) • with handle 360 x 310 x 310 mm •...
-
Page 55: Approved Accessories
Approved accessories Accessories Approved accessories The following accessories are not part of the scope of delivery and must be ordered separately. Accessories 5752 2391 Overflow protection device with equipment mount and jar PSU 5752 2392 Overflow protection device with chamber for hydrophobic bacterial and viral filter 5752 4514 Hydrophobic filter (for AS universal overflow protection) -
Page 56: Bora Up 2080 Complete Unit
BORA UP 2080 OP / surgical aspiration / mobile / 2 x 3 l 5752 5673 BORA UP 2080 OP / surgical aspiration / mobile / 2 x 4 l/ PSU 5752 5674 BORA UP 2080 OP / surgical aspiration / mobile / 2 x 4 l/ PC Tab. -
Page 57: Notes On Emc
Notes on EMC Consumables Notes on EMC WARNING! Medical electrical equipment is subject to special precautions with regard to EMC and must be installed according to the following EMC notes. Guidance and manufacturer's declaration – ambient conditions The product is suitable for use in the following environments: •... - Page 58 Notes on EMC Consumables Notes GA 5752 2300 GB 27...
- Page 59 Notes on EMC Consumables Notes GA 5752 2300 GB 27...
- Page 60 Manufacturer: ATMOS MedizinTechnik GmbH & Co. KG Ludwig-Kegel-Str. 16 79853 Lenzkirch GERMANY Phone: +49 7653 689-0 www.atmosmed.com...
Need help?
Do you have a question about the BORA UP 2080 and is the answer not in the manual?
Questions and answers