
Related Manuals for Kett HB-610


Summary of Contents for Kett HB-610
- Page 1 Grain Moisture Tester HB-610 Operating Manual Thank you for purchasing this product. Please read the operating manual carefully and use this product properly.
- Page 2 Safety Precautions If the safety precautions for the Grain Moisture Tester are not observed, injuries or damage to property may result. While the safety of the product has been given considerable attention, please read the precautions in the operating manual and use the instrument properly. •...
-
Page 4: Table Of Contents
CONTENTS 1. Features ....................7 2. Specifications ..................8 3. Calibration Curve List ................9 4. Part Names ..................10 5. Display ....................11 6. Description of Keypad ................. 12 7. Directions .................... 13 7-1. Before Measurement ..............13 7-2. Measurement Method ..............14 7-3. - Page 5 7-10-1. Inputting a company name ......... 26 7-10-2. Displaying company name ...........28 7-10-3. Deleting company name ..........28 8. Preparing a Calibration Curve ............29 8-1. What is a Calibration Curve? ............ 29 8-2. Precautions when Preparing a Calibration Curve ....30 8-3.
-
Page 7: Features
1. Features This unit is a grain moisture tester that applies electric resistance of an object to be measured. Only putting the bar sensor into bag displays their moisture content (%). This moisture tester needs only simple operation for quick measurement without selecting an operator or measurement environment. -
Page 8: Specifications
2. Specifications Measurement Principle : Electrical resistance Applications : Raw cashew nut / Cashew kernel / Cashew kernel testa Calibration Curves : See 3."Calibration Curve List" Measurement Range : See 3."Calibration Curve List" Accuracy : See 3."Calibration Curve List" Standard Method : See 3."Calibration Curve List"... -
Page 9: Calibration Curve List
3. Calibration Curve List Applications Calibration Method Measuring Accuracy* Standard method curve name range Raw cashew (in a bag) 7 - 35% 1.5% ISO665 Raw cashew (in a bucket) Bucket 7 - 35% 2.5% ISO665 UNECE STANDARD Cashew kernel 3 - 11% 0.8% DDP-17 UNECE STANDARD... -
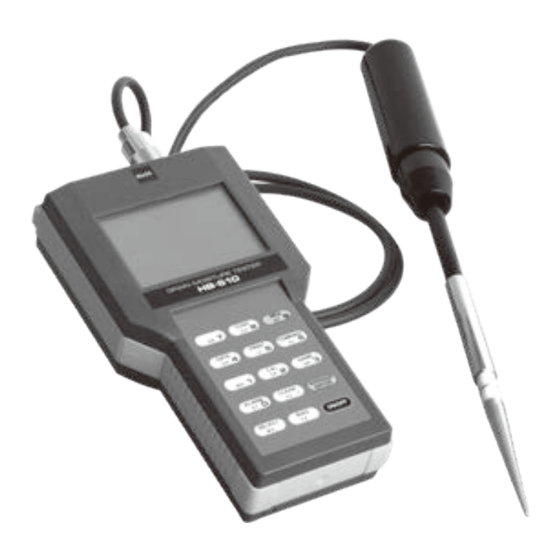
Page 10: Part Names
4. Part Names Main unit <Accessories sensor> Connector Display Bar sensor (UB-1000) <Accessories> Control panel Shoulder strap 1.5 V battery (AA) (6) Battery cover (back) Carrying case Operating manual... -
Page 11: Display
5. Display Description of display Item No. Name of display area Description Calibration curve number display Displays the number of the calibration curve being used. Battery indicator Comes on when battery is depleted. Measuring times Displays the number of times measured. Displays the calibration curve name or the set calibration Name of calibration curve curve name. -
Page 12: Description Of Keypad
6. Description of Keypad * The AB to YZ keys are used for inputting alphabetical characters (name of calibration curve). * Of the numeric keys of 0 to 9, some combine numerical input and other functions. Function Used to turn power On and Off. Used for moisture value bias compensation. -
Page 13: Directions
7. Directions 7-1. Before Measuring (1) The unit is powered by six 1.5 V batteries (A A , alkaline). (2)Tighten the lock ring Remove the rear battery cover, and place the batteries into the compartment taking care to correctly orient the positive negative terminals. -
Page 14: Measurement Method
7-2. Measurement Method (1) Press the key to turn on the power. All elements of the LCD will be displayed for about 3 seconds. Subsequently, the "calibration curve number," "TIMES," and "%" will be displayed. * At this time, if the display shows something other than that described above, there may be a problem with the unit. - Page 15 (3) Measure the sample according to the method for each application. Measurement errors may occur if the method is not correct. <Bag> Slowly insert the bar sensor completely from the side of the bag. <Bucket> Put the sample in a bucket with a depth of 20 cm or more, and insert the bar sensor from the top.
- Page 16 (4) Press the key, and the decimal point will start to blink. After approximately 3 seconds, the buzzer will sound with a "beep", and the "number of measurement times," the "moisture value," and the "bar graph" will be displayed. * The bar graph will display up to 50% full scale in 2% increments. * "HI"...
-
Page 17: Displaying The Average Value
7-3. Displaying the Average Value When the number of measurements is from 2 to 9, and you press , the “AVE”, “average value”, and “measurement number” will be displayed. At this time, the “AVE”, “average value”, and “measurement number” remain displayed, but if you proceed to make a measurement, the “measurement number”... -
Page 18: Setting The Measurement Mode
7-4. Setting the Measurement Mode There are two measurement modes: "Normal measurement mode" and "Continuous measurement mode." After pressing the key and turning on the power, the unit will be set to "Normal measurement mode." If the unit is set to "Continuous measurement mode," measurements can be made without pressing the key for each measurement. -
Page 19: How To Make Bias (Offset) Adjustment
7-5. How to Make a Moisture Value Bias (offset) Adjustment The calibration curves (scale) for this unit were prepared by determining the relationship between the moisture of sample resulting from a drying method and the electrical resistance of the sample, and then statistically processing these results. -
Page 20: Setting The Alarm
7-6. Setting the Alarm An upper limit moisture alarm can be set. When paper having higher moisture than the set value is measured, the alarm will sound with a beeping tone. (1) Press the key. The numbers to the right of "ALARM" will blink. (2) Enter the alarm value. -
Page 21: Printer Output
7-7. Printer Output Measured values can be printed out by using the optional printer <Printout example> (VZ-390). The output content is "time and date," "calibration Ex) Channel No.01/ Company : ABC curve number," "number of measurement times," "moisture value," "average moisture value," and "company name (if any)". (1) Set up Press the key in normal measurement mode. -
Page 22: Data Storage
7-8. Data Storage Up to 250 measurement values are stored automatically. The contents of the data are “data number”, “year/month/day”, “time”, company name (if any), “calibration curve number”, and “moisture value”. * If the number of stored data items exceeds 250, the oldest data item is deleted and the new data item is added. -
Page 23: Date And Time Display
(3) Batch erasure of stored data Press the keys in the order of A tone sounds and “0” will be displayed for the measurement number. Next, the display for moisture changes from 0 000. The original display will return after approximately 15 seconds. (4) Displaying the number of data Press the keys in the order of to display the... - Page 24 The following procedure sets the western calendar date and time. <Example> 23 January 2023, 4:56 * In the operation below, to confirm the input number, press the key. If you make a mistake when pressing an input number key, press key.
- Page 25 (3) Entering the time (in this case, 4:56) After the input of Step (2) is completed, the screen at the right will be displayed. First, enter 04 for the hour by pressing keys in the order of Next, enter 56 for the minutes by pressing keys in the order of * When the hour and the minutes are 1-digit numbers, enter a leading "0".
-
Page 26: Inputting A Company Name
7-10-1.Inputting a company name A 3 letter (alphabetical character) company name can be entered for the unit. Only one company name can be set for the instrument at a time. Therefore, it cannot be set for each calibration curve. <Example> Entering the company name "ABC"... - Page 27 3. Entering "B". Press the key, and the display will change from "A_ _" to "AA". Press the key one more time, and the display will change from "AA" to "AB". Press the key, and the display will change from "AB" to "AB_ _". 4.
-
Page 28: Displaying Company Name
7-10-2.Displaying company name Press the keys in the order of to display the company name that is set for the instrument. It is displayed for 2 seconds. Meanwhile, the calibration number will disappear. 7-10-3.Deleting company name Press the keys in the order of delete the company name. -
Page 29: Preparing A Calibration Curve
These may be expressed as an equation, a graph, a table, or some other form. Calibration curves for the HB-610 show the relationship between the electrical resistance value for grain measured using a bar sensor and the moisture value determined by a standard method. -
Page 30: Precautions When Preparing A Calibration Curve
8-2. Precautions when Preparing a Calibration Curve * Prepare the calibration cur ve with the same method as when m e a s u r i n g t h e s a m p l e . I f t h e m e t h o d i s d i f f e r e n t , a c c u r a te measurements cannot be made. -
Page 31: How To Prepare A Calibration Curve
<When measuring 5 sample points> ◆ Measurement at point 1 (1) Preparing samples. Prepare 2 to 5 samples having different HB-610 count value moisture levels. At this time, prepare samples including the Sample upper and lower bounds of the moisture values you actually... -
Page 32: Inputting A Calibration Curve
◆ Calibration curve name ◆ Sample name "Calibration Curve Preparation Table" on p. 40.) ◆ Sensor name * When preparing the table, put the moisture values from the HB-610 in ◆ Measurement temperature : the ascending order. HB-610#20 Moisture value per... - Page 33 (1) Press the key to turn on the power. All elements of the LCD will be displayed for about 3 seconds. Subsequently, the "calibration curve number," "TIMES," and "%" will be displayed. (2) Select the calibration curve number Press the key, and the calibration curve number will start blinking.
- Page 34 When the key is pressed, the display will change from "HB6" to "STD" to confirm the entry. * Enter the "HB-610 count value" when "HB6" is displayed, and enter the "standard method moisture value" when "STD" is displayed. <Procedure 2>...
- Page 35 (count value = 999, moisture value = 99.9). For example, when preparing a 2-point sample calibration curve, enter the upper limit values (HB-610 = 999, standard method = 99.9) for all of the measurement values for [Sample 3 ] to [Sample 5 ].
-
Page 36: Inputting A Name For The Calibration Curve
8-5. Inputting a Name for the Calibration Curve A 3 letter (alphabetical character) calibration curve name can be entered for the unit's user calibration curves. <Example> Entering the name "ABC" for calibration curve number 22. (1) Selecting the calibration curve number Press the key, and the calibration curve number will start blinking. - Page 37 3. Entering "B". Press the key, and the display will change from "A_ _" to "AA". Press the key one more time, and the display will change from "AA" to "AB". Press the key, and the display will change from "AB" to "AB_ _". 4.
-
Page 38: Display Of The Input Moisture Value When Preparing A Calibration Curve
* At this time, if there is an interval greater than 3 seconds between the pressing of each key, the curve number cannot be set. The HB-610 count value for "Sample 1 " is displayed. "HB6" is shown on the display. -
Page 39: Erasing A Calibration Curve
8-7. Erasing a Calibration Curve (1) First, enter the calibration curve number you want to erase by pressing the key. (2) Successively press keys in the order of . The buzzer will sound, and all the LCD elements will be displayed for approximately 3 seconds. Afterwards, the "Calibration curve number,"... - Page 40 ◆ Calibration curve number ◆ Calibration curve name ◆ Sample name ◆ Sensor name ◆ Measurement temperature Moisture value per a HB-610#20 count value standard method Sample 1 Sample 2 Sample 3 Sample 4 Sample 5...
-
Page 41: Error Display
9. Error Display When there is a problem with the unit or with the measurement conditions, the following errors will be displayed for 4 seconds, and then the power will turn off. (1) There is a problem with the temperature sensor. Servicing is required. - Page 42 (3) The measurement cannot be made because the temperature of the unit is below -5°C. Bring the temperature of the unit up to the operating temperature range (0 to 40°C), and make the measurement again. (4) The measurement cannot be made because the temperature of the unit is above 50°C.
- Page 44 Caution ● It is strictly prohibited to transfer part or all of this manual without permission. ● The contents of this manual are subject to change without notice. ● The appearances, screens, etc. of the product and accessories displayed on this manual may differ from the actual ones, however, operations and functions are not affected. ● All efforts have been made to ensure the contents of this manual are accurate. However, if you notice any part to be unclear, incorrect, omitted, or the like in this manual, please contact us. 1-8-1 Minami-Magome, Ota-ku, Tokyo 143-8507, JAPAN ● Be aware that we are not liable for the effects resulting from opera- +81-3-3776-1121 +81-3-3772-3001 tions according to this manual regardless of the items above. https://www.kett.co.jp/english/ overseas@kett.co.jp 060468...
Need help?
Do you have a question about the HB-610 and is the answer not in the manual?
Questions and answers