
Related Manuals for Kett HB-300


Summary of Contents for Kett HB-300
- Page 1 Universal Moisture Tester HB-300 Operating Manual Thank you for purchasing this product. Please read the operating manual carefully and use this product properly.
-
Page 3: Table Of Contents
Contents 1. Universal Moisture Tester HB-300 ........................4 2. Features ................................5 3. Specifications ..............................6 4. Nomenclature ..............................7 5. Display screen ..............................8 6. Operation panel keys ............................9 7. Flow chart for measurement ......................... 10 8. Preparation for measurement ........................11 9. -
Page 4: Universal Moisture Tester Hb-300
HB-300 can measure the moisture of many kinds of samples in various conditions and shapes such as solid, powder, grains, paste, sheet, etc. You can make the calibration for your samples relatively easily and register it to the tester. -
Page 5: Features
2. Features l By setting an unique calibration for each material, as required, the HB-300 can measure various kinds of materials. l Easy operations to make calibrations. l Up to 10 calibrations can be registered in the instrument l Standard probe for constant pressure measurement is included. Many other optional probes are available. -
Page 6: Specifications
3. Specifications Measurement method : Electric resistance method Measurement subjects : Solid, powder, grain, paste or sheet materials except samples containing electrolyte Indicating range : 1 ~ 99% Measurement range : Electric resistance.... 10KΩ ~ 900MΩ Water content value..Depends on the sample Measurement accuracy : Depends on the sample Display... -
Page 7: Nomenclature
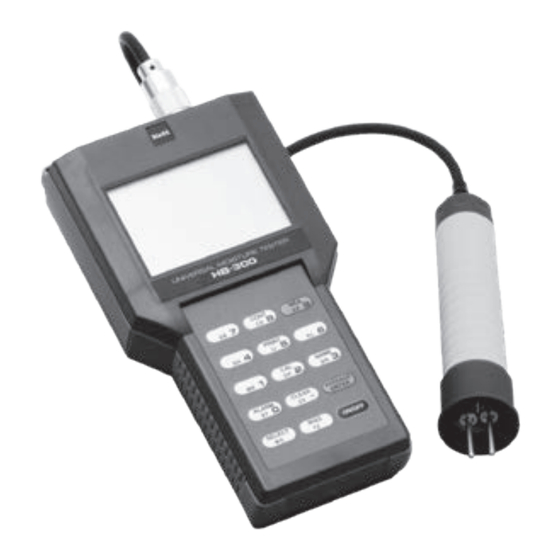
4. Nomenclature [Instrument body] [Accessory] Connector Display screen 1.5 V batteries (AA alkaline) x 6 Standard probe Standard probe Operation panel Shoulder strap Carrying case Battery compartment cover Fanction mode list Operating manual... -
Page 8: Display Screen
5. Display screen *C display (On/Off) Calibration number Alarm Setting Moisture value Battery information Measurement times Bar graph • C of "C display" stands for Calibration. (Refer to Page 23, procedure e .) -
Page 9: Operation Panel Keys
6. Operation panel keys • 0~9 keys for entering numerical values. Some numeric keys have other functions as well. Function To turn the power on /off. To apply bias correction. [Operation panel] To select calibration #. To calculate average. To enter the numerical values on display. To clear miss types. To set the upper alarm. To set the calibration. To measure the sample. -
Page 10: Flow Chart For Measurement
7. Flow chart for measurement Calibration has Select Calibration # been set Proceed to Page 11 "8 Preparation for measurement" and Page 25 "10. How to measure" Calibration not set Produce calibration Register Proceed to Page 11 "8 Preparation for measurement" and Page 13 "9. How to make the calibration" Criterion calibration Select Calibration Measurement curve # 00... -
Page 11: Preparation For Measurement
8. Preparation for measurement Install the six AA batteries in the battery compartment on the back of the instrument: Remove the battery compartment cover and install the batteries. Take care not to reverse the polarity ( & ) of the batteries. Replace the cover. • When the batteries are worn, will blink on the display screen. - Page 12 Firmly connect the probe connector to the instrument body and turn the lock ring. 2 Insert firmly. 1 Turn the lock ring. Fig.2 Prepare the sample to be measured, leave it to allow the sample temperature to even and equalize with the instrument's temperature.
-
Page 13: How To Make The Calibration
[Calibration sample] can be displayed in a form of numerical expression, graph, list and etc. The criterion calibration set in HB-300 is a numeric expression of correlation of moisture and electric resistance. It was obtained by measuring electric resistance of a timber with a 4needle probe and its actual moisture measured by the drying process. -
Page 14: How To Produce The Calibration Curve
9-2. How to produce the calibration curve • Use the same probe that will be used to measure the sample later. Do not change the setting of "Constant" or "Fix" if using the standard probe. Using different probes or different ways of measurement such as angle of the probe and depth may affect accuracy. • While making a calibration, tr y to make the environment of measurement as equal as possible to the environment at the site where you will be using the instrument later. Especially difference of temperature will affect accuracy. • It is necessary to make multiple calibrations and register them respectively if seasonal temperature changes of the sample are expected. - Page 15 [Example: Measuring 5 samples] Measure the samples with the criterion calibration of HB- u Measurement 1 300 (in #00). Also measure the actual moisture value of HB-300 measurement the same samples with the standard method or the drying 7.3% process using Infrared Moisture Determination Balance.
-
Page 16: How To Enter The Calibration (Measuring 5 Samples)
Make a note of the measurement result acquired with the u Calibration # criteria calibration (#00) as shown in Table 1 on the right. u Sample name Use a photocopy of the table format on the last page of this manual. HB-300 results Actual moisture (with #00 content • Fill in the list starting from the smaller results first. calibration) - Page 17 Step Display Description Press the key to turn the power on. The LCD will blink for about 3 seconds. Displays [Calibration #], [TIMES] and [%] [Select for calibration #] Press the key to enter calibration # selection m o de. T he c a lib r ati o n # will blink . Ente r “02” fo r instance.
- Page 18 07.3% for instance. Press the key, the display will change to [STD] from [HB3]. • [HB3] stands for HB-300 measurement result and [STD] for standard method process result to enter. Pr e s s t h e a n d key to enter 05.4% for instance.
- Page 19 Step Display Description Press the key, the display will change to “2 TIMES” from “1 TIMES”. Enter sample #2 results. Press the key for 12.5%. Press the key, the display will change to [STD] from [HB3]. Press the key for 22.0% to enter.
- Page 20 Step Display Description Pre s s the , the di splay will cha nge to “3 TIMES” from “2 TIMES”. Enter sample #3 results. Press the key for 20.0% to enter. Press the key, the display will change to [STD] from [HB3].
- Page 21 Step Display Description Press the key, the display will change to “4 TIMES” from “3 TIMES”. Enter sample #4 results. & Press the key for 32.5% to enter. Press the , the display will change to [STD] from [HB3]. Press the for 40.0% to enter.
- Page 22 Step Display Description Press the key, the display will change to “5 TIMES” from “4 TIMES”. Enter sample #5 results. Press the for 35.7% to enter. Press the key, the display will change to [STD] from [HB3]. Press the key for 46.0% to enter.
- Page 23 Measurement mode. • “C” will appear on the right of the calibration # on the display after the registration is done properly. • All 5 pairs of data (i.e. both HB-300 and the standard process measurement data) must be entered in "1 TIMES"~ "5 TIMES" to produce a calibration. If you are trying to make it with 2~4 samples, enter 99.9, the upper limit of the measurement for the...
-
Page 24: How To Input Sample Or Calibration Name
9-4. How to input sample or calibration name Example : When inpputing “ABC” Step Display Description Press the key, and "__" will be displayed at right side of calibration number. Press the key, and "A" will be displayed at right side of calibration number. key, and will change from "A" to Press the "A__"... -
Page 25: How To Measure
13 "9. How to make the calibration" Press the key, the calibration number will blink. Enter two digit number (01~10). • Prior to using HB-300, you need to register a specific calibration for your sample. Refer to page 13 "9. How to make the calibration, If you haven't completed the registration and just want to see relatively referential measurement readouts, select "00" . shows that either numbers or... - Page 26 Example: Entering 02 to select Press the key, the first digit will blink. Next, press key. "02C" will be displayed. • If a registered calibration is selected, "C" will appear on the right of the calibration #. • Once the calibration is registered, it will remain in the memory of the instrument after the power is turned off. Push the probe toward the sample. • You must use the same probe used to measure the calibration data. Do not change the status of "Constant" or "Fix". Using different probes or different measurement procedures may affect the accuracy.
- Page 27 Move the probe away from the sample. The last moisture % will remain displayed. To continue the measurement, push the probe toward the sample again as per page 26 (3). Turn the power off pressing the key after you have finished measurement.
-
Page 28: Display Of The Average
10-2. Display of the average After measurement has been done 2~9 times, you can display the average by pressing the key. The key will display "AVE" "Calculated average" and "Measurement times". • After 9 times the "Measurement times" display will return to 1. • In the continuous measurement mode, the average cannot be requested. -
Page 29: How To Set Continuous Measurement Mode
10-3. How to set continuous measurement mode In this mode, you don't have to press the key every time for measurement. To set continuous measurement mode; After the operation on P.26 "10-1 Measurement (4) Press key", Press the key, the decimal point will blink and the bar graph will appear. "LO"... -
Page 30: How To Proceed For Bias Correction
10-4. How to proceed for bias correction The calibrations that you have set on the instrument are statistically calculated correlations of the sample's actual moisture and its electric resistance. However the measurement results may differ from the actual moisture, being affected by many aspects of the sample and the environment at the measurement site. -
Page 31: How To Set The Alarm
10-5. How to set the alarm The upper moisture limit alarm can be set at 1~99%. A series of short beeps let you know the sample is over the limit. Press the key. The number to the right of "ALARM" will blink. Enter the limit value. Enter 2-digit number of the limit. -
Page 32: Setting For Printer Output
10-6. Setting for printer output Calibration number, Measurement times, Moisture value and Average moisture value can be printeed by using optional printer. Setting Press the key. "P" will be displayed at the right side of "TIMES". • Doing the following measurement or the power supply is turned off. -
Page 33: Data Storage
10-7. Data storage up to 250 measurement values are stored automatically. The contents of the data are “data number”, “year/ month/day”, “time”, “calibration curve number”, and “moisture value”. <Printout example> Block function For cases such as dif ferent measurement samples, pressing the key between measurements is recognized as a separator signal, and a line feed is inserted when printing out. -
Page 34: Function Mode
11-1. Display of input moisture values when preparing a calibration curve Press the key. • At this time, if there is an interval greater than 3 seconds between the pressing of each key, the curve number cannot be set. The HB-300 results for "Sample 1 " is displayed. Press the key, and the standard method results for "Sample 1 " will be displayed. Each time the key, and the results for "Samples 2... -
Page 35: Erasing A Calibration Curve
11-2. Erasing a calibration curve The setting of a standard calibration returns to #00. Press the key. The buzzer will sound, and all the LCD elements will be displayed for approximately 3 seconds. After that "Calibration #", "TIMES" and "%" will be displayed. 11-3. Printer output of stored data Up to 250 stored data are printer output. -
Page 36: Batch Erasure Of Stored Data
11-4. Batch erasure of stored data Press the key. A tone sounds and “0” will be displayed for the measurement num- ber. Next, the display for moisture changes from 0 000. The original display will return after approximately 15 seconds. 11-5. Date and time display <Display example> Press the key. The date and time (24-hour system) are displayed. - Page 37 The following procedure sets the western calendar date and time. <Example> 27 June 2020, 18:43 If you make a mistake when pressing an input number key, press the key. Step Description Display Press the key. Press the key. Press the key.
- Page 38 Step Description Display Press the key. Press the key. Press the key. Press the key. Press the key. “TIMES” will blink. The date and time are displayed. Press the key to turn off the power. shows that either numbers or marks enclosed are blinking.
-
Page 39: Error Display
11. Error Display If an error has occurred in the instrument or in the measurement conditions, either of the following messages will appear for 4 seconds before turning the power off automatically. The temperature sensor has an error. Call for repair. The electric circuit for measuring the water content has an error. - Page 40 The instrument temperature is –5°C (23°F) or lower. Warm the instrument up to the usable ambient temperature range 0~40°C (32~104°F). The instrument temperature is 50°C (122°F) or higher. Cool down the instrument to the usable ambient temperature range 0~40°C (32~104°F).
- Page 41 Calibration # u Sample Name HB-300 Measurement Actual moisture by the (Calibration #00) Standard method Sample 1 Sample 2 Sample 3 Sample 4 Sample 5...
- Page 44 Caution ● It is strictly prohibited to transfer part or all of this manual without permission. ● The contents of this manual are subject to change without notice. ● The appearances, screens, etc. of the product and accessories displayed on this manual may differ from the actual ones, however, operations and functions are not affected. ● All efforts have been made to ensure the contents of this manual are accurate. However, if you notice any part to be unclear, incorrect, omitted, or the like in this manual, please contact us. ● Be aware that we are not liable for the effects resulting from opera- tions according to this manual regardless of the items above. 060337...
Need help?
Do you have a question about the HB-300 and is the answer not in the manual?
Questions and answers