Table of Contents
Advertisement
Quick Links
Advertisement
Table of Contents

Related Manuals for Kett HI-520-2


Summary of Contents for Kett HI-520-2
- Page 1 Concrete and Mortar Moisture Tester HI-520-2 Operating Manual...
-
Page 2: Safety Precautions
Safety Precautions If the safety precautions for the concrete and mortar moisture tester are not observed, damage to property may result. Although product safety is fully considered, after carefully reading the precautions in this manual, please use the product in a proper manner. ■... -
Page 3: Table Of Contents
CONTENTS 1. About the Model HI-520-2 ..........4 2. Specifications ..............5 3. Part names .................7 4. Display/Description of keys ..........8 5. Battery installation ..............9 6. Measurement method ............10 7. Settings ................12 8. Notes regarding use and handling of the HI-520-2 ..27... -
Page 4: About The Model Hi-520-2
Moisture content can be displayed directly simply by pressing the unit against the object to be measured. The HI-520-2 also features alarm and hold functions which make it possible to confirm the results of measurements taken at locations which are not directly visible. -
Page 5: Specifications
2. Specifications Measurement method High frequency capacitance (20MHz) Measurement range LWC (ALA ) ...0 - 23% : Artificial light weight aggregate concrete ......0 - 50% (Gypsum board) Concrete ..........0 - 12% This mode is displayed with a relative value of .. - Page 6 Applications/Modes and Functions Temperature Registration Thick board Data save/ Applications/Modes compensa- Alarm Hold of calibra- selection output tion tions Normal functions LWC (ALA) Concrete Mortar D mode Others S&D (D mode, S mode) Make User Cal (0 - 7) *1 Thick board is selectable for GYP and CSB. *2 The data logger software, "HDL-01", (option) and a Windows PC with Excel installed are needed.
-
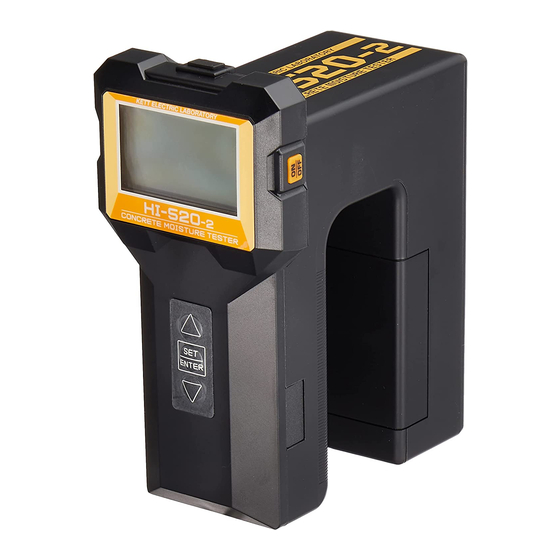
Page 7: Part Names
3. Part names <Main unit> [HOLD] button USB connector Display [POWER] button Control key Buzzer Battery compartment Strap Moisture sensor (rear side) <Accessories> (Option) 9V alkaline battery Data logger software (006P) ×1 Soft case Operating Manual HDL-01... -
Page 8: Display/Description Of Keys
4. Display / Description of key ④ ① 2 0 1 4 / 0 3 / 1 9 1 5 : 2 3 2 0 1 4 / 0 3 / 1 9 1 5 : 2 3 ⑤ ② 78.8 ⑤... -
Page 9: Battery Installation
5. Battery installation The unit is powered by one 9 V battery (006P alkaline). The unit is powered by one 9 V Replace the battery with new a battery (006P alkaline). new one. Pay attention to the directions. -
Page 10: Measurement Method
6. Measurement method Step Operation Display Description Press the power switch while the moisture Start of measurement c uiring ver sensor is pointed into the air. * Adjustment of the instrument is performed when the power is turned on. To perform correct measurements, be sure to turn on the [POWER] button power while the moisture sensor is directed... - Page 11 Step Operation Display Description While holding the main unit as shown in the Measurement drawing, slightly push the moisture sensor against the object to be measured, and the measured result is displayed. 2 0 1 4 / 0 3 / 1 9 1 5 : 2 3 * Moisture calibrations are made while holding the unit and slightly pushing it against the object to %...
-
Page 12: Settings
7. Settings Settings from 1 through 5 can be performed by pressing the key on the measurement screen. aterial 2 0 1 4 / 0 3 / 1 9 1 5 : 2 3 emperature C larm Concrete ac Lig t Material selection (P.13) Backlight brightness... - Page 13 1 Material selection [Material] Seven types of factory calibrated products may be selected. (1) Press the key on the measurement screen, and the screen changes to the setting screen. aterial Use the ▲ or ▼ key to select “Material” and press the key.
- Page 14 2 Temperature compensation [Temperature.C] This setting cannot be performed when the D mode is selected or the custom calibrations are used. Automatic temperature correction is performed on the basis of the temperature sensed by the temperature sensor in the measuring instrument.
- Page 15 3 Alarm setting [Alarm] This setting cannot be performed when the D mode is selected or the custom calibrations are used. The upper limit of moisture content can be specified. When the moisture content exceeds the specified value, a buzzer sounds. (1) Press the key on the measurement screen, and the screen aterial...
- Page 16 4 Backlight brightness [Back Light] The brightness of the backlight can be selected (Off, Moderate, or Bright). The backlight is useful for measurement or key operation in the dark. (1) Press the key on the measurement screen, and the screen aterial changes to the setting screen.
- Page 17 5 Extension functions [Others] (1) Press the key on the measurement screen, and the screen emperature C changes to the setting screen. larm Use the ▲ or ▼ key to select “Others” and press the key. ac Lig t t er (2) There are 6 extension functions as listed below : Use the ▲...
- Page 18 5 Others [ ① Select User Cal] (1) Select “Select User Cal” on the extension function and press elect er Cal key. er Cal emor (2) Use the ▲ or ▼ key to select from “User0” through “User7” utput or “S & D” and press the key.
- Page 19 The S mode can also provide values correlated with the high-frequency capacitance sig- nal, but the measurement depth is different between the D mode and S mode. The D mode measures the moisture content at relatively deeper point, and on the other hand, the S mode measures the moisture content at relatively shallower point.
- Page 20 * At least two samples and up to eight samples are needed. Ar- Table 1 range the results in ascending order of the D mode values as Moisture D mode shown in the [Table 1]. Each point is referred to as a zigzag value point, and connect zigzag points with a straight line.
- Page 21 (3) Use the ▲ or ▼ key to select “D.MODE” and press the key. er Cal (4) Use the ▲ or ▼ key to select “D.MODE 246” and press the key. oint (5) Use the ▲ or ▼ key to select “Moisture 12.4” and press the key.
- Page 22 5 Others [ ③ Data Memory] The measured data can be stored only when a user calibration has been completed. When a factory calibration is selected, the measured data cannot be stored. The measured data can be stored in the internal memory. elect er Cal (1) Select “Data Memory”...
- Page 23 5 Others [ ④ Data Output] The data stored in the internal memory can be downloaded to a PC. * To download the data to a PC, the data logger software, “HDL-01”, (option) is needed. Use a Windows PC with Excel installed. elect er Cal er Cal...
- Page 24 5 Others [ ⑤ Clear All Data] All the data stored in the internal memory can be deleted. (1) Select “Clear All Data” on the extension function screen and er Cal press the key. emor utput (2) Select “Clear All Data” again. Clear ll ata (3) Press the key to delete all the stored data and return to the...
- Page 25 5 Others [ ⑥ Date and Time] The date and time can be set. (1) Select “Date and Time” on the extension function screen and emor press the key. utput Clear ll ata (2) Use the ▲ or ▼ key to set the year and press the key.
- Page 26 Languge switching The language displayed can be changed. (1) Turn ON the power while pressing key at power OFF. Calibration Language (2) Select “Language” on the screen and press the key. Eeprom (3) Use the ▲ or ▼ key to select the language and press the Recover key.
-
Page 27: Notes Regarding Use And Handling Of The Hi-520-2
8. Notes regarding use and handling of the HI-520-2 • When making measurements, hold the unit so that the sensor is in even contact with the surface to be measured. It is best if the surface being measured is flat. - Page 28 Caution • It is strictly prohibited to transfer part or all of this manual without permission. • The contents of this manual are subject to change without notice. • • to be unclear, incorrect, omitted, or the like in this manual, please contact us. •...
Need help?
Do you have a question about the HI-520-2 and is the answer not in the manual?
Questions and answers