
Related Manuals for Kett HM-540


Summary of Contents for Kett HM-540
- Page 1 Wood Moisture Tester HM-540 Operating Manual Thank you for purchasing this product. Please read the operating manual carefully and use this product properly.
- Page 2 Safety Precautions If the safety precautions for the wood moisture tester are not observed damage to property may result. While the safety of the product has been given considerable attention, read the precau- tions in the operating manual and use the instrument properly. •...
-
Page 3: Table Of Contents
CONTENTS 1. Features of Wood Moisture Tester HM-540 ........4 2. Specifications ................... 5 3. Part Names ..................6 4. Description of Display ................ 8 5. Battery Installation ................9 6. Measurement Method..............10 7. Various Settings ................12 8. Extension functions [Other settings] ..........20... -
Page 4: Features Of Wood Moisture Tester Hm-540
1. Features of Wood Moisture Tester HM-540 This unit is a handy high-frequency moisture tester with integrated main unit and sensor section. Specifying the thickness of the wood and the specific gravity allows the moisture of various kinds of woods to be measured. The moisture can be measured just by pushing this device against an object to be measured, and therefore, the surface of the wood is not spoiled. -
Page 5: Specifications
2. Specifications Measurement method : High frequency capacitance (20MHz) Application : Wood Measurement range : 2 - 150% (specific gravity and tree species dependent) Measurement precision : Standard error: 0.5% or less (our standard sample, cedar/cypress: 20% or less) Drying method: JIS Z 2101:2009 Data memory : 999 points Compensation function : Thickness : 10-40 mm Specific gravity : 0.1 to 1.25 (up to 3 setting values storable) Moisture : slope (0-2.50), offset (−9.9-9.9) -
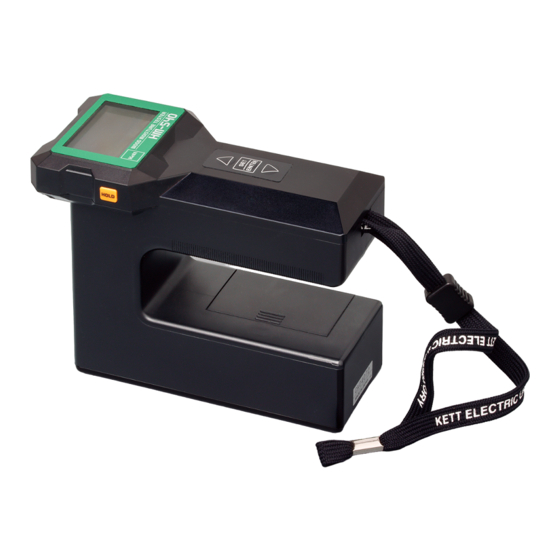
Page 6: Part Names
3. Part Names <Main unit> button HOLD Display Used to hold or cancel the measured USB connector value on the screen. button Used to determine settings Turns the power on and off. or item selection. [ ▲ ] [ ▼] keys Buzzer Used to move to differing i t e m s o n t h e s c r e e n o r... - Page 7 <Accessories> Batteries (9V) Carrying pouch Specific gravity table Operating Manual 9V alkaline battery (006P) ×1 <Options> Data Logger Software HDL-02...
-
Page 8: Description Of Display
4. Description of Display ① ⑤ ② ⑥ ③ ⑦ ④ ⑧ Item No. Items to be displayed This indicator is displayed when the remaining battery capacity is insufficient. ① [ ] Low battery, [ ] Battery replacement ② The data number is displayed when the data memory is set. ③... -
Page 9: Battery Installation
5. Battery Installation The power supply of this unit uses one 9V (006P alkaline) battery. Pull your thumb in the direction Put in the bat ter y properly of t h e a r r ow to r e m ove t h e with attention to the positive (+) battery compartment lid. -
Page 10: Measurement Method
6. Measurement Mode Step Operation Display Operation description Press the button with the moisture sensor Start measurement facing the air. * The device is regulated at power-on. For accurate m e a s u r e m e n t , b e s u r e t o t u r n o n t h e p ow e r with the moisture sensor facing the air. - Page 11 Step Operation Display Operation description When this unit is held as shown in the illustration Measurement and the electrode of the moisture detection section is lightly pushed against an object to be measured, the measurement result is displayed. * The moisture scale of this unit is designed to be lightly pushed against an object to be measured as shown in the illustration as a standard state.
-
Page 12: Various Settings
7. Various settings ● When the key is pressed on the measurement screen, a setting can be selected from through (P.13) 5 Auto hold settings (P.17) 1 Material selection 2 Temperature compensation (P.14) (P.18) 6 Display settings 3 Thickness compensation (P.15) 7 Extension functions (P.19) (P.16) 4 Alarm settings... - Page 13 1 Material selection Select the object to be measured for moisture. (1) Select “Material” with the [▲] and [▼] keys on the setting screen and press the key. (2) Press the [▲] and [▼] keys to select the measurement target (ceder, cypress, SG), and press the key to confirm.
- Page 14 2 Temperature compensation Temperature compensation is automatically conducted on the basis of the temperature sensed with the internal temperature sensor. When the temperature difference between the timber and this unit is 10˚C or more, or when the temperature of the timber to be measured is 40˚C or more, select the manual setting, and enter the temperature of the timber to be measured.
- Page 15 3 Thickness compensation When an object to be measured is 40 mm or less in thickness, compensation calculation using the plate thickness is conducted. (1) Select “Thickness C.” with the [▲] and [▼] keys on the set- ting screen, and press the key.
- Page 16 4 Alarm settings The upper limit moisture can be specified. When the measured moisture value exceeds the specified value, a buzzer sounds. (1) Select “Alarm” with the [▲] and [▼] keys on the setting screen, and press the key. (2) Select “On” with the [▲] and [▼] keys, and press the to confirm. (3) Press the [▲] and [▼] keys to select the moisture value. * The moisture value that can be specified is the range of 2 through 40%.
- Page 17 5 Auto hold settings When the measured value is stable for a certain period, the measurement result screen can be automatically held. (1) Select “Autohold” with the [▲] and [▼] keys on the setting screen, and press the key. (2) Select “On” with the [▲] and [▼] keys, and press the key to confirm.
- Page 18 6 Display settings The brightness of the backlight and contrast can be adjusted. (1) Select “Display” with the [▲] and [▼] keys on the setting screen, and press the key. (2) Select “Backlight” or “Contrast” with the [▲] and [▼] keys, and press the key to confirm.
- Page 19 7 Extension functions [Other settings] Advanced settings can be conducted such as storing or outputting the measured data and correction of moisture values. Refer to "8. Extension functions" for each setting of the extension functions.
-
Page 20: Extension Functions [Other Settings]
8. Extension functions [Other settings] ● When the key is pressed on the measurement screen and an extension function is selected on the setting screen, each item of the extension functions can be selected from through (P.21) 5 Data output (P.26) 1 Statistics 2 Memorized data display (P.22) 6 Clear all data... - Page 21 1 Statistics Statistical calculations are conducted with the use of the data stored in the memory. Maximum values, minimum values and standard deviations are displayed. (1) Select “Statistics” with the [▲] and [▼] keys on the exten- sion screen, and press the key.
- Page 22 2 Memorized data display The data stored in the memory is displayed. In addition, selected data can be deleted. (1) Select “Memorized Data” with the [▲] and [▼] keys on the extension screen, and press the key. (2) The stored data number, measurement targets, and (2) The stored data number, measurement targets, and measured values are displayed in list form.
- Page 23 3 Moisture value correction The measured moisture value is compensated with the use of the linear expression (ax+b). (1) Select “Correction” with the [▲] and [▼] keys on the exten- sion screen, and press the key. (2) Then move the cursor to "On" and press the key.
- Page 24 (5) The set correction value will be saved and the measurement screen will automatically be displayed. * If the moisture value is not corrected, select “Disable", and press the key. * If the moisture value correction is selected, the correction icon is displayed on the measurement screen.
- Page 25 4 Data memory The measured data can be stored in the internal memory. (1) Select “Data Memory” with the [▲] and [▼] keys on the ex- tension screen, and press the key. (2) Select "On" with the [ (2) Select "On" with the [▲] and [ ] and [▼] keys.
- Page 26 5 Data output The measured data stored in the internal memory can be outputted to a PC. * To output the data to a PC, data logger software, HDL-02, (option) is required. Use the software on Windows with Microsoft Excel. (1) Select “Data Output”...
- Page 27 6 Clear all data The measured data stored in the internal memory can be fully deleted. (1) Select “Data Output” with the [▲] and [▼] keys on the ex- tension screen, and press the key. (2) Select "Clear All Data” again with the [▲] and [▼] keys. (3) Pressing the key will delete all saved data and automat- ically display the measurement screen.
- Page 28 7 Date and time The settings of date and time can be conducted. (1) Select “Date and Time” with the [▲] and [▼] keys on the extension screen, and press the key. (2) Adjust the year. Select the year with the [▲] and [▼] keys, and press the key to confirm.
-
Page 29: Notes Regarding Measurement
● Pu t t h i s d ev i c e o n a n o b j e c t t o b e HM-540 measured to place the electrode of the Object to be... - Page 32 Notes ● Copying some or all of the contents of this user manual without prior written consent is strictly prohibited. ● The contents of this user manual may be changed at any time in the future without any prior notice. ● The appearance and/or representations of the products and parts depicted in this user manual may not appear exactly as their actual counterparts, but this does not affect their operation or functionality. ● This user manual was intended to be written as clearly and accurately as possible. However, if you are unclear about anything in this user manual or notice any missing information, please contact us directly. ● We cannot be held responsible for any actions or effects resulting from the execution of any operations outlined in this user manual. 1-8-1 Minami-Magome, Ota-ku, Tokyo 143-8507, JAPAN +81-3-3776-1121 +81-3-3776-3001 https://www.kett.co.jp/english/ overseas@kett.co.jp 060405-01...
Need help?
Do you have a question about the HM-540 and is the answer not in the manual?
Questions and answers