Advertisement
Features and Characteristics
- An integrated balance eliminates sample pre-measurement.
- Twelve product types can be measured.
- The product number (1 - 12) and product name (4 characters) are displayed.
- When inactive, the unit will automatically power off in approximately three minutes.
- Moisture content can be bias adjusted for each product to correlate with local standards.
Specifications
| Measuring Principle | Dielectric constant |
| Sample Volume | 240mL |
| Functions | Average, Auto power off, Bias adjustment |
| Operating Temperature | 0 to 40˚C |
| Display | LCD |
| Power Supply | Batteries (1.5V"R6"or"AA"sizeX4pc.) |
| Dimensions | 130(W) X 190(D) X 210(H)mm |
| Weight | Net 1kg |
| Accessories | Funnel, Sample cup, Batteries (1.5V"R6"or"AA"sizeX4pc.), Operating manual |

Before entering operation, please confirm if this moisture tester has correct type number that you require by turning power on. Product names and their channel numbers are as per attached "PRODUCT LIST"
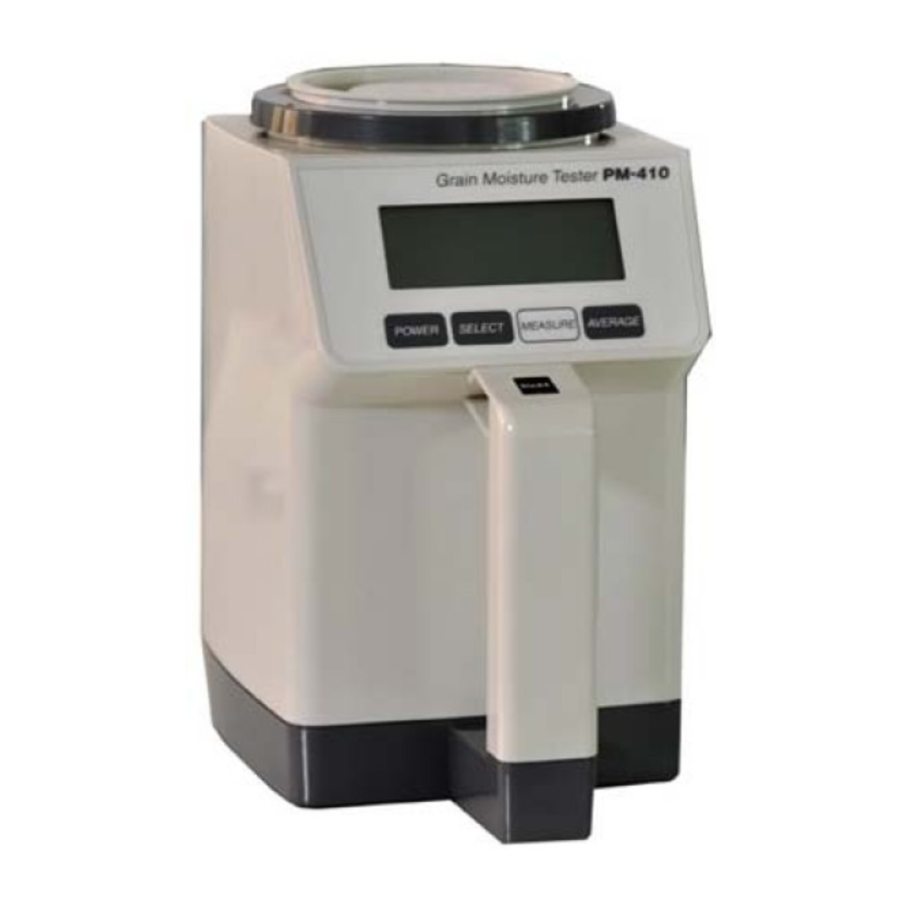
Appearance and Names
Main body

LCD Display

Accessories

Before Measuring
- Remove the funnel and sample cup from the unit.
- Load the batteries.
The unit is powered by four AA batteries.
Place the batteries in the compartment, taking care to correctly orient the positive and negative terminals. - The PM-410 features an integrated balance. For best accuracy, place the unit on a horizontal surface, in a location that is not subject to wind or vibration.
Attempting measurements while holding the unit in your hands or in a location where wind or vibration is present reduce precision or make accurate measurements impossible. - Prepare the sample to be measured before measurement. Allow it to equilibrate to theambient temperature of the PM-410.
Measurement Methods
- Turn on the PM-410.
Press the "POWER" key. All indicators will be displayed for approximately three seconds. The number and name of the product, "TIMES" and "%" indicators will be displayed. If this does not happen (as shown in Figure 1), a problem may exist with the PM-410.
Please see the error code display (Error Code Display Section) whenever either of 001, 002, 003, -5˚C. 50˚C is displayed.
![]()
- Select the Product.
Press the "SELECT" key. Each press of the key increments the product number (Figure 2 - Figure 3).
The product number cycles back to product 1 after product 12.
The product number is retained in the non-volatile memory when the unit's power is off.
![]()
- Pour the sample into the sample cup.
Place the funnel on top of the sample cup.
Pour the sample into the cup until it overflows (Figure 4).
It should take about 4~5 seconds.
Remove the funnel and level the cup by moving the funnel across the top edge (Figure 5).
![]()
- Pour the sample into the measuring section.
Press the "MEASURE" key.
The decimal point blinks (Figure 6).
![]()
The unit is performing zero-adjustment of the built-in scale while the decimal point is blinking.
Be sure not to touch the unit at this moment.
Pour the sample into the unit when the "POUR" indicator begins blinking (Figure 7).
![]()


- Pour the sample into the center of the measuring section at a speed at which the entire sample is poured in about 5 ~ 6 seconds. Pour the sample in to be even (Figure 8).
![]()

After the "POUR" indicator goes out, the decimal point blinks 4 times or more (Figure 9) and then the moisture content and the number of measurement are displayed (Figure 10).

The unit is measuring the weight of the sample while the decimal point is blinking after the "POUR" indicator goes out.
Do not pour in more sample during this period or the measurement precision will be greatly downgraded.
Do not put more sample into the measuring section even if some spills out.
- The following indicators are displayed if the moisture content is outside of the measuring range:
"FFF" is displayed if the moisture content is above the measuring range.
"AAA" is displayed if the moisture content is below the measurable range.
- Dispose of the sample (Figure 11).
The moisture content is displayed during this time. If you wish to continue with further measurements, restart the procedure from step 3. ("Pour the sample into the sample cup").
![]()

∗ The symbol ![]() on the display means blinking.
on the display means blinking.
Displaying the Average Value
- Press the "AVERAGE" key to display the average of the measured values.
When the number of measurements is between 2 and 9, "AVERAGE", the numbe of measurements and the average are displayed (Figure 12).
Once the "AVERAGE" key is pressed the number of measurements goes back to "1".
![]()

Performing Moisture Content Bias Adjustment
Moisture content bias adjustment can be made from -9.9 ~ +9.9% for each product. Input a bias value if the moisture content has any discrepancy against the official standard.
- Set the unit to the bias adjustment mode.
Confirm if the power is turned off.
Press the "POWER" key.
Press the "SELECT" key continuously while the model name and other indicators are displayed (Figure 13), after which the display will appear blank (Figure 14). Continue to hold the "SELECT" key depressed for approximately 8 seconds, until the "%" and "BIAS" value indicators are displayed (Figure 15). The bias value is initially set to "0.0".
![]()
- Select the Product.
Press the "SELECT" key.
Each press of the "SELECT" key increases the product number by one (Figure 16).
The product number cycles back to 1 after passing 12.
![]()
- Input the bias.
Press the "MEASURE" key to increase the bias value.
Each press increases the bias value by 0.1%.
Press the "AVERAGE" key to decrease the bias value.
Each press of the key decreases the bias value by 0.1%.
The bias correction value is maintained in memory even when the unit's power is off.


- Auto Power Off Function
The unit's power automatically turns off if no key is pressed for approximately 20 seconds instead of 3 minutes.
- Turn off the power.
Press the "POWER" key.
Replacing the Batteries
The battery indicator " " is displayed when the batteries are exhausted.
Replace all four with new batteries.
Error Code Display
Error code will be displayed whenever the unit becomes out of order. In this case error code will be displayed for 4seconds, then the power turns off.
 | Temperature sensor problem. Repair is necessary. |
 | There is a problem with the electronic circuit used for moisture measurement. Repair is necessary. |
 | There is a problem with the scale. Repair is necessary. |
 | Measurements cannot be made because the temperature of the unit is below -5˚C. Raise the temperature of the unit before making measurements. |
 | Measurements cannot be made because the temperature of the unit is above 50˚C. Lower the temperature of the unit before making measurements. |
1-8-1 Minami-Magone Ota-Ku, Tokyo 143-8507 Japan
Tel. +81-3-3776-1121 Fax. +81-3-3772-3001
http://www.kett.co.jp
E-mail overseas@kett.co.jp

Documents / Resources
References
Download manual
Here you can download full pdf version of manual, it may contain additional safety instructions, warranty information, FCC rules, etc.
Advertisement


Need help?
Do you have a question about the PM-410 and is the answer not in the manual?
Questions and answers