Table of Contents
Advertisement
Quick Links
Advertisement
Table of Contents

Subscribe to Our Youtube Channel
Related Manuals for barbas BOX 20 45


Summary of Contents for barbas BOX 20 45
- Page 1 User manual BOX 20 45 Serial number: Production date:...
- Page 2 Barbas Bellfires BV. This document could contain technical inaccuracies or typographical errors. Barbas Bellfires BV reserves the right to revise this document from time to time in the contents thereof.
-
Page 3: Table Of Contents
Warnings and cautions used in this document................6 Related documentation........................6 Description....................7 Overview of the BOX 20 45......................7 Overview of the BOX 20 45 with wood log storage module............10 Intended use..........................12 Safety.....................13 Safety instructions for operation....................13 Safety instructions with regard to the environment..............14 Fuel...................... -
Page 4: Declaration Of Performance
Name, registered trade name or registered trade mark Barbas Bellfires BV; Hallenstraat 17; 5531 AB Bladel; The Netherlands and contact address of the manufacturer as required pursuant to Article 11(5) -
Page 5: Box 20 45 With Wood Log Storage Module
Name, registered trade name or registered trade mark Barbas Bellfires BV; Hallenstraat 17; 5531 AB Bladel; The Netherlands and contact address of the manufacturer as required pursuant to Article 11(5) -
Page 6: About This Document
• Do basic maintenance This document refers to the BOX 20 45 as 'the appliance'. This document is an essential part of your appliance. Read it carefully before you do work on the appliance. Keep it in a safe place. -
Page 7: Description
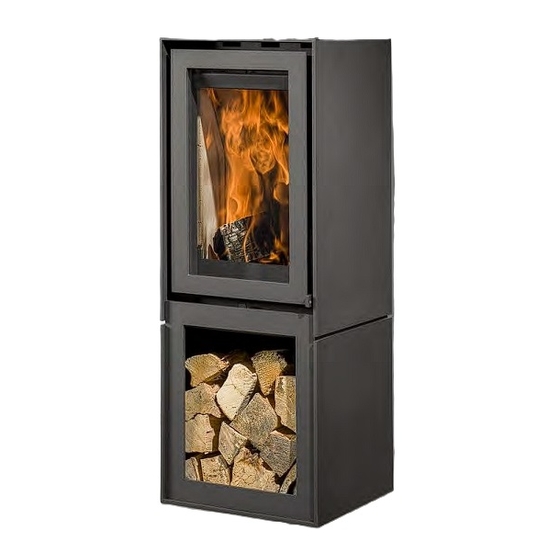
Overview of the BOX 20 45 The BOX 20 45 is optionally available with a wood log storage module under the appliance. The BOX 20 45 is available with a screened glass door or with a steel frame door. Door handle Log guard... - Page 8 Description Secondary air inlet Upper baffle (steel) Air wash inlet Lower baffle (ceramic) Adjustable feet Connection for external combustion Figure 2. Bottom view of the BOX 20 45 with screened door Box 20 45...
- Page 9 Description Connection for external combustion Rear flue connection Figure 3. Rear view of the BOX 20 45 Box 20 45...
-
Page 10: Overview Of The Box 20 45 With Wood Log Storage Module
Ash tray (under the grate) Primary air inlet Ceramic panels Grate Top flue connection Steel bottom plates Control lever Figure 4. Front view of the BOX 20 45 with wood log storage module and steel frame door Box 20 45... - Page 11 Secondary air inlet Upper baffle (steel) Air wash inlet Lower baffle (ceramic) Adjustable feet External bottom combustion air inlet (optional) Figure 5. Bottom view of the BOX 20 45 with wood log storage module and steel frame door Box 20 45...
-
Page 12: Intended Use
External rear combustion air inlet Rear flue connection (optional)) Figure 6. Rear view of the BOX 20 45 with wood log storage module Intended use The appliance is intended for indoor use to heat the room wherein it is installed. Do not use it for other purposes. -
Page 13: Safety
Do not use the appliance in case of visual glass damage. • Make sure that the appliance is installed correctly. Refer to the Installation and Maintenance manual. You can find the manuals on www.barbas.com. • Wear the glove and use the operating hook or a poke when refilling the appliance •... -
Page 14: Safety Instructions With Regard To The Environment
Dispose of ceramic heat-resistant glass as household waste. Do not dispose of ceramic heat-resistant glass in a glass recycling container. • Dispose of an obsolete appliance according to instructions of the authorities or the fitter. • Obey the local regulations. Box 20 45... -
Page 15: Fuel
The above listed amount burns for approximately 45 minutes. This time can be different, dependent on the chimney draught and the position of the combustion air valve. The amount of fuel specified here should not be exceeded, overloading can cause excess smoke. Box 20 45... -
Page 16: Operation
Make sure that the glass is not damaged. Make sure that the door opens and closes completely, by moving the door handle Steel frame door Turn the handle forward to open the door. Turn the handle downward to close the door. Box 20 45... - Page 17 Remove document and components from the combustion chamber. Make sure that the control lever moves easy. Make sure that the ash tray is empty. Make sure that all package material, stickers, etc, have been removed from the vicinity of the appliance after installation. Box 20 45...
-
Page 18: First Use Of The Appliance
Do not use the appliance when there is fog or haze or no wind. Put the control lever in the far right position. If applicable, open the valve in the external combustion air supply line. If applicable, open the chimney valve completely. Open the door of the appliance. Box 20 45... - Page 19 After approximately 20 minutes the wood logs burn. Dependent on the quality of the chimney the wood logs burn for approximately 1 to 1.5 hours. Do not open the door of the appliance before the last flames have almost disappeared. Box 20 45...
-
Page 20: Reload With Fuel
Reload the appliance with 2 wood logs, put flat on the combustion chamber floor. Use the recommended amount of fuel. Refer to chapter Close the door. After ignition of the fuel, move the control lever to the left to a position that gives a quiet burning fire. Box 20 45... -
Page 21: Control The Burn Process
Continuous firing with the primary air inlet fully open (control lever in the far right position) causes a white-hot fire that can damage the appliance. Use the primary air only during the first fuel load and for ignition of a new fuel load. Box 20 45... -
Page 22: Increase The Flue Draught
Unscrew the socket screw. Make sure the nut stays attached to the socket screw. Push up (1) the front of the heat shield and pull it forward (2) and move downward to a vertical position (3). Remove the upper baffle from the appliance. Box 20 45... -
Page 23: General Firing Tips
• After the first load, do not overload the appliance with fuel. Refer to for the recommended amount of fuel. Too much fuel leads to incomplete combustion, soot formation and a chance of a chimney fire. Box 20 45... -
Page 24: Maintenance
Clean the glass with a soft cloth, a sponge or paper. Use glass cleaner or ceramic hob cleaner. Make sure that the glass is dry. Water droplets can leave a mark on the glass. Note: Damaged or broken glass must be replaced before the appliance can be used again. Box 20 45... -
Page 25: Troubleshooting
Do the recommended ignition when the door of the combus- procedure. Refer to chapter tion chamber is open 6.3.1 • Remove the break out strip from the upper baffle. Refer to 6.3.4 chapter • Contact your installer. Box 20 45... - Page 26 The underpressure in the in- Reduce the underpressure, for ex- stallation room is too high ample by opening a ventilation opening in the installation room. Box 20 45...
-
Page 27: Technical Data
Technical data Name Barbas Model • BOX 20 45 • BOX 20 45 with wood log storage module Tested in accordance with EN 13240:2001-A2:2004 EN 16510-1 annex D, E, F Energy efficiency index (according EU 2015/1186) Energy efficiency class Fuel •... -
Page 28: Warranty Terms
Complaints will only be accepted if they are reported to the Barbas dealer, together with the serial number of the Barbas appliance which is stated on the front of the manual. In addition, the original receipt (invoice, receipt, cash receipt) showing the date of purchase must also be submitted. - Page 29 Article 5: Warranty period This warranty will only be granted during the warranty period. The body of the Barbas appliance is guaranteed for a period of 10 years against construction and/or material faults, starting from the moment of purchase. For other parts of the Barbas appliance, a similar warranty applies from the moment of purchase for a period of two years.
- Page 30 Warranty Terms Box 20 45...
- Page 31 Warranty Terms Box 20 45...
- Page 32 Your Barbas dealer 001 - 29.01.2021 - 351148...
Need help?
Do you have a question about the BOX 20 45 and is the answer not in the manual?
Questions and answers