Table of Contents
Advertisement
Quick Links
Advertisement
Table of Contents

Related Manuals for Hayear HY-1070


Summary of Contents for Hayear HY-1070
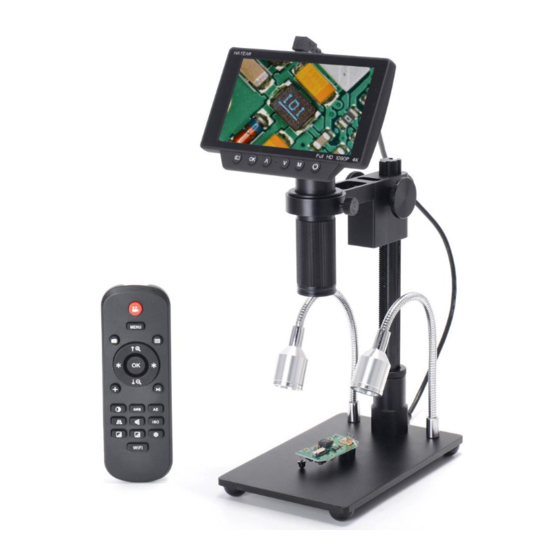
- Page 1 HAYEAR HY-1070 Digital Microscope Camera...
-
Page 2: Table Of Contents
Table of Contents ....................Foreword .................... Basic Parameters ................... Parts of HY-1070 ..................◆ Main Device ..................◆ Remote Control ..................Connection and Output ....................Direction ..................◆ Individual Use ..................◆ HDMI Output ..................◆ USB Output ................Software Installation ................ -
Page 3: Foreword
Electronics Co., Ltd. It realizes Full HD, high object distance, multifunction and multi-output at the same time. With help of the Hayear measuring software, it can easily meet many different requirements in many fields, such as industrial overhaul and teaching demonstration. And it’s appearance design combines more ergonomic consideration, provides users with better experience. -
Page 4: Main Device
How to increase the lens magnification? Standard working with 150x lens 2x attachment objective lens HY-1070 Standard working with 150x lens, if you add a 2x attachment objective lens then the original magnification also will double, that means it’s a 300x lens. -
Page 5: Remote Control
◆Remote Control *Freeze screen: freeze screen image, can be operated under the standby, video and capture mode. * Digital magnification & digital reduction: digital zoom can up to 8X * Luminance+ & luminance-: exposure from +2.0 to -2.0 * Lock/unlock: lock the file when recording to avoid delete by mistake. * Sharpness+ &... -
Page 6: Connection And Output
Besides of the output to the microscope screen itself, HY-1070 still has 3 kinds output as HDMI, USB and TF card storage. The below is an aerial view of the different ports of the main device, we will expand it in the later chapters. -
Page 7: Direction
Direction ◆Individual Use *Power on connection and output 1. According to the chapter connect lines to the corresponding position, ④⑤⑥⑦ keep the power cord and switch on power. 2. Press on the “on/off” button on the main device. (usually the microscope will on automatically when power on) 3. - Page 8 Press on the OK button to select the option you need to set. When the option you need to set is highlight, press on the ↑ or the ↓ button to set it. Image size setting Under the capture mode, press on the MENU button to enter the main menu, press on the ↓ button to select the image size setting and click OK button to enter, and then press on the ↑...
- Page 9 ISO setting Under the capture mode, press on the MENU button to enter the main menu, press on the ↓ button till the ISO setting highlight then press on the OK button to enter, and then press on the ↑ or the ↓ button to set what you need. TV mode setting ...
- Page 10 EV setting Press on the MENU button to enter the main menu, press on the ↓ button till the EV setting option highlight then press on the OK button to enter, and then press on the ↑ or the ↓ button to set the EV you need. Metering ...
- Page 11 Screensavers setting Press on the MENU button to enter the main menu, press on the ↓ button till the screensavers setting option highlight then press OK button to enter, and then press on the ↑ or the ↓ button to select setting. Frequency setting Press on the MENU button to enter the main menu, press on the ↓...
- Page 12 Resolution setting Under the video mode, press on the MENU button to enter the main menu, press on the ↓ button till the resolution setting option highlight then press on the OK button to enter, and then press on the ↑ or the ↓ button to select the resolution you need.
- Page 13 *System setting menu 1. Under the video standby mode, long press the "M" button on the main device till the menu is displayed on the screen and press the "M" button again. (or use the remote control to press the "MENU"...
- Page 14 HY-1070d9eea30d21c0 password:12345678 Second step: open the WIFI on the mobile phone, you can check the WIFI network HY-1070 then click to connect, it will show a tick when connect success, open the WiFi Action Camera APP to connect Camera.
-
Page 15: Hdmi Output
1. You can adjust the Settings for photo and video resolution, white balance, exposure and so on. The image below is the default resolution. HDMI output First, make sure the connected monitor is hd monitor, otherwise the resolution can not reach 1080P Second, power on the microscope and connect it to the hd monitor, make sure there is power on when using since there is no built-in battery. -
Page 16: Usb Output
HAYEAR User Manual Overview Hayear is an application for imaging a dynamic image processing , it has the following characteristics: Support a variety of cameras, can switch at any time to use. using GPU rendering for image previewing, support for live image display of high-resolution and high frame rates. - Page 17 Camera Control Device Control: Support different cameras, preview resolution and output format. The highest resolution is 1920x1080. Exposure and Gain: If the connected camera can not support some functions such as brightness target value, then the corresponding parameter can not be set up White balance: If the connected camera can not support some functions such as brightness target value, then the...
- Page 18 Vertical Rectangle Measure perimeter and acreage of a rectangle. Polygon Measure perimeter and acreage of a polygon. Circle Measure a circle, the circle is determined by center point and radius. Two Points Circle Measure a circle, the circle is determined by two points. Three Points Circle Measure a circle, the circle is determined by three points.
- Page 19 3. Calibration: Magnificatior, Actual Length, Meter 4. After select “ calibration”, choose the unit and multiplying power you need, then you can calibrate. How to set cross hair on measure software? 1. First step: select setup 2. Second step: select video overlay 3.
-
Page 20: Software Installation
Software Installation Download the software: http://www.hayear.com The “HAYEAR” can support only the Windows system, the users can also download by the link on the official website. The operating systems: Windows 7、Windows8、Windows10、Linux The operating environment: Microsoft.Net Framework 4.0 , Microsoft Visual C++ 2010 If there is no the two complete runtime library, there will be an error when installing the software. -
Page 21: Thanks
If you have any question, or any advice and feedbacks, feel free to contact us: info@hayear.com . We’d like to provide the best service to you. Our official website is http://www.hayear.com/. We reserve all the right for the final explanation. - Page 22 Copyright © HAYEAR...
Need help?
Do you have a question about the HY-1070 and is the answer not in the manual?
Questions and answers