Table of Contents
Advertisement
Quick Links
Advertisement
Table of Contents

Related Manuals for Hayear HY-5299L


Summary of Contents for Hayear HY-5299L
- Page 1 HAYEAR User Manual HY-5299L Industrial Camera V1.5 ( English Version )
- Page 2 Storage TF Card, Max 256G PC Support Windows / Mac / Linux System PC Software with Measuring Function Image Measurement Support HAYEAR Measurement Language EN /FR /ES /Portugues /Deutsch /Italiano /CN/Pyccknn/ JP Output Interface HDMI/USB Standard usb2.0 interface (Type B)
-
Page 3: Interface Introduction
Interface Introduction Remote Control and Key Operation Instruction Preparatory work 1:Twist the cover and install the lens. 2:Inset the HDMI cable and DC power, when the LED light turn on yellow the camera is on. 3:When connect the camera with the computer, just plug the USB line is OK ( no need to use the power supply) Menu operation instructions... -
Page 4: Line Setting
1:Line setting Cross hair: click on the freeze/capture button to open or close the hair line. Line: cycle from 1-10-OFF, click on the freeze/capture button to switch the numeric value Direction: click on the freeze/capture button to switch horizontal/vertical/off Position: click on the freeze/capture button to adjust, long press can rapidly increase/decrease, the numeric value smaller, the horizontal line more upper(if you choose vertical line then it will be more left), the numeric value larger then the horizontal line more lower(if you choose the vertical line then it will be more right) -
Page 5: White Balance
4:Timing Photo Click on the ↑or↓ button to select timing photo , click on Off or On to save your option. 5:Picture scale Click on the ↑or↓ button to select 16:9 or 4:3, click on OK to save your option. 6:Mirror contrast Click on the ↑or↓... - Page 6 Click on the ↑or↓ button to switch selection, click on OK to save your option. 9:Color Click on the ↑or↓ button to switch selection, click on OK to save your option. 10: Language Click on the ↑or↓ button to switch selection, click on OK to save your option. 11: Frequency Click on the ↑or↓...
-
Page 7: Default Setting
12: Date/time After finishing setting click on OK button to save and jumps to next setting, after finishing all setting click on OK button to save, then click on the MENU button to return back to main menu. 13: Format Choose cancel and click OK it will return to main menu, choose confirm and click OK it will be format. -
Page 8: Hdmi Output
17:Electronic amplification and reduction Press the “freeze” button the image will electronic amplification, the multiple will be showed on the left of the image, the maximum multiple up to 5 times and image will be vague when magnification. After electronic amplification, press on the “capture” button the image will reduction, the multiple will be shown on the left of the image and it can reduce to the original size 18:Switch photo and video mode The system default is photo mode, press the “OK”... - Page 9 First make sure it is a certified memory card, then format it and try again. USB output S-EYE User Manual Overview HAYEAR is an application for imaging a dynamic image processing , has the following characteristics: User Interface 1. Toolbar:Take pictures/Recording video/Browse files.
- Page 10 “Snap” button to set picture file format and resolution. Recording: Click “Record” button to start video recording, Click again to stop recording. When recording ,there will be an animation indicator over the image. Browse:Click “Browse” button to open the folder where pictures and video stored. Device Control: Support different cameras, ...
- Page 11 Reset camera parameters. Open camera property dialog, generally supported by the DirectShow cameras Camera Control Measurement Icon Function Description Move Move or adjust the measurement tool. Point Setup > Video Overlay > Marker Line Measure length of a line. Vertical Rectangle Measure perimeter and acreage of a rectangle.
-
Page 12: Mac System
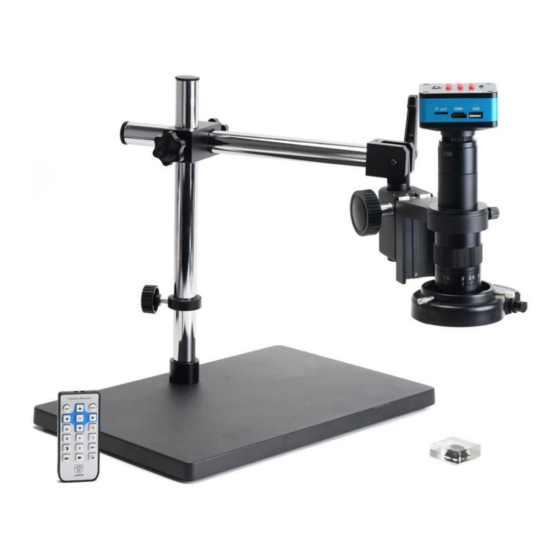
MAC System... - Page 13 Installation Guide Mount the pillar Tighten the screw after mounting the pillar Install the fixed ring Install the adjustment mechanism Install the adjustment mechanism Install the objective lens Install the universal rod fixed cube (Tighten the fixed ring to prevent it from Tighten the screw of universal rod fixed Install the universal rod sliding down)
- Page 14 If you have any question, or any advice and feedbacks, please feel free to contact us: info@hayear.com .We’d like to provide the best service to you. Our official website is http://www.hayear.com/. We reserve all the...
Need help?
Do you have a question about the HY-5299L and is the answer not in the manual?
Questions and answers