
Related Manuals for Hayear HY-6110


Summary of Contents for Hayear HY-6110
- Page 1 HAYEAR Industrial Camera Microscope User Manual HY-6110 Industrial Camera V1.2 Shenzhen HAYEAR Electronics Co., Ltd. http://www.hayear.com...
- Page 2 ◆ Color, Exposure, Date, Optical Frequency Setting ---------------------------------- 11 ◆ TF Card, System, Resolution Setting ------------------------------------------------- 13 ◆ Loop Recording, Date Stamp Setting ------------------------------------------------ 13 HAYEAR Software --------------------------------------------------------------------------- 15 Product Qualified Card --------------------------------------------------------------------- 20 Shenzhen HAYEAR Electronics Co., Ltd. http://www.hayear.com...
-
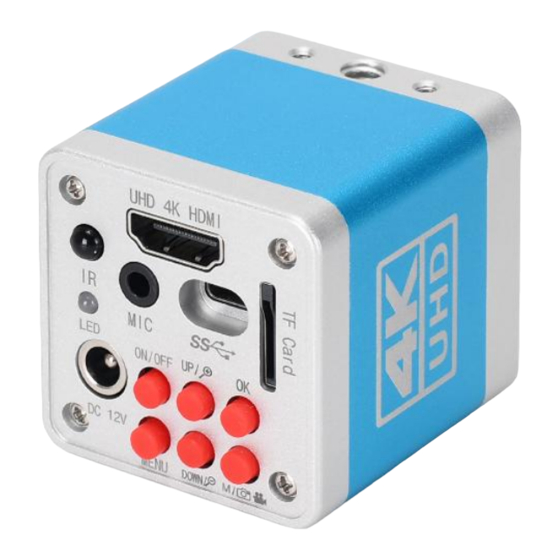
Page 3: Basic Parameter
Foreword HY-6110 is a multifunctional digital microscope with individually designed, developed and manufactured by Shenzhen Hayear Electronics Co., Ltd. It realizes Full HD, high object distance, multifunctional and multi-output at the same time. With help of the Hayear measuring software, it can easily meet many different requirements in many fields, such as industrial overhaul and teaching demonstration. -
Page 4: Packing List
8. If the image appears grey dot, please use a dust blower to blow the dust off the filter, do not use detergent to wipe. Packing list HY-6110 Camera ---------1 piece Power supply -------------1 piece Remote Control ----------1 piece Type c cable ---------------1 piece... -
Page 5: Quick Start
HAYEAR Remote control & button instruction Operation instruction Preparatory work 1. Remove the cover and install lens. △ Noting: tear off the dust protection in front of the ! sensitive film before installing the lens, otherwise the image will be vague!!! 2. - Page 6 HAYEAR *Video mode 1. Press “AE” to enter Video mode, press “OK” to star recording, press OK again to stop recording. Press “AE” to enter Video mode, press “AE”again Enter preview photo/video mode, press “OK”can play video and watch images. Press “AE” return to menu.
- Page 7 HAYEAR press OK to enter, then press UP/DOWN to select the resolution you need, and press OK to save the setting. Press Menu again to quit. Image ratio setting Press Menu button to enter main menu, press Down button to find the Image ratio option, press OK to enter, then press UP/DOWN to select the ratio you need, and press OK to save the setting.
-
Page 8: Image Quality Setting
HAYEAR One-Click exposure setting Press Menu button to enter main menu, press Down button to find the One-Click exposure option, press OK to enter, then press UP/DOWN to select, and press OK to save the setting. Press Menu again to quit. After turned on this function, adjust the brightness of the light source, the brighter the brightness, the higher the exposure. -
Page 9: Iso Setting
HAYEAR HDR Setting Press Menu button to enter main menu, press Down button to find the HDR option, press OK to enter, then press UP/DOWN to select, and press OK to save the setting. Press Menu again to quit. -
Page 10: Exposure Compensation
HAYEAR Exposure Compensation Press Menu button to enter main menu, press Down button to find the Exposure compensation option, press OK to enter, then press UP/DOWN to select the exposure value you need, and press OK to save the setting. Press Menu again to quit. -
Page 11: Video Resolution Setting
HAYEAR TF card format setting Press Menu button to enter main menu, press Down button to find the Format option, press OK to enter, then press UP/DOWN to select Cancel or Confirm. Select Cancel and press OK to give up the operation and return to the main menu;... -
Page 12: Loop Recording Setting
HAYEAR Loop recording setting Press Menu button to enter main menu under video mode, press Down button to find the Loop Recording option, press OK to enter. Select the duration you need and press OK to confirm and save. Press Menu to quit. - Page 13 HAYEAR HAYEAR Image Software Instruction Overview HAYEAR measurement software is dynamic image processing software specially developed for camera imaging, with the following features: 1. Support multi cameras, can be switched at any time as you need. 2. The image preview is rendered by GPU and supports dynamic image display with high frame rate and high resolution.
-
Page 14: User Interface
HAYEAR User Interface 1. Main menu: Used to display setting interface, language setting, cross line setting, software information, measurement function setting, etc. 2. Toolbar: Take pictures/Recording video/Browse files. 3. Sidebar tab: Control panels, camera property settings, color settings, exposure settings, etc. -
Page 15: Camera Control
HAYEAR Camera Control Camera device setting: Choose from different cameras, preview resolutions and output formats for images. Image flipped horizontally and vertically Exposure and gain control: If the connected camera does not support certain functions, such as the brightness target value, the corresponding interface controls will not operate. -
Page 16: How To Calibrate
HAYEAR rectangle Draw a rectangle and measure the area of the rectangle irregular Draw an irregular polygon, right click the mouse to end the polygon drawing, and measure the area of the polygon Circle Determine the circle with the center and radius, measure the... -
Page 17: Common Malfunctions
HAYEAR 2. After step 1, please find “Calibrate” in “Option”. 3. Enter actual data on the calibrate window After the calibration, please adjust the unit and magnification. Unit: The unit you need Magnification: The magnification of the microscope you using The measurement function can be used now. - Page 18 HAYEAR Qualified Certificate The product has passed the tested, approved for sale Inspector: - 18 -...
Need help?
Do you have a question about the HY-6110 and is the answer not in the manual?
Questions and answers