
Subscribe to Our Youtube Channel
Related Manuals for Hayear HY-5200


Summary of Contents for Hayear HY-5200
- Page 1 HDMI Industrial Camera User Manual HY-5200 Industrial Camera V1.3 ( English Version )
-
Page 2: Specification
Foreword HY-5200 is a multifunctional electronic microscope camera independently designed, developed and produced by us. It integrates high-definition picture quality, high object distance, multi-function, multi-output mode and convenient operation. Combine with matching measurement analysis software, It fully meets the various needs of industrial maintenance, teaching demonstration and other fields. -
Page 3: Package Include
8:If there is a gray shadow on the image, use the dust blower to blow off the dust on the optical filter, do not use the detergent to wipe it. Package Include HY-5200 Camera---------1pcs 5V Power supply --------1pcs HDMI Line-----------------1pcs... -
Page 4: Preparatory Work
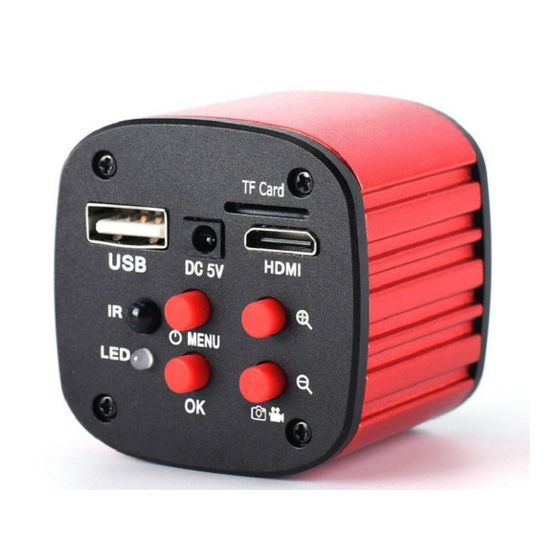
Remote Control and Key Operation Instruction Menu Photograph Line Enlarge Image preview Video Record Zoom+/Up Zoom-/down White balance Left Mirror Right Freeze Black and white Play Preparatory work 1. Twist the cover off and install the lens. △Noting: tear off the dust protection in front of the sensitive film before installing the lens, otherwise the image will be vague!!! 2. -
Page 5: Line Setting
Language choose( take Chinese as example ) 1、 Press the “MENU” button to enter the main menu, then press the “ ” button till the language setting is highlight, press the “OK” button to enter the language setting and press the “ ”... - Page 6 3、When the cross hair is highlight, press the “OK” button to open or close the cross hair. 4: Cross Hair Setting (1) Cross Hair Press the “OK” button to open the Cross Hair setting, the Cross Hair will be displayed on the middle part of the screen, press the “OK”...
-
Page 7: White Balance Setting
Direction Press the “OK” button, it will cycle among HOR-OFF-VER, HOR means horizontal line, VER means vertical line and OFF means turn off the line. (4) Position Press the “OK” button, it will decrease from 959-0. Long press on the “OK” button it will decrease rapidly and long press the “MODE”... -
Page 8: Color Setting
Color Setting Press the “MENU” button to open the main menu, press the “ ” button when it goes to the color option and press the “OK” button to enter the color setting menu, press the “ ” or “ ”... -
Page 9: Date And Time Setting
Format TF card 1、Press the “MENU” button to open the main menu, then press the “ ” button, when it goes to Format, press the “OK” button to select it. Press the “ ” or “ ” button to select cancel or confirm. When select confirm and press “OK”... -
Page 10: System Setting
System setting 1、 Press the “MENU” button to open the main menu, press the “ ” button to the default setting option and then press “OK” button to enter the setting page. Select the confirm it will return menu setting to defaults. Select cancellation it will exit. -
Page 11: Usb Output
HAYEAR User Manual Overview Hayear is an application for imaging a dynamic image processing , it has the following characteristics: 1. Support a variety of cameras, can switch at any time to use. 2. using GPU rendering for image previewing, support for live image display of high-resolution and high frame rates. -
Page 12: User Interface
User Interface 1. Toolbar:Take pictures/Recording video/Browse files. 2. Sidebar tab:Switching the rightmost control panels, currently provides camera control and measurement functions. 3. Control panel:Specific camera control and measurement operations. 4. Status bar:Display camera information, Change user interface view, Toggle measure result panel. 5. - Page 13 Normal camera parameter adjustment. Reset camera parameters. Open camera property dialog, generally supported by the DirectShow cameras Measurement Icon Function Description Move Move or adjust the measurement tool. Point Setup > Video Overlay > Marker Line Measure length of a line. Vertical Rectangle Measure perimeter and acreage of a rectangle.
- Page 14 How to calibration? The way to calibration 1. Calibration: select pixel, 100%, max resolution Click on the “option” to select “calibration” 3. Calibration: Magnificatior, Actual Length, Meter 4. After select “ calibration”, choose the unit and multiplying power you need, then you can calibrate.
-
Page 15: Software Installation
3. Third step: select the Cross in Type Software Installation Download the software: http://www.hayear.com The “HAYEAR” can support only the Windows system, the users can also download by the link on the official website. The operating systems: Windows 7、Windows8、Windows10、Linux The operating environment: Microsoft.Net Framework 4.0 , Microsoft Visual C++ 2010... - Page 16 Second, if there is still no image, please check the “Device Manager” of your PC, delete the “USB Camera” in the “Imaging devices” and rescan . Let the system identifies again. After all, in the “Imaging devices” there will show another name, which is “HY-5200”. Then restart the software. 3.Why there is a measurement error? First, if you want to get a more precise result, you need to use a more precise calibration.
- Page 17 If you have any question, or any advice and feedbacks, feel free to contact us: info@hayear.com . We’d like to provide the best service to you. Our official website is http://www.hayear.com/. We reserve all the right for the final explanation.
Need help?
Do you have a question about the HY-5200 and is the answer not in the manual?
Questions and answers