3M PPS Series 2.0 - Performance Spray Gun HVLP - Gravity Manual
- Manual (2 pages) ,
- Quick start manual (2 pages) ,
- Quick start manual (2 pages)
Advertisement
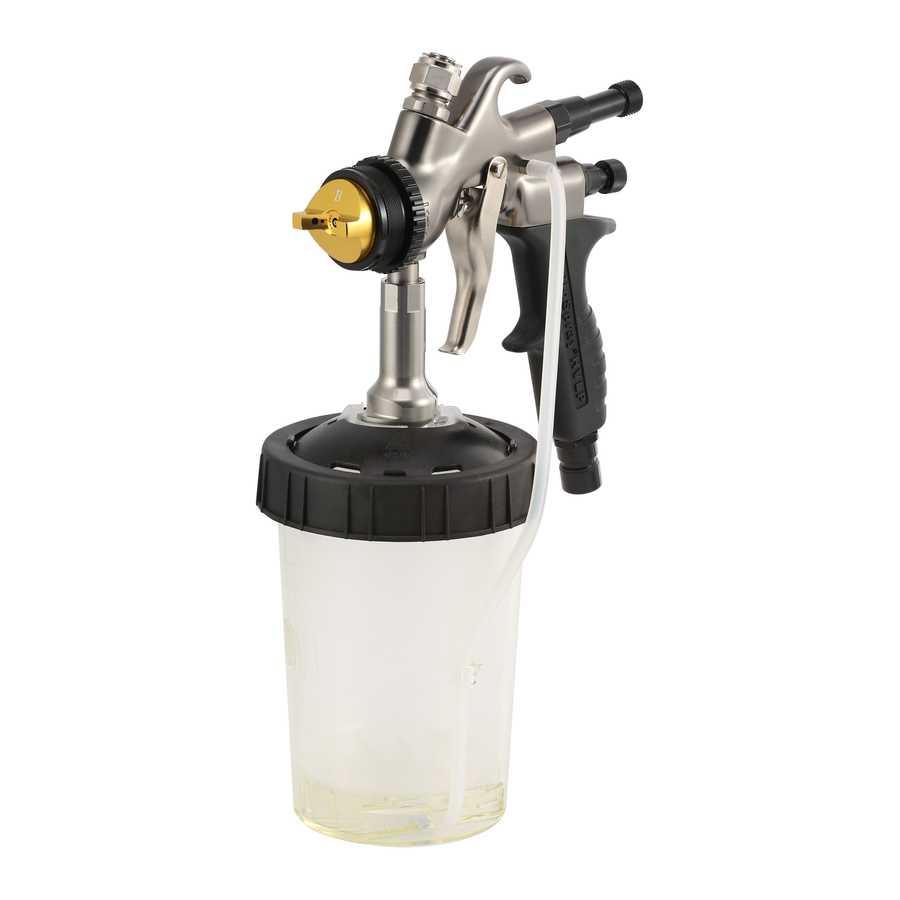
3M Performance Spray Gun HVLP - Gravity
Recommended Set Up Starting Points
Fan Control Knob: Open 2 rotations from closed position
Fluid Control Knob: Open 4 rotations from closed position
Air Flow control valve: 18-20 psi / 1.24 – 1.37 Bar
Maximum Operating Air Pressure: 20 psi | 1.38 bar
Assembly
- Attach the supplied air flow valve to the bottom of the gun.

- Attach the nozzle to the spray gun with the locking collar fully connected. Note: It is easier to install the nozzle while pulling the trigger backward toward the spray gun handle. To remove the nozzle from the spray gun, reverse the process.

- Attach 3M™ PPS™ Series 2.0 spray cup to nozzle.

- Once the spray gun is properly assembled you may attach the air line.


Nozzle Recommendation
* Starting points only, refer to Paint Manufacture for recommendation on fluid tip size
| 2.0 | 1.8 | 1.6 | 1.4 | 1.3 | 1.2 | |||||||
| High Viscosity Coatings |  | | ||||||||||
| Sprayable Fillers | | | ||||||||||
| High Build Primer | | | | |||||||||
| Primer Surfacer | | | | |||||||||
| Wet on Wet Primer | | | ||||||||||
| Primer Sealer | | | ||||||||||
| Direct Gloss | | |||||||||||
| Single Stage Top Coat | | |||||||||||
| Solvent Base Color | | | ||||||||||
| Clearcoat | | | | |||||||||
| Waterborne Base Coat | | | ||||||||||

Do not immerse spray gun or nozzles in cleaning solvents or gun washers. The maximum operational air pressure of this HVLP spray gun is 20 psi/ 1.38 bar. See manual for additional use and health and safety information.
Adding the 3M ™ PPS ™ Series 2.0 Spray Cup System Components
- Insert the 3M™ PPS™ Series 2.0 Spray Cup System disposable liner into the 3M™ PPS™ Series 2.0 Spray Cup System mixing cup.

- Pour material to be sprayed into the 3M™ PPS™ Series 2.0 Spray Cup System mixing cup. Stir as needed.

- Place the 3M™ PPS™ Series 2.0 Spray Cup System lid with built-in filter on top of the 3M™ PPS™ mixing cup with liner and snap into place.

- Turn until tight. Insert 3M™ PPS™ Series 2.0 Spray Cup System sealing plug prior to shaking or sealing.

- Attach spray gun to filled 3M™ PPS™ Series 2.0 Spray Cup System cup.


3M Performance Spray Gun HVLP - Pressure
Recommended Set Up Starting Points
Fan Control Knob: Open 2 rotations from closed position
Fluid Control Knob: Open 4 rotations from closed position
Air Flow Control Valve: 18 psi / 1.24 bar.
Maximum Operating Air Pressure: 18 psi / 1.24 bar
Maximum Operating Fluid Pressure: 50 psi/ 3.44 bar.
Assembly
- Attach the supplied air flow valve to the bottom of the gun.

- Attach Fluid Hose Whip to base of spray gun.

- Attach the nozzle to the spray gun with the locking collar fully connected.
Note: It is easier to install the nozzle while pulling the trigger backward toward the spray gun handle.

- Connect hose whip to nozzle.

- Attach fluid and pressure lines from bulk feed system (or pressure pot)
Note: Utilize the optional manual fluid shut-off valve, if desired, between hose whip and fluid supply


Nozzle Recommendation
*Starting points only, refer to Paint Manufacture for recommendation on fluid tip size
| 1.1 | 1.4 | 1.8 | |
| Textured Paints | | | |
| 1K Top Coats | | | |
| 2K Top Coats | | | |
| Base Coat / Single Stage Materials | | ||
| Clear Coats | | | |
| Epoxy / Urethanes Primers | | | |
| Adhesives | | | |
| Release Agents | |
Cleaning
Pressure
- Once the system is adequately flushed (pot, lines), depressurize the system (or close the optional fluid valve)
- After pressure is relieved, remove the hose whip from the nozzle.
- Remove nozzle from spray gun to clean residue from the nozzle. Rinse out and flush cleaning solvent through the nozzle with fluid tip pointed straight down into receptacle to collect waste solvent.
- Wipe needle tip. Store spray gun with a nozzle attached to protect the needle.
Gravity
- Once coating application is complete, disconnect the air hose from the gun.
- To drain back paint into cup - Invert cup, pull trigger, and tap the PPS™ cup on a table 3 times.
- Rinse out nozzle spout and flush cleaning solvent through the nozzle by pulling trigger with fluid tip pointed straight down into receptacle to collect waste solvent.
- Store spray gun with a nozzle attached to protect the needle.
For additional questions, contact your local 3M representative.
See manual for additional use and safety information.
Do not immerse spray gun or nozzles in cleaning solvents or gun washers.
The maximum operational air pressure of this HVLP spray gun is 18 psi/1.24 bar. The maximum operational fluid pressure is 50 psi/ 3.44 bar.
Please recycle.
3M United Kingdom plc Automotive Aftermarket
3M Centre, Cain Road, Bracknell, RG12 8HT
Phone: +44 (0)161 237 6391
aadukenquiries@mmm.com
www.3Mbodyshop.co.uk
3M Ireland Limited Automotive Aftermarket
The Iveagh Building, The Park Carrickmines, Dublin 18
Phone: +353 12160301
aadukenquiries@mmm.com
www.3Mbodyshop.co.uk
Printed in the UK. 3M and PPS are trademarks of 3M Company © 3M 2020. All rights reserved.

Documents / ResourcesDownload manual
Here you can download full pdf version of manual, it may contain additional safety instructions, warranty information, FCC rules, etc.
Download 3M PPS Series 2.0 - Performance Spray Gun HVLP - Gravity Manual
Advertisement


Need help?
Do you have a question about the PPS Series 2.0 and is the answer not in the manual?
Questions and answers