Advertisement
Technical Support and E-Warranty Certificate https://www.vevor.com/support
WATER CHILLER
USER MANUAL
MODEL: CL-280 CL-600
We continue to be committed to provide you tools with competitive price.
"Save Half", "Half Price" or any other similar expressions used by us only represents an
estimate of savings you might benefit from buying certain tools with us compared to the major
top brands and doses not necessarily mean to cover all categories of tools offered by us. You
are kindly reminded to verify carefully when you are placing an order with us if you are
actually saving half in comparison with the top major brands.
Advertisement
Table of Contents

Related Manuals for VEVOR CL-280


Summary of Contents for VEVOR CL-280
- Page 1 Technical Support and E-Warranty Certificate https://www.vevor.com/support WATER CHILLER USER MANUAL MODEL: CL-280 CL-600 We continue to be committed to provide you tools with competitive price. "Save Half", "Half Price" or any other similar expressions used by us only represents an estimate of savings you might benefit from buying certain tools with us compared to the major top brands and doses not necessarily mean to cover all categories of tools offered by us.
- Page 2 CustomerService@vevor.com This is the original instruction, please read all manual instructions carefully before operating. VEVOR reserves a clear interpretation of our user manual. The appearance of the product shall be subject to the product you received. Please forgive us that we won't inform you again if there are any technology or software updates on our product.
-
Page 3: Ⅰ. Safety Precautions
PLEASE READ THE INSTRUCTIONS CAREFULLY BEFORE USING THE EQUIPMENT AND KEEP IT FOR FURTHER REFERENCE Contents Ⅰ. SAFETY PRECAUTIONS Ⅱ. PRODUCT DESCRIPTION Ⅲ. DIMENSION AND SPECIFICATION Ⅳ. INSTALLATION Ⅴ. HOW TO USE Ⅵ. MAINTENANCE Ⅶ. CLEANING Ⅷ. ATTENTIONS IX. CIRCUIT DIAGRAM X. - Page 4 If the machine emits smoke, odor, motor noise and other abnormal conditions, Please do not use it. It may cause fire or electric shock. Do not disassemble, repair or rectify the machine during use. Doing so may result in fire or electric shock and personal injury. BE CAREFUL Do not damage or arbitrarily change the original power cord, and do not bend, forcibly pull, bind or press the power cord under heavy...
-
Page 5: Ⅱ. Product Description
Ⅱ. PRODUCT DESCRIPTION INTRODUCTION: Many thanks for choosing the VEVOR water chillers. --- with energy-saving, low-noise and excellent durable compressor provided by well-known brands. --- with finned condensor produced under strict quality control procedures and the radiator made with premium aluminum and coated with anti-corrosion paint. - Page 6 TECHNICAL PARAMETER MODEL CL-280 CL-600 POWER 0.1HP 0.25HP VOLT. & FREQ. 115V/60HZ 115V/60HZ COOLANT R134A R134A PUMP OUTFLOW ≥900L/H ≥1200L/H REFRIGERATING 280W 600W CAPACITY RECOMMENDED TANK ≤180L(47gal) ≤350L(92gal) SIZE WEIGHT (KG) 16.2 SIZE(MM) 310*320*370 320*360*410 CARTON DIMENSION(MM) 375*375*520 420*405*555 PERFROMANCE CURVES Temperature ℉...
-
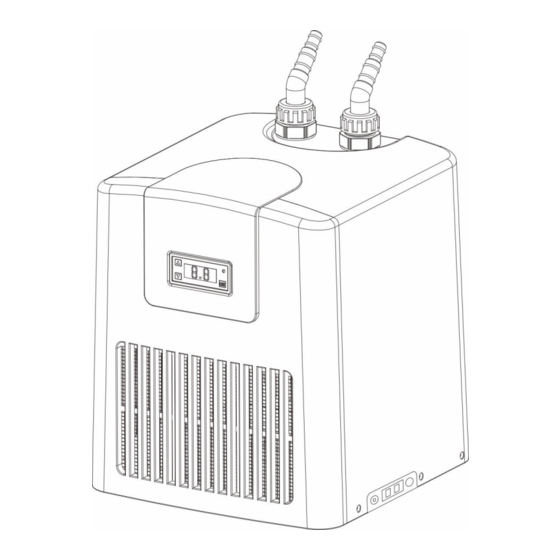
Page 7: Product Structure Diagram
Temperature ℉ Work time CL-600 (Min=Minute, H=Hour) NOTES: 1.Refrigerating effect will be impacted by ambient temperature, water circulation flow rate, installation position, lighting system, surrounding heat sources, room ventilation, aquarium/reservoir structure, etc. To get the best use of this machine, please strictly follow this instruction manual. - Page 8 heater socket:28*26*16 Size of connectors Φ16 Φ16 Φ12 Φ16 Φ10 Φ12 - 7 -...
- Page 9 Ⅲ. DIMENSION View from right side Back View Front View Top View DIMENSION MODEL L(mm) W(mm) H1(mm) H2(mm) CL-280 CL-600 - 8 -...
-
Page 10: Installation Method
Ⅳ. INSTALLATION TIPS!Please check the accessories before installation. Installation method: 1.Check the Accessories Box, inside of which there are 2 PVC hoses, 1 water pump, 1 hose clamp, and 1 suction cup. See the Fig.1. Take out the 2 hoses firstly. Fig. - Page 11 Fig. 5 Fig. 4 4.Pick the hose 1 ( the hose with one end connected to the chiller inlet), see the Fig. 5, then connect the other end to the water pump outlet, fasten the hose clamp tight (see the Fig. 6) Pick the hose 2 (the hose with one end connected to the chiller outlet), then insert the other end through the elastic ring of the suction cup, and fix it at proper position inside the aquarium wall (see the Fig.6.)
-
Page 12: Adjust Temperature
Ⅴ. HOW TO USE Before using the machine, please check: (1)Power cord is securely plugged into a grounded, correctly rated outlet. Make sure the power voltage and frequency are in accordance with the data specified on the nameplate or in the instruction manual. (2)The water inlet, outlet and hose are connected correctly and firmly, make sure there are no leaks or clogs. - Page 13 than the actual water temperature to cool. Fig.2. Fig.3. 3.After setting the temperature, the LCD shows the current water temperature, and the chiller will select cool or heat mode automatically after comparing the set temperature and actual water temperature. If in cool mode, the green indicator blinks in “delayed start” state, after a 3 minutes’...
- Page 14 Fig.5. Fig.6. Ⅵ. MAINTENANCE 1.Regular maintenance is needed each year. Please power off and unplug before maintaining. 2.Please DO NOT use chemicals such as gasoline, benzene and diluent to wipe the chiller. 3.Control panel and motor must be kept dry. If water or any liquid is found on the chiller, please turn off the power immediately and wipe it off with cloth before restarting.
- Page 15 Ⅶ. CLEANING Step1: Please unplug (important!). See the Fig. 1. Fig.1 Step2: Please gently “PULL” on the left and right sides of the air inlet window and open it (see the Fig. 2), and then take the air filter out. See the Fig. 3. Fig.2 Fig.3 Step3: To prevent dust accumulation, please clean the air filter in water or with a vacuum...
- Page 16 Ⅷ. ATTENTIONS - 15 -...
- Page 17 - 16 -...
-
Page 18: Circuit Diagram
IX. CIRCUIT DIAGRAM TROUBLE-SHOOTING Failures may be caused by improper operation or maintenance. Before sending the defective product for repair, check the troubleshooting table below. Failure Possible cause Possible solution The LCD doesn’t Bad power connection, Change fuse, check the power switch, plug. display and the blown fuse, broken... - Page 19 To calibrate water temperature: 1. Press and hold “SET” for 10 seconds to enter Temp Error Adjustment Function, digital display will show “CA”. The displayed There is tolerance 2. Press "▲"(turn up) or "▼" (turn down) water temp is between the LCD until the displayed figure equals to the different from the displayed temp and the...
- Page 20 TechnicalSupport and E-Warranty Certificate https://www.vevor.com/support...
Need help?
Do you have a question about the CL-280 and is the answer not in the manual?
Questions and answers