
Related Manuals for BUSCH COMBI COBRA DS 3181 C


Summary of Contents for BUSCH COMBI COBRA DS 3181 C
- Page 1 Instruction Manual COMBI Screw Vacuum Pumps and Boosters COBRA DS 3181 C 0870739194 | A0003_en-US | Original instructions 20/04/2023...
-
Page 2: Table Of Contents
WY (MB) rotary lobes vacuum pump... . 13 Congratulations on your purchase of the Busch vacuum pump. With Oil level, pump not operating ....13 watchful observation of the field’s requirements, innovation and steady... -
Page 3: Cobra Ds 3181 C
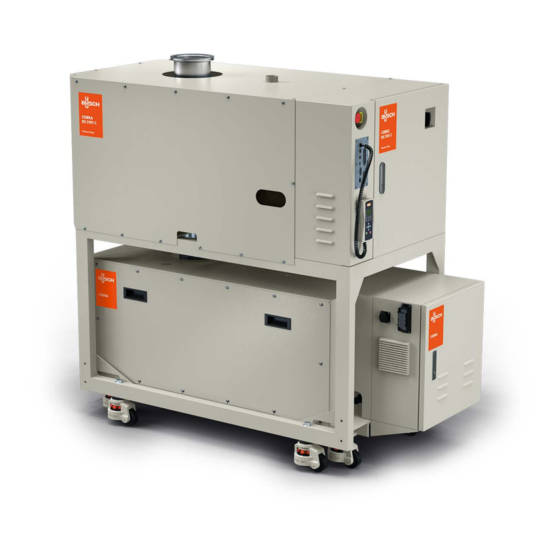
COBRA DS 3181 C DP Backing vacuum pump DP 0800 A ECO Power connection ESS Emergency stop switch Inlet MSH Main switch OUT Discharge (to silencer) PTB Pump terminal box RC Remote control SC Sensor connection DS 3181 C COBRA DS 3181 C Page 3 0870739194 (En) -
Page 4: Cobra Dp 0800 A
TS 1 1 OSG 1 DGR 1 DGR 2 TS 2 TS 5 TS 4 MV FS OSG 2 COBRA DP 0800 A FS Flow switch, cooling water TS 4 Temperature switch, oil temperature 140°C HE Heat exchanger TS 5 Overpressure sensor IN Inlet CLF Cooling liquid filler plug MV Solenoid valve, nitrogen system... - Page 5 CLP Glycol circulating pump CWI Cooling water inlet CWO Cooling water outlet CWV Cooling water regulating valve DGR 2 Regulating valve, dilution gas DGR 1 Regulating valve, dilution gas FME Nitrogen flow meter OSG 3 OSG 4 FS 1 Flow switch, cooling liquid FS 2 Flow switch, cooling water HE Heat exchanger FS 1...
-
Page 6: Product Description
Product description endplate of cylinder B-side. The flow of the cooling liquid is controlled by a flow switch FS 1. If the flow is under 1 l/min during a minimum time of 30 seconds, then the pump stops. The temperature regulator TS 2 will give an emergency signal if the temperature of the cooling liquid is above 100°C. -
Page 7: On/ Off Switch
Hot surface! Do not touch! cooling liquid (CLF) – cooling liquid temperature See "Installation and Maintenance Instructions, Busch PLC and Busch Filling in oil (OFP) LCD (No. 0870758077)". On/ Off switch WARNING! The vacuum pump is delivered with a circuit breaker. The function... -
Page 8: Noise Emission
COBRA DS vacuum pump rents, whether induced or via contact, exceed the limits in Table A5-1 of Appendix 5 (SEMI S2 guideline). Lock Out/ Tag Out procedure (Type 1 of electrical work) l Stop the pump with the remote control (press on STOP button during 10s) l Press on emergency stop button l Switch off the main disconnect switch... -
Page 9: Transport In Unpacked State
Transport in unpacked state Storage The vacuum pump is fastened to the pallet with fixing pins: Temporary storage u Unscrew the fastening nuts underneath the pallet. l Make sure that the intake and exhaust flanges are closed (put on the protective caps included in the delivery package of the vacuum CAUTION pump) l Store the vacuum pump... -
Page 10: Installation And Start-Up
Make sure that the vacuum pump is at least 1 m away from any cuum pump. If you have any doubts, contact your Busch representa- wall to ensure good cooling tive. -
Page 11: Cooling Water Connection
2 Nm is adhered to and check with a the vacuum pump. If you have any doubts, contact your Busch repre- calibrated torque wrench (Nuts M6). -
Page 12: Procedure To Connect The Inline Power Cable
Pump side Mating connectors Interface connection (50 poles) / PID Interface Pump side The information concerning the use of the Busch PLC and the Busch Supplier Part description Part number LCD can be found in the Operation and Maintenance manual (Art-No. -
Page 13: Oil Filling
Oil filling CAUTION The COBRA DS vacuum pumps are generally dispatched with oil al- ready in the vacuum pump. Before vacuum pump first startup, control In case of a vacuum pump filled with oil, make sure that by lifting the oil level. In the event of absence of this lubricant, please carry out the inclination angle of the vacuum pump do not exceed 5°... -
Page 14: Filling In Cooling Liquid
u Fill in more oil l Let the vacuum pump run for a few minutes If the intake line is equipped with a shut-off device: l Stop the vacuum pump and wait a few minutes u Open the shut-off device l Unscrew purge cap on cylinder upper plate If the intake line is not equipped with a shut-off device: l Control that cooling liquid level is just under cylinder upper plate... -
Page 15: Switching The Vacuum Pump On/ Off
The vacuum pump is intended for use in a potentially non-explosive u Unscrew the filler cap for the cooling liquid environment. u Drain the cooling liquid completely Max. permissible number of startings per hour: 6. u Screw on the filler cap for the cooling liquid again As far as temperature is concerned, the pump is suitable for continuous u Collect the cooling liquid and recycle it or dispose of it duty at any pressure between atmosphere and ultimate pressure. -
Page 16: Description Of The Load Lock Operation Mode
Description of the Load Lock operation mode: l LL Mode = Off u The mode « Load Lock » is de-activated, the module DP and the module MB, when present, operate constantly at their maximum frequency of rotation. NOTE: the parameters « DP (or MB) Current Level », « Time Before » and «... -
Page 17: Standard Operational Time Chart
Standard operational time chart Signal control mode (Select LL mode = EXTERN) LCD start or Remote start (tool→pump) 1) Cold start delay (5 sec) 50/60Hz Pump speed Dry pump 90Hz 30Hz Booster 2) MB on delay Pump ready (pump→tool) Process on (tool→pump) pump start-up processing... -
Page 18: Current Control Mode (Select Ll Mode = Auto)
Current control mode (Select LL mode = AUTO) LCD start or Remote start (tool→pump) 1) Cold start delay (5 sec) 50/60Hz Pump speed Dry pump 90Hz 30Hz Booster 2) MB on delay Pump ready (pump→tool) open(on) close(off) open(on) close(off) close(off) open(on) Chamber open/close (gate valve on/off) pump stop... -
Page 19: Maintenance
[mm] around the machine must be set up. l Inspect the vacuum pump for leaks of cooling liquid - if there are leaks, repair the vacuum pump (Busch) CAUTION l Inspect the vacuum pump for leaks of cooling water - if there are leaks, repair the vacuum pump (Busch) The surface temperature of the vacuum pump can exceed 50°C... -
Page 20: Every 16 000 Hours Of Operation, At The Latest After 4 Years
If the oil level lies below the target circle: l Drain the oil (see “Draining the oil”) u Top up with oil (see “Refilling oil”) l A main inspection of the vacuum pump (Busch) If the oil level exceeds the target circle: Lock Out/ Tag Out procedure u Check the condensate drain l Drain the oil (see “Draining the oil”) -
Page 21: Checking The Colour Of The Oil
If dark oil similar to the example shown is observed, you have to l Carefully remove the oil drain plugs again and drain any remaining contact the Busch Customer Service without delay. Oil change l Make sure that the seals of the drain plugs are not damaged and that they sit properly. -
Page 22: Wy (Mb) Rotary Lobes Vacuum Pump
l Make sure that the oil level is in the target circle of the oil sight l Close the purge cap on cylinder endplate B-side glasses l Fill in again by filler hole until cooling liquid flows by purge cap of l Make sure that the seals of the filler cap are not damaged and that cylinder upper plate they sit properly. -
Page 23: Checking The Cooling Water
Decontamination"), which can be downloaded from Checking the current consumption www.buschvacuum.com. Busch service will only accept vacuum pumps that come with a com- l Check the current intensity of the motors of the DP and MB pletely filled in and legally binding signed form. - Page 24 When the product has reached the end of its lifetime: – decontaminate the vacuum pump CAUTION Only authorised personnel may carry out dismantling work on the vacuum pump. Before work begins, the operator of the vacuum pump must fill in a form or a “Declaration of Decontamination” that provides information on possible dangers and appropriate measures.
-
Page 25: Oil Type/ Quantity
Make sure that the oil type corresponds to specification: – Busch YLC 250 B, Art. No. 0831 131 400 (0,5 l @ 1 kg) WARNING The use of chemically contaminated or polluted oil can lead to hazardous pump conditions which could cause personal injury. -
Page 26: Cooling Liquid Type/ Quantity
Cooling liquid type/ quantity Cooling liquid type l Make sure that the cooling liquid type corresponds to specifications : Specifications Zitrec M-25 (ready-to-use) 20 litres can 5 litres can part no. 0831 238 761 part no. 0831 563 469 Cooling liquid quantity The quantity of cooling liquid specified in this instructions manual is of informative nature only. -
Page 27: Technical Data
Technical data DS 3181 C Technical data Nominal pumping speed 3500 (2065) 60 Hz /h (cfm) Torr 7,5 x 10 Ultimate pressure mbar 1,0 x 10 12,4 kW (MB: 90 Hz) Power consumption at 60 Hz kW on idle mode ultimate pressure 10,3 (MB: 30 Hz) -
Page 29: Eu-Declaration Of Conformity
EU Declaration of Conformity This Declaration of Conformity and the CE-markings affixed to the nameplate are valid for the machine within the Busch scope of delivery. This Decla- ration of Conformity is issued under the sole responsibility of the manufacturer. -
Page 30: Uk Declaration Of Conformity
UK Declaration of Conformity This Declaration of Conformity and the UKCA-markings affixed to the nameplate are valid for the machine within the Busch scope of delivery. This Dec- laration of Conformity is issued under the sole responsibility of the manufacturer. - Page 31 Notes Instruction Manual COBRA DS 3181 C_EN_en...
- Page 32 With a network of over 60 companies in more than 40 countries and agencies worldwide, Busch has a global presence. In every country, highly competent local personnel delivers custom-tailored support backed by a global network of expertise. Wherever you are.
Need help?
Do you have a question about the COMBI COBRA DS 3181 C and is the answer not in the manual?
Questions and answers