
Related Manuals for Starkey Genesis AI


Summary of Contents for Starkey Genesis AI
- Page 1 Your Rechargeable Hearing Aid User Manual Genesis AI Rechargeable Products mRIC R (Micro Receiver-In-Canal) Rechargeable RIC RT (Receiver-In-Canal) Rechargeable with Telecoil...
- Page 2 Warnings, Cautions, & Notices REQUIRED HEARING AID INFORMATION The following additional information is provided in compliance with U.S. Food and Drug Administration (FDA) regulations: WARNING: People younger than 18 should go to a doctor before using this. People younger than 18 years old need specialized care, and using this without a medical evaluation may worsen impairment or disability.
- Page 3 Warnings, Cautions, & Notices CAUTION: The sound output should not be uncomfortable or painful. You should turn down the volume or remove the device if the sound output is uncomfortably loud or painful. If you consistently need to turn the volume down, you may need to farther adjust your device. CAUTION: You might need medical help if a piece gets stuck in your ear.
- Page 4 Warnings, Cautions, & Notices A person who is younger than 18 years old with hearing loss should have a medical evaluation by a doctor, preferably an ENT, before buying a hearing aid. The purpose of a medical evaluation is to identify and treat medical conditions that may affect hearing but that a hearing aid won’t treat on its own.
- Page 5 It is well-known that mobile phones are potential sources of noise for hearing aids. Your Starkey Hearing Aids have been tested for compliance to two standards that define hearing aid immunity to digital wireless devices and meet the requirements of ANSI C63.19-...
- Page 6 Congrats! Your best life begins with better hearing.
- Page 7 Introducing your new hearing aids. Great to have you hear. Use this helpful manual to get to know your new hearing aids – and get the most out of your hearing experience. After all – when you hear better, you live better.
- Page 8 What’s included Hearing aid styles covered in this user manual (select yours): mRIC R RIC RT Serial Number Left: Right: Your hearing aids contain an on-board, rechargeable lithium-ion battery that is not removable. 8 | What’s included...
-
Page 9: Table Of Contents
Table of contents 1. Warnings, Cautions, & Notices 2. Get to know your hearing aids Meet your hearing aids Use your hearing aids Care for your hearing aids 3. Troubleshooting guide 4. Additional guidance Intended use FCC information Regulatory information Technical data 9 | TOC... -
Page 11: Get To Know Your Hearing Aids
Get to know your hearing aids • Meet your hearing aids • Use your hearing aids • Care for your hearing aids... -
Page 12: Meet Your Hearing Aids
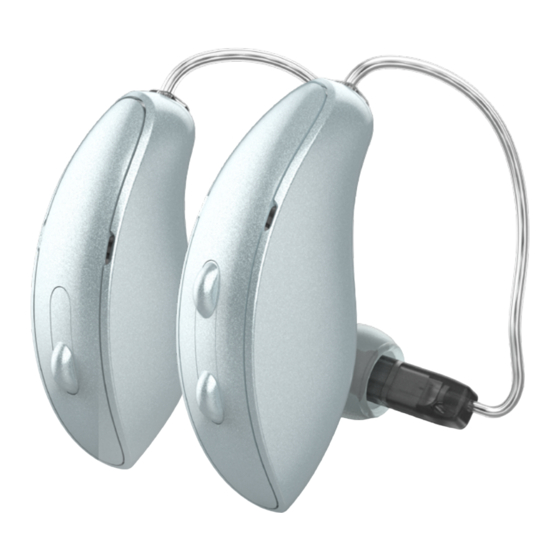
Meet your hearing aids Overview 1. Cable 2. Microphones 3. User control mRIC R: Push button RIC RT: Rocker switch 4. Receiver 5. Wax guard (included accessory) 6. Manufacturer, model name, & serial number 7. Charging contacts 8. Side indicator RED is for right ear, BLUE is for left ear 9. - Page 13 mRIC R RIC RT NOTE: Illustrations below represent both mRIC R and RIC RT hearing aids. 13 | Get to know your hearing aids...
-
Page 14: Use Your Hearing Aids
Use your hearing aids STEP 1: Charge your hearing aids Select your charger: StarLink Charger StarLink Premium Mini Charger Before using your hearing aids for the first time, fully charge them. See Your StarLink Charger User Manual. 14 | Get to know your hearing aids... - Page 15 Use your hearing aids STEP 2: Put on your hearing aids 1. Take your hearing aid from the charger. Slide the top of it behind your ear, so the cable and earbud (or earmold) hang in front. 2. Ease the earbud or earmold into your ear canal until secure.
- Page 16 Use your hearing aids 3. Tuck the optional retention lock into the bottom curve of your ear, so that the tip bends toward the back of your head. Done! NOTE: • Minor irritation and/or inflammation may occur as your ear becomes accustomed to having an object in it.
- Page 17 Use your hearing aids STEP 3: Remove your hearing aids 1. Gently pull the optional retention lock from the bottom curve of your ear then pull the earbud or earmold from your ear canal. 2. Lift your hearing aid out from behind your ear.
- Page 18 Use your hearing aids Power ON/OFF An indicator will sound through your hearing aid when you turn it ON or OFF: • ON indicator – a series of tones that increase in pitch. • OFF indicator – a series of tones that decrease in pitch.
- Page 19 Use your hearing aids Turning ON Turning OFF Each hearing aid will turn ON after you remove it from the Each hearing aid charger. will turn OFF when A 3-second delay Charger you place it in the occurs before your charging slot (and hearing aid turns begin charging).
- Page 20 Use your hearing aids Power ON/OFF Reminder – StarLink Chargers need to be plugged in to an external power source to charge hearing aids (i.e., wall outlet). StarLink Premium Mini Chargers must have a charged battery or can be plugged into an external power source. Battery indicators •...
- Page 21 Use your hearing aids User control Your hearing aid user control lets you control your hearing aids by hand. This is set up by your hearing care professional, who can also program the button to let you use many smart features. Your user control operates in 3 ways: •...
- Page 22 Use your hearing aids Phone calls and hearing aids Your hearing aids are designed to accommodate calls on your mobile or landline phone. • Landline calls To use your landline phone while wearing hearing aids, talk to your hearing care professional. They can help you set up a “telephone”...
-
Page 23: Care For Your Hearing Aids
Care for your hearing aids Keep your hearing aid clean at all times. Heat, moisture and foreign substances can result in poor performance. 1. Do not clean using water, solvents, cleaning fluids or oils. Do not take your hearing aid apart or insert a cleaning tool inside of them. - Page 24 Care for your hearing aids Storage tips When you’re not wearing your hearing aids, protect them from damage using these storage tips: • Store them inside your storage case or charger (plugged in or powered, so they’re ready to use again).
- Page 25 Care for your hearing aids Replacing wax guards The wax guards in your hearing aids prevent earwax from building up in the receiver. It’s best to replace these if you notice built-up debris or poor sound from your hearing aids. To replace your wax guards: 1.
- Page 26 Care for your hearing aids 3. Use the opposite end of the application stick to insert the new wax guard straight into the hearing aid. Push firmly. 4. Pull straight out to remove the application stick. Do not twist. Discard the application stick. Done! 26 | Get to know your hearing aids...
- Page 27 Care for your hearing aids Replacing earbuds It’s a good idea to replace your earbud regularly or if your earbud is loose, misshaped, or discolored from oils and moisture. A change in sound quality can also be a signal to replace your earbuds.
- Page 28 Care for your hearing aids 3. Place the end of the receiver into the middle of your new earbud. 4. Push firmly to ensure the earbud attaches securely to the receiver. 5. Ensure the earbud fully covers the threaded portion of the receiver. Done! 28 | Get to know your hearing aids...
- Page 29 Troubleshooting guide...
-
Page 30: Troubleshooting Guide
Troubleshooting guide If, for any reason, your hearing aid does not operate properly, do NOT attempt to fix it yourself. Not only are you likely to violate any applicable warranties or insurance, you could easily cause further damage. Should your hearing aid fail or perform poorly, check this troubleshooting guide for possible solutions. - Page 31 Troubleshooting guide Possible Symptom Solutions causes 1. Clean your hearing aids. Blocked earbud, 2. Replace the earmold, or tubing. wax guards as needed. Inconsistent 1. Place your hearing aid hearing aids in performance. the charger until charging begins. A restart is needed. 2.
- Page 32 Troubleshooting guide Possible Symptom Solutions causes 1. Clean your hearing aids. Blocked earbud, 2. Replace the earmold, or cable. wax guards as needed. Place your hearing aids in the charger until the charger Charging is needed. No sound indicator lights coming from change from your hearing...
-
Page 33: Additional Guidance
Additional guidance • Intended use • FCC information • Regulatory information • Technical data... -
Page 34: Intended Use
Intended use INTENDED USE: An air conduction hearing aid is a wearable sound-amplifying device intended to compensate for impaired hearing. Hearing aids are available in multiple gain/output levels appropriate to treat hearing losses ranging from mild to profound. Your hearing aids are designed to operate in public and residential environments and are designed to comply with international Electromagnetic Compatibility emissions and immunity standards for medical devices. - Page 35 Intended use International Use Your hearing aids are approved to operate at a radio frequency that is specific to your country or region and might not be approved for use outside your country or region. Be aware that operation during international travel may cause interference to other electronic instruments, or other electronic instruments may cause interference to your hearing aids.
- Page 36 Intended use INSTRUMENT DESCRIPTION Multiflex Tinnitus Technology is a software function that generates sound which is programmed into a hearing aid. The hearing aid may be used in one of three modes of operation: as a hearing aid, as a tinnitus treatment instrument or as a hearing aid and tinnitus treatment instrument.
- Page 37 Intended use TINNITUS THERAPY CONCEPTS AND BENEFITS Multiflex Tinnitus Technology can be used as a part of a tinnitus treatment program. Multiflex Tinnitus Technology plays a white noise through the hearing aid. Multiflex Tinnitus Technology is programmed according to your hearing loss and preference, and your hearing care professional can adjust the settings of Multiflex Tinnitus Technology to meet your needs.
- Page 38 Intended use Important Notice for Prospective Sound Generator Users Good health practice requires that a person with tinnitus have a medical evaluation by a licensed physician (preferably a physician who specializes in diseases of the ear) before using a sound generator. Licensed physicians who specialize in diseases of the ear are often referred to as otolaryngologists, otologists or otorhinolaryngologists.
-
Page 39: Fcc Information
FCC ID: EOA-24GENMACRO IC: 6903A-24GENMACRO EU ADVERSE EVENT REPORTING Any serious incident that has occurred in relation to your Starkey device should be reported to your local Starkey representative and the Competent Authority of the Member State in which you are established. -
Page 40: Regulatory Information
Consult user manual Keep dry Instructions for Disposal of Old Electronics Starkey Laboratories, Inc. encourages, the EU requires, and your local community laws may require, that your hearing aids be disposed of via your local electronics recycling/disposal process. The instructions below are provided for the benefit of disposal/ recycling personnel. - Page 41 Regulatory information Symbol Applicable Symbol Symbol Meaning Standard Number BS EN ISO Manufacturer 5.1.1 15223-1:2021 Manufacturer symbol – To identify the Authorized manufacturer of a product representative BS EN ISO 5.1.2 in the European 15223-1:2021 Community Date of BS EN ISO EEA/EU/EC European Authorised 5.1.3 Representative symbol...
-
Page 42: Technical Data
Technical data mRIC R ANSI/IEC ANSI/IEC ANSI/IEC Measurement 2cc Coupler 2cc Coupler 2cc Coupler Peak OSPL90 (dB SPL) HFA OSPL90 (dB SPL) Peak Gain (dB) HFA Full-On Gain (dB) Frequency Range (Hz) <100-9400 <100-9500 <100-9200 HFA Frequencies (kHz) 1.0,1.6,2.5 1.0,1.6,2.5 1.0,1.6,2.5 Reference Test Gain (dB) Equivalent Input Noise (dB) Harmonic Distortion... - Page 43 Technical data Matrices: L, M, P Battery: Lithium-ion OSPL90 FOG 50 1000 10000 OSPL90 FOG 50 1000 10000 OSPL90 FOG 50 1000 10000 43 | Additional guidance...
- Page 44 Technical data mRIC R CUSTOM CASED ANSI/IEC ANSI/IEC ANSI/IEC ANSI/IEC Measurement Coupler Coupler Coupler Coupler Peak OSPL90 (dB SPL) HFA OSPL90 (dB SPL) Peak Gain (dB) HFA Full-On Gain (dB) <100- <100- <100- <100- Frequency Range (Hz) 9400 9500 9200 5800 HFA Frequencies (kHz) 1.0,1.6,2.5 1.0,1.6,2.5 1.0,1.6,2.5 1.0,1.6,2.5...
- Page 45 Technical data Matrices: L, M, P, UP Battery: Lithium-ion OSPL90 FOG 50 1000 10000 OSPL90 FOG 50 1000 10000 OSPL90 FOG 50 1000 10000 OSPL90 FOG 50 1000 10000 45 | Additional guidance...
- Page 46 Technical data RIC RT ANSI/IEC ANSI/IEC ANSI/IEC Measurement 2cc Coupler 2cc Coupler 2cc Coupler Peak OSPL90 (dB SPL) HFA OSPL90 (dB SPL) Peak Gain (dB) HFA Full-On Gain (dB) Frequency Range (Hz) <100-9400 <100-9500 <100-9200 HFA Frequencies (kHz) 1.0,1.6,2.5 1.0,1.6,2.5 1.0,1.6,2.5 Reference Test Gain (dB) Equivalent Input Noise (dB) Harmonic Distortion...
- Page 47 Technical data Matrices: L, M, P Battery: Lithium-ion OSPL90 FOG 50 1000 10000 OSPL90 FOG 50 1000 10000 OSPL90 FOG 50 1000 10000 47 | Additional guidance...
- Page 48 Technical data RIC RT CUSTOM CASED ANSI/IEC ANSI/IEC ANSI/IEC ANSI/IEC Measurement Coupler Coupler Coupler Coupler Peak OSPL90 (dB SPL) HFA OSPL90 (dB SPL) Peak Gain (dB) HFA Full-On Gain (dB) <100- <100- <100- <100- Frequency Range (Hz) 9400 9500 9200 5800 HFA Frequencies (kHz) 1.0,1.6,2.5 1.0,1.6,2.5 1.0,1.6,2.5 1.0,1.6,2.5...
- Page 49 Technical data Matrices: L, M, P, UP Battery: Lithium-ion OSPL90 FOG 50 1000 10000 OSPL90 FOG 50 1000 10000 OSPL90 FOG 50 1000 10000 OSPL90 FOG 50 1000 10000 49 | Additional guidance...
- Page 50 Notes 50 | Notes...
- Page 51 Notes 51 | Notes...
- Page 52 ® Bluetooth SIG, Inc. and any use of such marks by Starkey is under license. Genesis, Starkey, and StarLink are trademarks of Starkey Laboratories, Inc. ©2023 Starkey Laboratories, Inc. All Rights Reserved. 5/23 BKLT3143-01-EN-ST-CA Patent: www.starkey.com/patents...
Need help?
Do you have a question about the Genesis AI and is the answer not in the manual?
Questions and answers
Re: Starkey Genesis AI 12. What does the red exclamation point symbol signify? The self test sauys that everything is OK but the left hearing aid shows a battery with a red exclamation point.