Advertisement
Quick Links
Advertisement

Related Manuals for Sim-Lab GT1-PRO


Summary of Contents for Sim-Lab GT1-PRO
- Page 1 INSTRUCTION MANUAL GT1-PRO COCKPIT VERSION 1.0 Last updated: 12-07-2023...
-
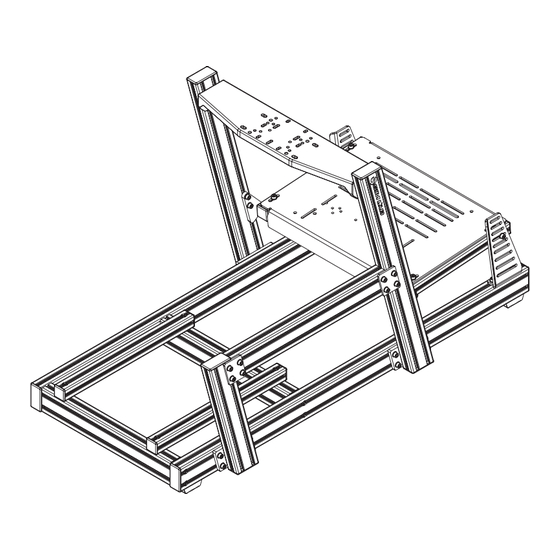
Page 2: Before You Start
BEFORE YOU START: Thank you for purchasing this Sim-Lab product! On the following pages, you will find detailed instructions on assembly. This requires only a set of simple tools and some of your time. Please check the bill of materials before starting (page 18) and make sure all the parts are delivered. - Page 3 Rubber M8 X 20 Slot-Nut M8 Profile 80X40 Note: the counterbores should point (arrows) End-Cap Foot to the outside of the cockpit. This page is showing assembly for the LEFT side. BUILD 2X 3 19...
- Page 4 Washer M8 M8 X 40 (DIN 988) 4 19...
- Page 5 Washer M8 Slot-Nut M8 Profile 40X40 M8 X 40 End-Cap (DIN 988) 5 19...
- Page 6 Sandwhich Plate Profile 80X40 M8 X 20 Slot-Nut M8 End-Cap Angled LEFT* BUILD 2X Part A12 is only countersunk on one side, therefore only fits on the LEFT side of the cockpit. For the RIGHT side of the upright assembly, see the next page. 6 19...
- Page 7 Washer M8 M8 X 20 Slot-Nut M8 7 19...
- Page 8 Slot-Nut M8 Profile 40X40 End-Cap BUILD 2X 8 19...
- Page 9 M8 X 16 Washer M8 Slot-Nut M8 Pedal Deck Pedal Deck Pedal Deck M8 X 20 Upright Left Upright Right Pivot (A23) (A22) 9 19...
- Page 10 M8 X 16 Washer M8 M8 X 20 (A23) (A22) 10 19...
- Page 11 Pedal Deck M8 X 16 Washer M8 11 19...
- Page 12 Washer M8 Wheel Deck M8 X 20 12 19...
- Page 13 Side Mount Profile 80X40 M8 X 20 Slot-Nut M8 End-Cap Angled Sandwhich Plate Part A15 is symmetrical and can be used on both sides of the cockpit. 13 19...
- Page 14 Side Mount Washer M8 M8 X 16 Slot-Nut M8 Plate 14 19...
- Page 15 Washer M8 Slot-Nut M8 M8 X 20 15 19...
- Page 16 Washer M8 Slot-Nut M8 M8 X 16 16 19...
- Page 17 Servo Mount Servo Mount Washer M8 Lock-Nut M8 M8 X 25 Left Right 17 19...
-
Page 18: Hardware Kit
Machined. Slot-Nut M8 40X40 Length=400mm HARDWARE KIT Pedal deck upright left Pedal deck upright right Pedal deck pivot BOX B - GT1-Pro Servo Mount Pedal deck HARDWARE KIT Sandwich plate left Part QTY Note Sandwich plate right Servo mount left... - Page 19 They can be reached at support@sim-lab.eu Alternatively, we now have a Discord server where there are quite some experienced Sim-Lab customers hanging out. They might just help you along if you ask them nicely ;) www.sim-lab.eu/discord...
Need help?
Do you have a question about the GT1-PRO and is the answer not in the manual?
Questions and answers