
Related Manuals for DFI CMS631-Q470E/H420E


Summary of Contents for DFI CMS631-Q470E/H420E
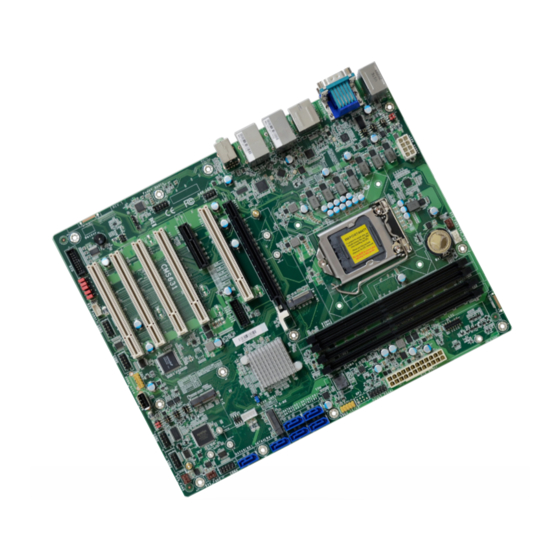
- Page 1 CMS631-Q470E/H420E ATX Industrial Motherboard User’s Manual © July 13, 2023 DFI Inc.
- Page 2 1. The changes or modifications not expressly approved by the party responsible for com- are the properties of the respective owners. pliance could void the user’s authority to operate the equipment. 2. Shielded interface cables must be used in order to comply with the emission limits. User's Manual | CMS631-Q470E/H420E...
-
Page 3: Table Of Contents
► Serial Port 1,2 Configuration ....31 NCT6126D Super IO Configuration ► Serial Port 3,4 Configuration ....31 NCT6126D Super IO Configuration ► Serial Port 5,6 Configuration ....32 NCT6126D HW Monitor ....................32 NCT5525D HW Monitor ► Smart FAN Function ..........33 User's Manual | CMS631-Q470E/H420E... - Page 4 • To reduce the risk of electric shock, unplug the power cord before removing the sys- tem chassis cover for installation or servicing. After installation or servicing, cover the system chassis before plugging the power cord. User's Manual | CMS631-Q470E/H420E...
- Page 5 The board and accessories in the package may not come similar to the information listed above. This may differ in accordance with the sales region or models in which it was sold. For more information about the standard package in your region, please contact your dealer or sales representative. User's Manual | CMS631-Q470E/H420E...
-
Page 6: Chapter 1 - Introduction
4 x USB 2.0 (2.54mm pitch, colay vertical Type A, optional: MOQ required) 1 x USB 2.0 vertical Type A H420E: 2 x USB 3.2 Gen 1 2 x USB 2.0 (2.54mm pitch, colay vertical Type A, optional: MOQ required) User's Manual | CMS631-Q470E/H420E... - Page 7 Environment: GB, GC - Ground Benign, Controlled H420E: 521,024 hrs @ 25°C ; 292,119 hrs @ 45°C ; 181,960 hrs @ 60°C ; 155,038 hrs @ 65°C Calculation Model: Telcordia Issue 4 Environment: GB, GC - Ground Benign, Controlled User's Manual | CMS631-Q470E/H420E...
-
Page 8: Dimensions
Chapter 1 INTRODUCTION ▲ Dimensions ▲ Block Diagram User's Manual | CMS631-Q470E/H420E... -
Page 9: Chapter 2 - Hardware Installation
SATA 1 (R1) JP25 (Opt.) SATA 2 (R2) JP11 PCI 5 Buzzer JP12 SATA 3 (R3) JP13 JP14 JP15 Digital I/O COM2 COM3 COM4 COM5 USB2_ USB2_14 SATA 4 SATA 5 COM6 Power (R4) (R5) 9/10 User's Manual | CMS631-Q470E/H420E... -
Page 10: System Memory
Data will be accessed in chunks of 128 bits from the memory channels. Dual channel provides better system performance because it doubles the data transfer rate. Features • Q470E: Four 288-pin Non-ECC UDIMM up to 128GB • H420E: Two 288-pin Non-ECC UDIMM up to 64GB • Dual Channel DDR4 2400/2666/2933MHz User's Manual | CMS631-Q470E/H420E... -
Page 11: Removing The Dimm Module
Hold the card by its edges and remove it from the slot. The tabs snap automatically to the edges of the card and lock the card in place. Step 1 Step 1 Step 2 Step 2 Step 3 Step 3 User's Manual | CMS631-Q470E/H420E... -
Page 12: Cpu
Align the 4 screw holes and tighten the heat sink up by inserting screws, DO remember to con- nect the fan cable on the board. There are 4 screw holes around the CPU for the heat sink to be mounted. User's Manual | CMS631-Q470E/H420E... -
Page 13: Jumper Settings
„ JP4 (COM 1) / JP7 (COM 2) 2 4 6 2 4 6 1 3 5 1 3 5 1-3, 2-4 On: 3-5, 4-6 On: RS232 (default) RS232 with power „ 1-2 On: Normal (default) „ 2-3 On: Clear CMOS Data User's Manual | CMS631-Q470E/H420E... -
Page 14: Dio Power & Voltage (Jp11/12/13/14/15)
„ JP11 (DIO 0~3 PWR) / JP12 (DIO 4~7 PWR) / JP13 (DIO 8~11 PWR) / JP14 (DIO 12~15 PWR) „ ATX mode „ AT mode 1-2 On: 2-3 On: DIO PWR (default) 2-3 On: 1-2 On: GND (default) 3V3SB „ JP15 1-2 On: 2-3 On: 5VSB (default) User's Manual | CMS631-Q470E/H420E... -
Page 15: Connector Power Control (Jp27&Jp28)
JP24 is used to set InnoAGE functions. *Note: Currently support InnoAge out-of-band management through RJ45 only. JP27 and JP28 are used to control the power of M2CN1(M.2-M1) and M2CN2(M.2-M2). Assignment INNOAGE_PCRST# INNOAGE_RECOV# 1-2 On: 2-3 On: INNOAGE_PWRLED# 3V3 (default) 3V3DU INNOAGE_HDDLED# INNOAGE_PWRBTN# User's Manual | CMS631-Q470E/H420E... -
Page 16: Usb Ports
1 x USB 2.0 internal ports, (USB 14) Wake-On-USB Keyboard/Mouse The Wake-On-USB Keyboard/Mouse function allows you to use a USB keyboard or USB mouse to wake up a system from the S3 (STR - Suspend To RAM) state. User's Manual | CMS631-Q470E/H420E... -
Page 17: Graphics Interfaces
The VGA port is used for connecting a VGA monitor. Connect the monitor’s 15-pin D-shell cable connector to the VGA port. After you plug the monitor’s cable connector into the VGA port, gen- tly tighten the cable screws to hold the connector in place. DSR- DSR- RTS- RTS- CTS- CTS- User's Manual | CMS631-Q470E/H420E... -
Page 18: Rj45 Lan Ports
Mic-in Jack (Pink) This jack is used to connect an external microphone. Front Audio The front audio connector allows you to connect to the second line-out and mic-in jacks that are at the front panel of your system. User's Manual | CMS631-Q470E/H420E... -
Page 19: Internal I/O Connectors
6 Serial ATA 3.0 ports with data transfer rate up to 6Gb/s DIO8 DIO9 • Integrated Advanced Host Controller Interface (AHCI) controller • Support RAID 0, RAID 1, RAID 5, RAID 10 DIO10 DIO11 DIO12 DIO13 DIO14 DIO15 User's Manual | CMS631-Q470E/H420E... -
Page 20: Com Ports (J9, J11, J13, J15, J16)
JP11 Buzzer PCI 5 JP12 JP13 SATA 3 (R3) JP14 JP15 DTR- DTR- Digital I/O COM3 USB2_ COM2 COM4 COM5 USB2_14 SATA 4 SATA 5 COM6 Power (R4) (R5) 9/10 DSR- DSR- RTS- RTS- CTS- CTS- User's Manual | CMS631-Q470E/H420E... -
Page 21: Cooling Fan Connectors
Insufficient power supplied to the system may result in instability or malfunction TACH of the add-in boards and peripherals. Calculating the system’s approximate power usage is important to ensure that the power supply meets the system’s consump- tion requirements. Control User's Manual | CMS631-Q470E/H420E... -
Page 22: Front Panel (J18)
Power On Suspend) state, it will blink at 1-second intervals. When the system is in the S3 (STR - Suspend To RAM) state, it will blink at 4-second intervals. Power Button This button is used to switch the system's power on or off . User's Manual | CMS631-Q470E/H420E... -
Page 23: Lpc Connector (J21)
Intel Low Pin Count Interface Specification Revision 1.1’. The table below indicates the ® pin functions of the LPC connector. Assignment Assignment Assignment +12V_SATA L_AD1 RST# L_AD0 FRAME# VCC3 5V_SATA LAD3 LAD2 SERIRQ 5V5B User's Manual | CMS631-Q470E/H420E... -
Page 24: Expansion Slots
Install PCI cards for other expansion demands. M.2 Socket The M.2 socket is the Next Generation Form Factor (NGFF) which is designed to support mul- tiple modules and make the M.2 more suitable in application for solid-state storage. User's Manual | CMS631-Q470E/H420E... -
Page 25: Battery
• There exists explosion hazard if the battery is incorrectly installed. the board when it’s correctly mounted. • Replace only with the same or equivalent type recommended by the manufacturer. • Dispose of used batteries according to local ordinances. User's Manual | CMS631-Q470E/H420E... -
Page 26: Chapter 4 - Bios Settings
When “” appears on the left of a particular field, it indicates that a submenu which contains additional options are available for that field. To display the submenu, move the highlight to that field and press <Enter>. User's Manual | CMS631-Q470E/H420E... -
Page 27: Main
The time format is <hour>, <minute>, <second>. The time is based on the 24-hour military-time clock. For example, 1 p.m. is 13:00:00. Hour displays hours from 00 to 23. Minute displays min- utes from 00 to 59. Second displays seconds from 00 to 59. User's Manual | CMS631-Q470E/H420E... -
Page 28: Rc Acpi Configuration
The system enter soft-off state after power failure. Power-on signal input is abled, only one thread per enabled core is enabled. required to power up the system. Last State The system returns to the last state right before power failure. User's Manual | CMS631-Q470E/H420E... -
Page 29: Power & Performance
Enable or disable CPU Power Management. It allows CPU to enter "C states" when it’s idle and nothing is executing. ME Unconfig on RTC Clear When disabled, ME will not be unconfigured on RTC Clear. Firmware Update Configuration Configure Management Engine Technology Parameters. User's Manual | CMS631-Q470E/H420E... -
Page 30: Trusted Computing
"Security Device Support" is disabled. Select WatchDog Timer Unit — Second or Minute. SuperIO WatchDog Timer Set SuperIO WatchDog Timer Timeout value. The range is from 0 (disabled) to 255. Note: The sub-menus are detailed in following sections. User's Manual | CMS631-Q470E/H420E... -
Page 31: Nct6126D Super Io Configuration ► Serial Port 1,2 Configuration
► Serial Port 3,4 Configuration Serial Port Serial Port Enable or disable serial port. Enable or disable serial port. RS485 Auto Flow Set Serial RS485 Auto Flow. COM Mode Choose mode between RS232 / RS485 / RS422 User's Manual | CMS631-Q470E/H420E... -
Page 32: Nct6126D Super Io Configuration ► Serial Port 5,6 Configuration
NCT6126D Super IO Configuration ► Serial Port 5,6 Configuration NCT6126D HW Monitor This section displays the system’s health information, i.e. voltage readings, CPU and system temperatures, and fan speed readings Serial Port Enable or disable serial port. User's Manual | CMS631-Q470E/H420E... -
Page 33: Serial Port Console Redirection
SYS Smart Fan/CPU Smart Fan Control = [Disabled] • Fix Fan Speed Count Set the fan speed, the value ranging from 1-100%, 100% being full speed. The fans will always operate at the specified speed regardless of gauged temperatures. User's Manual | CMS631-Q470E/H420E... -
Page 34: Serial Port Console Redirection ► Console Redirection Settings
Select parity bits: None, Even, Odd, Mark or Space. Enable or disable USB Mass Storage Driver Support. Stop Bits Select stop bits: 1 bit or 2 bits. Flow Control Select flow control type: None or RTS/CTS. User's Manual | CMS631-Q470E/H420E... -
Page 35: Network Stack Configuration
Set the number of times the presence of media will be checked. Use either +/- or numeric keys Other PCI devices to set the value. Determines OpROM execution policy for devices otherthan Network, Storage, or Video. User's Manual | CMS631-Q470E/H420E... -
Page 36: Usb Power Control
Chapter 3 BIOS SETTINGS ▲ Advanced USB Power Control USB Power 5V_Dual: Support system wake from S3/S4 by USB KB&MS 5V: No Support system wake from S3/S4 by USB KB&MS User's Manual | CMS631-Q470E/H420E... -
Page 37: Chipset
▲ Chipset ▲ Chipset Graphics Configuration Primary Display Select which of IGFX/PEG/PCI Graphics device to be the primary display. Internal Graphics Keep IGFX "Enabled" or "Disabled" based on the setup options, or select "Auto" for auto-detec- tion. User's Manual | CMS631-Q470E/H420E... -
Page 38: Peg Port Configuration
PEG Port Configuration PEG Port Configuration ► PEG Port Feature Configuration Detect Non-Compliance Device Enable Root Port Detect Non-Compliance PCI Express Device in PEG Enable/Disable the Root Port Max Link Speed Configure PEG 0:1:0 Max Speed User's Manual | CMS631-Q470E/H420E... -
Page 39: Pch-Io Configuration
DXE and If VTD_INFO_PPI is installed in PEI. ) TBT tree won't be included in the exception list. DMA Control Guarantee Enable/Disable DMA_CONTROL_GUARANTEE bit. Hybrid Storage Mode Select Hybrid Storage detection and configuration Mode. User's Manual | CMS631-Q470E/H420E... -
Page 40: Pch-Io Configuration ► Pci Express Configuration
This option allows you to create RAID or Intel Rapid Storage configuration along with Intel® Optane™ system acceleration on Serial ATA devices. Ports and Hot Plug Enable or disable the Serial ATA port and its hot plug function. User's Manual | CMS631-Q470E/H420E... -
Page 41: Pch-Io Configuration ► Hd Audio Configuration
Chapter 3 BIOS SETTINGS ▲ Chipset PCH-IO Configuration ► HD Audio Configuration HD Audio Control the detection of the HD Audio device. Disabled HDA will be unconditionally disabled. Enabled HDA will be unconditionally enabled. User's Manual | CMS631-Q470E/H420E... -
Page 42: Security
Secure Boot. Press Enter and a prompt will show up for you to confirm. Reset To Setup Mode Clear the database from the NVRAM, including all the keys and signatures installed in the Key Management menu. Press Enter and a prompt will show up for you to confirm. User's Manual | CMS631-Q470E/H420E... -
Page 43: Boot
Select this option to save BIOS configuration settings to a USB flash device. ► Restore Setting from file This field will appear only when a USB flash device is detected. Select this field to restore set- ting from the USB flash device. User's Manual | CMS631-Q470E/H420E... -
Page 44: Updating The Bios
MAC address should be burned or not. c. After updating unique MAC Address from manufacturing, NVM will be protected immediately after power cycle. Users cannot update NVM or MAC address. User's Manual | CMS631-Q470E/H420E...
Need help?
Do you have a question about the CMS631-Q470E/H420E and is the answer not in the manual?
Questions and answers