
Related Manuals for BED BATH & Beyond Bedside


Summary of Contents for BED BATH & Beyond Bedside
- Page 2 IMPORTANT INFORMATION! please read the entire manual before starting to assemble and/or using this product.follow the manual thoroughly and keep it for further reference. AVOID SCRATCHES! In order to avoid scratching this furnuture should be assembled on a soft layer-could be a rug. IMPROVE EFFICIENCY ! Try to find a partner to install with you, which can speed up...
- Page 3 Please prepare the following tools A x 50 B x 66 C x 24 D x 14 7 x 31 mm 15 x 11 mm 8 x 30 mm 3.5 x 14 mm E x 8 F x 6 G x 9 H x 26 4 x 25 mm 4 x 35 mm...
- Page 4 Board Identification...
- Page 5 E x 2 C x 2 B x 4 G x 4 6 x 74 mm 8 x 30 mm 15 x 11 mm 4 x 25 mm - Insert wood dowels (C) into panel (5) & (6) . - Attach panel (5) to (6) and lock with cam (B) .
- Page 6 F x 6 H x 24 A x 14 4 x 35 mm 7 x 31 mm - Attach foot (F) to panel (5) & (6) with screw (H) . - Screw the cam bolt (A) into the panel (5) & (6) . ROTATE 180°...
- Page 7 E x 2 C x 2 B x 4 G x 4 6 x 74 mm 8 x 30 mm 15 x 11 mm 4 x 25 mm - Insert wood dowels (C) into panel (1) & (2) . - Attach panel (1) to (2) and lock with cam (B) .
- Page 8 A x 30 7 x 31 mm - Screw the cam bolt (A) into the panel (1) & (2) & (10) & (11). (Attention:Cam bolt & Insert nut need to be put together) RIGHT LEFT...
- Page 9 E x 4 C x 2 B x 8 6 x 74 mm 8 x 30 mm 15 x 11 mm - Attach panel (7) to (8) and lock with cam (B) - Insert wood dowels (C) into panel (10) & (11) . - Attach panel (10) to (11) and lock with cam (B) .
- Page 10 A x 4 C x 16 7 x 31 mm 8 x 30 mm - Screw the cam bolt (A) into the panel (3) . - Insert wood dowels (C) into panel (3) & (4) . (Attention:Cam bolt & Insert nut need to be put together)
- Page 11 D x 12 J X 12 3.5 x 14 mm - Fix part (J) to plate (3) & (4) using screw (D) as shown. ROTATE 180°...
- Page 12 B x 4 15 x 11 mm - Attach panel (3) to (7) & (8) and lock with cam (B).
- Page 13 B x 10 15 x 11 mm - Attach panel (5) & (6) to (3) & (7) & (8) and lock with cam (B).
- Page 14 B x 4 15 x 11 mm - Attach panel (4) to (5) & (6) and lock with cam (B).
- Page 15 K x 1 - Place glass panel (9) at the slots of part (J) and fix it . - Insert the lamp trough into the glass...
- Page 16 B x 14 15 x 11 mm - Attach panel (1) & (2) to (3) & (4) & (7) & (8) and lock with cam (B).
- Page 17 B x 16 15 x 11 mm - Attach panel (10) & (11) to (1) & (2) & (3) & (5) & (6) and lock with cam (B).
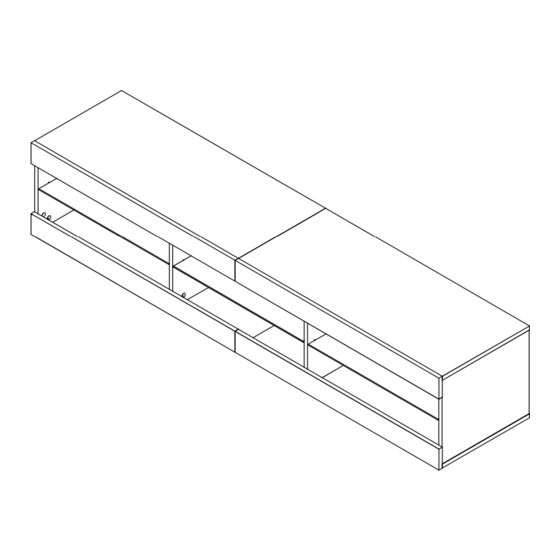
- Page 18 - Installation complete.
- Page 19 -Specifications of battery:cr2025 3v -LED lamp with effective remote control distance of 5 meters 1.Connected power adapter to the RGB control box . 2.Take out the remote control gasket 3.Align romote controller to the RGB Control box to adjust the color mode...
- Page 20 APP PROGRAM USAGE Scan two-dimensional code download APP Click to show Click to display the lamp list settings view Connect LED color strip and controller, Switch the power on controller color wheel Scan two-dimensional code download APP: Adjust the color Click spuare icon to adjust the color Start APP, search and connect controller...
Need help?
Do you have a question about the Bedside and is the answer not in the manual?
Questions and answers