Advertisement
Quick Links
Advertisement

Related Manuals for BED BATH & Beyond WF324493


Summary of Contents for BED BATH & Beyond WF324493
- Page 1 ASSEMBLY INSTRUCTIONS KING BED WITH HB BOOKCASE AND 8 DRAWERS WF324493/WF324494...
-
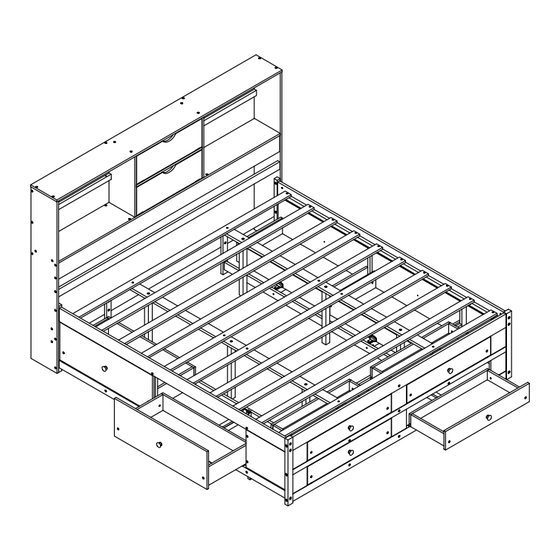
Page 2: Detail View
Detail View... -
Page 3: Part List
Part List WF324493 - Hardware inside Top panel HB - 1pc Shelf panel HB - 1pc Upper horizontal bar HB - 1pc Lower horizontal bar HB - 1pc Horizontal bar HB (Back) - 3pcs Lower horizontal bar HB - 1pc... - Page 4 Part List WF324494 Support HB (Left) - 1pc Support HB (Right) - 1pc Leg FB (Left) - 1pc Upper horizontal bar FB - 1pc Leg FB (Right) - 1pc Panel FB - 6pcs Lower horizontal bar FB - 1pc Divider horizontal bar FB - 1pc Lower support slat - 2pcs Horizontal bar - 1pc Horizontal bar - 1pc...
- Page 5 Hardware List WF324493 8*30mm Metal magnet (4pcs) Wood dowel (116pcs) Hex-Head bolts (18pcs) 60mm Hex-Head bolts (4pcs) Hex-Head bolts (86pcs) Hex-Head bolts (6pcs) 1/4"*15 (9.5mm) Hex-Head bolts (23pcs) Hex-Head bolts (5pcs) Horizontal-Hole bolts(108pcs) 3.5*15mm Wood screws (48pcs) Wood screws (24pcs)
- Page 6 STEP 1: 2PCS 4PCS STEP 2: 2PCS 4PCS STEP 3: 4PCS 8PCS...
- Page 7 STEP 4: 6PCS STEP 5: 4PCS STEP 6: 4PCS 4PCS Note:Part 8 will face up with the "x" mark on it, otherwise it cannot be tightened...
- Page 8 STEP 7: 20PCS 20PCS 8PCS STEP 8: 3PCS...
- Page 9 STEP 9: 2PCS 8PCS 8PCS STEP 10: 24PCS...
- Page 10 STEP 11: 2PCS 2PCS STEP 12: 8PCS...
- Page 11 STEP 13: 4PCS 8PCS STEP 14: 6PCS 4PCS 4PCS 6PCS...
- Page 12 STEP 15: 4PCS 4PCS STEP 16: 8PCS 4PCS 8PCS 4PCS...
- Page 13 STEP 17: 4PCS 4PCS Note:Part 8 will face up with the "x" mark on it, otherwise it cannot be tightened STEP 18: 8PCS...
- Page 14 STEP 19: 4PCS 4PCS STEP 20: 4PCS 8PCS STEP 21: 24PCS...
- Page 15 STEP 22: 6PCS 6PCS STEP 23: 3PCS...
- Page 16 STEP 24: 6PCS 8PCS 14PCS 4PCS 4PCS STEP 25: 4PCS 4PCS...
- Page 17 STEP 26: Assembling leg support (L) with lower support slat (D) later rotate, Move support slat inside Queen bed. STEP 27:...
- Page 18 STEP 28: 28PCS 6 " 6 " 2.7 " 152mm 152mm 69mm NOTE: Please make sure the bed slats close to the side rail before locking the screws to avoid breakage. This step is required for both the left and right sides. Moreover, please do not lock the screws of the bed slats at the outermost edge to avoid damaging.
- Page 19 STEP 30: 8PCS 16PCS 8PCS STEP 31: 4PCS 12PCS STEP 32: 4PCS 4PCS...
- Page 20 STEP 33: Align the slide rail at the bottom of the drawer and ensure it is secure, then push the drawer in firmly to make the slide rails smoothly on the track. STEP 34: 8PCS 16PCS 8PCS...
- Page 21 STEP 35: 8PCS 16PCS 8PCS STEP 36: 4PCS 12PCS STEP 37: 4PCS 4PCS...
- Page 22 STEP 38: Align the slide rail at the bottom of the drawer and ensure it is secure, then push the drawer in firmly to make the slide rails smoothly on the track. Make sure to tighten all the screws of the bed.
Need help?
Do you have a question about the WF324493 and is the answer not in the manual?
Questions and answers